In the following section we will describe in more depth the rationale behind the presented opinionated pipeline. We will go through each deployment step and describe it in details.
![[Important]](images/important.png) | Important |
|---|---|
You don’t need to use all pieces of Spring Cloud Pipelines. You can (and should) gradually migrate your applications to use those pieces of Spring Cloud Pipelines that you think best suit your needs. |
.
├── common
├── concourse
├── dist
├── docs
├── docs-sources
└── jenkins
In the common folder you can find all the Bash scripts containing the pipeline logic. These
scripts are reused by both Concourse and Jenkins pipelines.
In the concourse folder you can find all the necessary scripts and setup to run Concourse demo.
In the dist folder you can find the packaged sources of the project. Since the package
contains no tests or documentation it’s extremely small and can be used in the pipelines.
In the docs folder you have the whole generated documentation of the project.
In the docs-source folder you have the sources required to generate the documentation.
In the jenkins folder you can find all the necessary scripts and setup to run Jenkins demo.
This repository can be treated as a template for your pipeline. We provide some opinionated implementation that you can alter to suit your needs. The best approach to use it to build your production projects would be to download the Spring Cloud Pipelines repository as ZIP, then init a Git project there and modify it as you wish.
$ # pass the branch (e.g. master) or a particular tag (e.g. v1.0.0.RELEASE)
$ SC_PIPELINES_RELEASE=...
$ curl -LOk https://github.com/spring-cloud/spring-cloud-pipelines/archive/${SC_PIPELINES_RELEASE}.zip
$ unzip ${SC_PIPELINES_RELEASE}.zip
$ cd spring-cloud-pipelines-${SC_PIPELINES_RELEASE}
$ git init
$ # modify the pipelines to suit your needs
$ git add .
$ git commit -m "Initial commit"
$ git remote add origin ${YOUR_REPOSITORY_URL}
$ git push origin master
You can also clone the repository in case you would like to keep aligned
with the changes in the upstream repository. In order not to have many merge
conflicts it’s encouraged to use the custom folder hooks to override functions.
You can use Spring Cloud Pipelines to generate pipelines for all projects in your system. You can scan all your repositories (e.g. call the Stash / Github API and retrieve the list of repos) and then…
- For Jenkins, call the seed job and pass the
REPOSparameter that would contain the list of repositories - For Concourse, you’d have to call
flyand set pipeline for every single repo
You can use Spring Cloud Pipelines in such a way that each project contains its own pipeline definition in its code. Spring Cloud Pipelines clones the code with the pipeline definitions (the bash scripts) so the only piece of logic that could be there in your application’s repository would be how the pipeline should look like.
- For Jenkins, you’d have to either set up the
Jenkinsfileor the jobs using Jenkins Job DSL plugin in your repo. Then in Jenkins whenever you set up a new pipeline for a repo then you reference the pipeline definition in that repo. - For Concourse, each project contains its own pipeline steps and it’s up to the project to set up the pipeline.
Let’s take a look at the flow of the opinionated pipeline

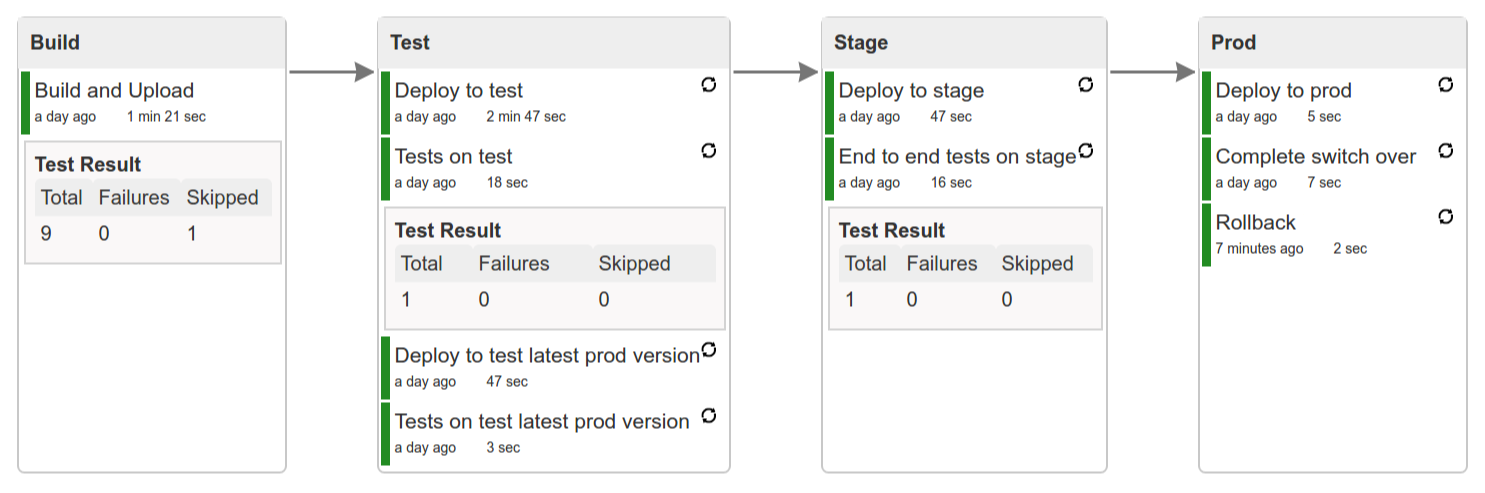
We’ll first describe the overall concept behind the flow and then we’ll split it into pieces and describe every piece independently.
So we’re on the same page let’s define some common vocabulary. We discern 4 typical environments in terms of running the pipeline.
- build environment is a machine where the building of the application takes place. It’s a CI / CD tool worker.
- test is an environment where you can deploy an application to test it. It doesn’t resemble production, we can’t be sure of it’s state (which application is deployed there and in which version). It can be used by multiple teams at the same time.
- stage is an environment that does resemble production. Most likely applications are deployed there in versions that correspond to those deployed to production. Typically databases there are filled up with (obfuscated) production data. Most often this environment is a single, shared one between many teams. In other words in order to run some performance, user acceptance tests you have to block and wait until the environment is free.
- prod is a production environment where we want our tested applications to be deployed for our customers.
Unit tests - tests that are executed on the application during the build phase. No integrations with databases / HTTP server stubs etc. take place. Generally speaking your application should have plenty of these to have fast feedback if your features are working fine.
Integration tests - tests that are executed on the built application during the build phase. Integrations with in memory databases / HTTP server stubs take place. According to the test pyramid, in most cases you should have not too many of these kind of tests.
Smoke tests - tests that are executed on a deployed application. The concept of these tests is to check the crucial parts of your application are working properly. If you have 100 features in your application but you gain most money from e.g. 5 features then you could write smoke tests for those 5 features. As you can see we’re talking about smoke tests of an application, not of the whole system. In our understanding inside the opinionated pipeline, these tests are executed against an application that is surrounded with stubs.
End to end tests - tests that are executed on a system composing of multiple applications. The idea of these tests is to check if the tested feature works when the whole system is set up. Due to the fact that it takes a lot of time, effort, resources to maintain such an environment and that often those tests are unreliable (due to many different moving pieces like network database etc.) you should have a handful of those tests. Only for critical parts of your business. Since only production is the key verifier of whether your feature works, some companies don’t even want to do those and move directly to deployment to production. When your system contains KPI monitoring and alerting you can quickly react when your deployed application is not behaving properly.
Performance testing - tests executed on an application or set of applications to check if your system can handle big load of input. In case of our opinionated pipeline these tests could be executed either on test (against stubbed environment) or stage (against the whole system)
Before we go into details of the flow let’s take a look at the following example.
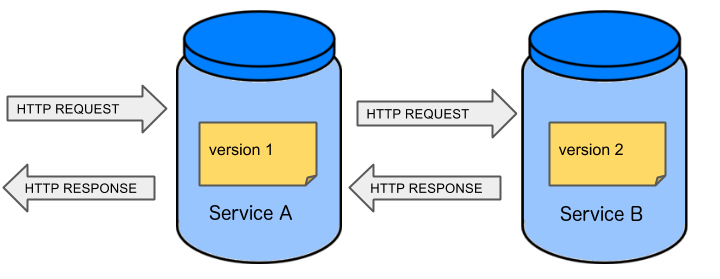
When having only a handful of applications, performing end to end testing is beneficial. From the operations perspective it’s maintainable for a finite number of deployed instances. From the developers perspective it’s nice to verify the whole flow in the system for a feature.
In case of microservices the scale starts to be a problem:

The questions arise:
Should I queue deployments of microservices on one testing environment or should I have an environment per microservice?
- If I queue deployments people will have to wait for hours to have their tests ran - that can be a problem
To remove that issue I can have an environment per microservice
- Who will pay the bills (imagine 100 microservices - each having each own environment).
- Who will support each of those environments?
- Should we spawn a new environment each time we execute a new pipeline and then wrap it up or should we have them up and running for the whole day?
In which versions should I deploy the dependent microservices - development or production versions?
- If I have development versions then I can test my application against a feature that is not yet on production. That can lead to exceptions on production
- If I test against production versions then I’ll never be able to test against a feature under development anytime before deployment to production.
One of the possibilities of tackling these problems is to… not do end to end tests.
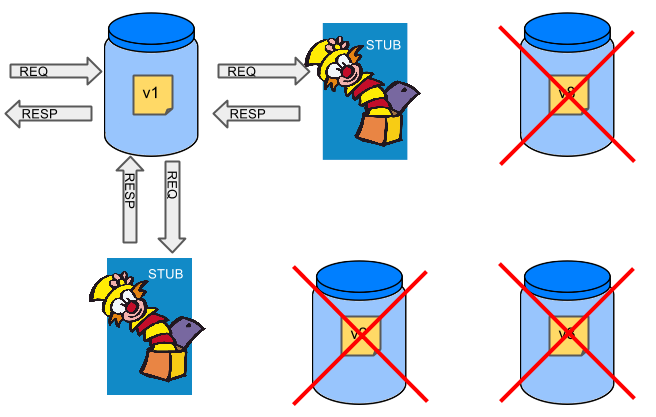
If we stub out all the dependencies of our application then most of the problems presented above disappear. There is no need to start and setup infrastructure required by the dependant microservices. That way the testing setup looks like this:
Such an approach to testing and deployment gives the following benefits (thanks to the usage of Spring Cloud Contract):
- No need to deploy dependant services
- The stubs used for the tests ran on a deployed microservice are the same as those used during integration tests
- Those stubs have been tested against the application that produces them (check Spring Cloud Contract for more information)
- We don’t have many slow tests running on a deployed application - thus the pipeline gets executed much faster
- We don’t have to queue deployments - we’re testing in isolation thus pipelines don’t interfere with each other
- We don’t have to spawn virtual machines each time for deployment purposes
It brings however the following challenges:
- No end to end tests before production - you don’t have the full certainty that a feature is working
- First time the applications will talk in a real way will be on production
Like every solution it has its benefits and drawbacks. The opinionated pipeline allows you to configure whether you want to follow this flow or not.
The general view behind this deployment pipeline is to:
- test the application in isolation
- test the backwards compatibility of the application in order to roll it back if necessary
- allow testing of the packaged app in a deployed environment
- allow user acceptance tests / performance tests in a deployed environment
- allow deployment to production
Obviously the pipeline could have been split to more steps but it seems that all of the aforementioned actions comprise nicely in our opinionated proposal.
Spring Cloud Pipelines uses Bash scripts extensively. Below you can find the list of software that needs to be installed on a CI server worker for the build to pass.
![[Tip]](images/tip.png) | Tip |
|---|---|
In the demo setup all of these libraries are already installed. |
 apt-get -y install \
    bash \
    git \
    tar \
    zip \
    curl \
    ruby \
    wget \
    unzip \
    python \
jq | Important |
|---|---|
In the Jenkins case you will also need |
Each application can contain a file called sc-pipelines.yml with the following structure:
build:
  main_module: foo/bar
lowercaseEnvironmentName1:
    services:
        - type: service1Type
          name: service1Name
          coordinates: value
        - type: service2Type
          name: service2Name
          key: value
lowercaseEnvironmentName2:
    services:
        - type: service3Type
          name: service3Name
          coordinates: value
        - type: service4Type
          name: service4Name
          key: value
If you have a multi-module project, you should point to the folder, where your
module that produces the fat jar lays. In the aforementioned example that module
would be present under the foo/bar folder. If you have a single module project,
then you don’t have to create this section.
For a given environment we declare a list of infrastructure services that we want to have deployed. Services have
type(example:eureka,mysql,rabbitmq,stubrunner) - this value gets then applied to thedeployServiceBash function- [KUBERNETES] for
mysqlyou can pass the database name via thedatabaseproperty name- name of the service to get deployedcoordinates- coordinate that allows you to fetch the binary of the service. Examples: It can be a maven coordinategroupid:artifactid:version, docker imageorganization/nameOfImage, etc.- arbitrary key value pairs - you can customize the services as you wish
When deploying to Cloud Foundry you can provide services of the following types:
type: brokerbroker- name of the CF brokerplan- name of the planparams- additional parameters that will be converted to JSONuseExisting- should use existing one or create a new one (defaults tofalse)
type: appcoordinates- maven coordinates of the stub runner jarmanifestPath- path to the manifest for the stub runner jar
type: cupsparams- additional parameters that will be converted to JSON
type: cupsSyslogurl- URL to the syslog drain
type: cupsRouteurl- URL to the route service
type: stubrunnercoordinates- maven coordinates of the stub runner jarmanifestPath- path to the manifest for the stub runner jar
# This file describes which services are required by this application
# in order for the smoke tests on the TEST environment and end to end tests
# on the STAGE environment to pass

# lowercase name of the environment
test:
  # list of required services
  services:
    - name: config-server
      type: broker
      broker: p-config-server
      plan: standard
      params:
        git:
          uri: https://github.com/ciberkleid/app-config
      useExisting: true
    - name: cloud-bus
      type: broker
      broker: cloudamqp
      plan: lemur
      useExisting: true
    - name: service-registry
      type: broker
      broker: p-service-registry
      plan: standard
      useExisting: true
    - name: circuit-breaker-dashboard
      type: broker
      broker: p-circuit-breaker-dashboard
      plan: standard
      useExisting: true
    - name: stubrunner
      type: stubrunner
      coordinates: io.pivotal:cloudfoundry-stub-runner-boot:0.0.1.M1
      manifestPath: sc-pipelines/manifest-stubrunner.yml

stage:
  services:
    - name: config-server
      type: broker
      broker: p-config-server
      plan: standard
      params:
        git:
          uri: https://github.com/ciberkleid/app-config
    - name: cloud-bus
      type: broker
      broker: cloudamqp
      plan: lemur
    - name: service-registry
      type: broker
      broker: p-service-registry
      plan: standard
    - name: circuit-breaker-dashboard
      type: broker
      broker: p-circuit-breaker-dashboard
      plan: standard
Spring Cloud Pipelines supports three main types of project setup
- Single Project
- Multi Module
- Multi Project (aka mono repo)
A Single Project is a project that contains a single module that gets
built and package into a single, executable artifact.
A Multi Module project is a project that contains a multiple modules.
After building all modules, one gets packaged into a single, executable artifact.
You have to point to that module in your pipeline descriptor.
A Multi Project is a project that contains multiple projects. Each of those
projects can be in turn a Single Project or a Multi Module project. Spring
Cloud Pipelines will assume that if there’s a PROJECT_NAME environment
variable that corresponds to a folder with the same name in the root of the
repository, that means that this is the project it should build. E.g for
PROJECT_NAME=foo, if there’s a folder foo, then Spring Cloud Pipelines
will treat the foo directory as the root of the foo project.