Click here to check out the slides by Cora Iberkleid where she migrates a setup of applications to be compliant with Spring Cloud Pipelines.
This tutorial covers refactoring applications to comply with, and take advantage of, Spring Cloud Pipelines.
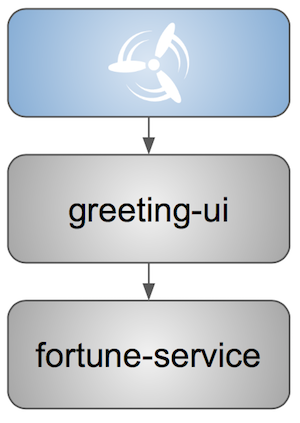
We will use a simple 3-tier application as an example:
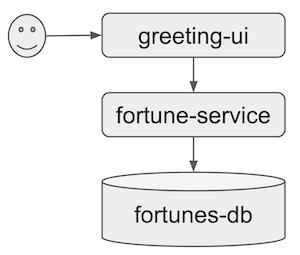
At the end of this tutorial, it will be possible to instantly create a Concourse pipeline for each app and run successfully through a full lifecycle, from source code commit to production deployment, following the lifecycle stages for testing and deployment recommended by Spring Cloud Pipelines. The app code bases will be improved with organized test coverage, a contract-based API, and a versioned database schema, enabling Spring Cloud Pipelines to carry out stubbed testing and to ensure backward compatibility for API and database schema changes.
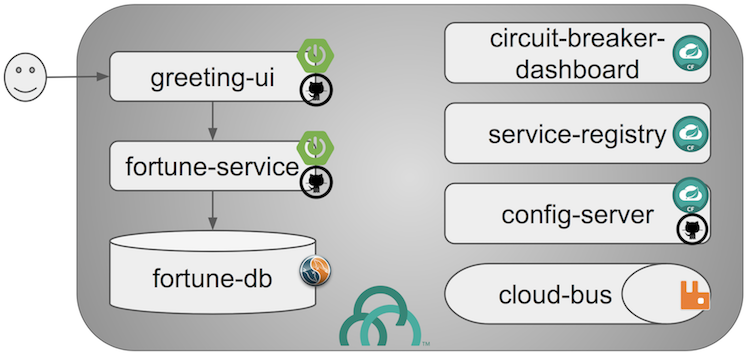
The sample application is implemented using Spring Boot apps for the UI and service tiers, and MySQL for the database.
The apps are built using Maven and pushed manually to Cloud Foundry. They leverage the three Pivotal Spring Cloud Services: Config Server, Service Discovery, and Circuit Breaker Dashboard. Rabbit is used to propagate Config Server refresh triggers.
The source code for the two Spring Boot apps is stored on GitHub, as is the backing repo for Config Server.
Through this tutorial, we will be adding Concourse and JFrog Bintray to manage the application lifecycle.
We will also be refactoring the application to comply with Spring Cloud Pipelines requirements and recommendations, including adding/organizing tests and introducing database versioning using Flyway and API contracts using Spring Cloud Contract.
GitHub - sample app source code and config repositories, a sample stubrunner app repository, and the Spring Cloud Pipelines code base
- Pivotal Web Services - public hosted Cloud Foundry offering free trial accounts and including MySQL, Rabbit, and Pivotal Spring Cloud Services in the Marketplace
- Concourse
- JFrog Bintray - public hosted Maven repository offering free OSS accounts
- Client Tools - on your local machine, you will need an IDE as well as the mvn, git, cf, and fly (Concourse) CLIs
The migration steps are broken down into three stages:
Scaffolding
- Minimal refactoring to comply with basic Spring Cloud Pipelines requirements.
- At the end of this stage, each app will have a corresponding pipeline on Concourse. The pipelines will successfully build the apps, store the artifacts in Bintray, tag the GitHub repositories, and deploy the apps to Test, Stage, and Prod spaces in Cloud Foundry.
Tests
- Add/organize tests to comply with Spring Cloud Pipelines recommendations. Incorporate flyway for database schema versioning and initial data loading.
- At the end of this stage, the pipelines will trigger unit and integration tests during the Build stage, smoke tests in the Test environment, and end-to-end tests in the Stage environment. The pipelines will also ensure backward compatibility for the database, such that you can safely roll back the backend service app, even after the database schema has been updated.
Contracts
- Incorporate Spring Cloud Contract to define the API between the UI and service apps and auto-generate tests and stubs.
- At the end of this stage, the pipelines will catch breaking API changes during the Build stage and ensure backward compatibility for the API, such that you can safely roll back the backend service (producer) app, even after an API change.
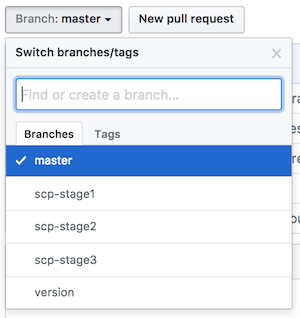
If you want to simply review the migration steps explained below, you can look at the various branches in the greeting-ui and fortune-service repositories - there is a branch representing the end-state of each stage:
If you want to use this tutorial as a hands-on lab, fork each of the following repositories:
Then, create a new directory on your local machine. You may name it anything you like; we will refer to it as $SCP_HOME throughout this tutorial.
In $SCP_HOME, clone your forks of greeting-ui and fortune-service, as well as the following two repositories:
Finally, create a directory called $SCP_HOME/credentials. Leave it empty for now.
In this stage, we make minimal changes to satisfy basic Spring Cloud Pipelines requirements so that the apps can run through the entire pipeline without error. We make "scaffolding" changes only - no code changes.
The steps in this stage must be completed for both greeting-ui and fortune-service.
git branch version
git checkout -b sc-pipelines
Branch version is required to exist, though it can be created as an empty branch. It is used by Spring Coud Pipelines to generate a version number for each new pipeline execution.
Branch sc-pipelines is optional and can be named anything you wish. The intention is for you to use it as a working branch for the changes suggested in this tutorial (hence we create it and also check it out).
mvn -N io.takari:maven:wrapper
This commands adds 4 files to a project:
.
├── mvnw
├── mvnw.cmd
└── .mvn
    └── wrapper
        ├── maven-wrapper.jar
        └── maven-wrapper.properties
Make sure all four files are tracked by Git. For example, you can add the following to the .gitignore file:
#Exceptions
!/mvnw
!/mvnw.cmd
!/.mvn/wrapper/maven-wrapper.jar
!/.mvn/wrapper/maven-wrapper.properties
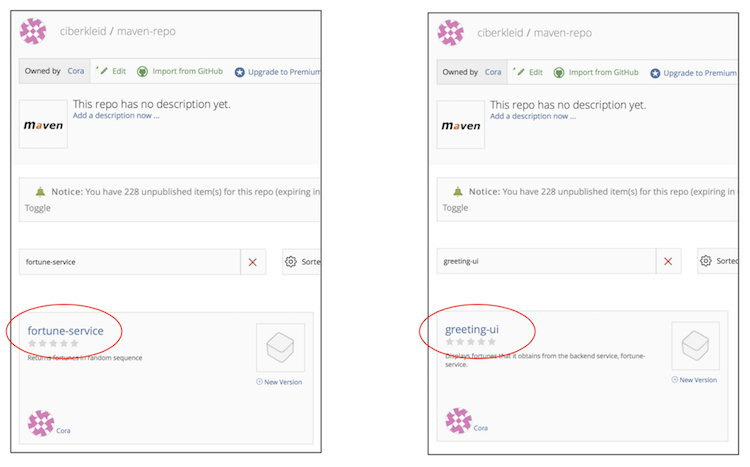
We are using Bintray as the maven repository. Bintray requires that a package exist before any app artifacts can be uploaded.
Log into the Bintray UI and create the packages as follows. You can use the Import from GitHub option to create these:
Edit the app pom.xml files as follows. Make sure the Bintray URLs match the URLs of the corresponding packages created in the previous step. The values you use will be different from the example shown below.
<properties>
...
<distribution.management.release.id>bintray</distribution.management.release.id>
<distribution.management.release.url>https://api.bintray.com/maven/ciberkleid/maven-repo/fortune-service</distribution.management.release.url>
</properties>

...

<distributionManagement>
<repository>
<id>${distribution.management.release.id}</id>
<url>${distribution.management.release.url}</url>
</repository>
</distributionManagement>
Though not required by Spring Cloud Pipelines, it makes sense to also configure your local maven settings with the credentials to your Bintray maven repo. To do so, edit your maven settings file, usually ~/.m2/settings.xml. If the file does not exist, create it.
Note that the id must match the id specified in the previous step. Also, make sure to use your username and API token (not account password) instead of the sample values shown below.
<?xml version="1.0" encoding="UTF-8"?>
<settings>
  <servers>
    <server>
      <id>bintray</id>
      <username>ciberkleid</username>
      <password>my-super-secret-api-token</password>
   </server>
 </servers>
</settings>
Push the above changes to GitHub. You should be pushing the following to each of the two app repos:
- 4 new maven wrapper files
- a modified .gitignore file
- a modified pom.xml
In $SCP_HOME/credentials, make two copies of the file $SCP_HOME/spring-cloud-pipelines/concourse/credentials-sample-cf.yml. Rename them as credentials-fortune-service.yml and credentials-greeting-ui.yml.
![[Caution]](images/caution.png) | Caution |
|---|---|
These files will contain credentials to your GitHub repo, your Bintray repo, and your Cloud Foundry foundation. Hence, we opt to put them in a separate directory. You may choose to store these files in a private git repo, but do not push them to a public repo. |
Edit the git properties of each credentials file. Make sure to replace the sample values shown below as appropriate. For tools-branch, you may opt to use a fixed release (use v1.0.0.M8 or later for Cloud Foundry). Leave other values as they are, we will update those in later steps.
app-url: [email protected]:ciberkleid/fortune-service.git
app-branch: sc-pipelines
tools-scripts-url: https://github.com/spring-cloud/spring-cloud-pipelines.git
tools-branch: master
build-options: ""

github-private-key: |
  -----BEGIN RSA PRIVATE KEY-----
  MIIJKQIBAAKCAgEAvwkL97vBllOSE39Wa5ppczT1cr5Blmkhadfoa1Va2/IBVyvk
  NJ9PqoTI+BahF2EgzweyiDSvKsstlTsG7QgiM9So8Voi2PlDOrXL6uOfCuAS/G8X
  ...
  -----END RSA PRIVATE KEY-----
git-email: [email protected]
git-name: Cora Iberkleid
Edit the maven repo properties of each credentials file. Make sure to replace the sample values shown below as appropriate. Bintray requires separate URLs for uploads and downloads. If you are using a different artifact repository, such as Artifactory or Nexus, and the repository URL is the same for uploads and downloads, then you do not need to set repo-with-binaries-for-upload.
m2-settings-repo-id: bintray
m2-settings-repo-username: ciberkleid
m2-settings-repo-password: my-super-secret-api-token

repo-with-binaries: https://ciberkleid:[email protected]/ciberkleid/maven-repo

repo-with-binaries-for-upload: https://api.bintray.com/maven/ciberkleid/maven-repo/fortune-service
At this point, all of the build jobs, which run on Concourse workers, will succeed.
To verify this, log in to your Concourse target and set the Concourse pipelines. Update the target name in the example below as appropriate.
# Set greeting-ui pipeline
fly -t myTarget set-pipeline -p greeting-ui -c "${SCP_HOME}/spring-cloud-pipelines/concourse/pipeline.yml" -l "${SCP_HOME}/credentials/credentials-greeting-ui.yml" -n

# Set fortune-service pipeline
fly -t myTarget set-pipeline -p fortune-service -c "${SCP_HOME}/spring-cloud-pipelines/concourse/pipeline.yml" -l "${SCP_HOME}/credentials/credentials-fortune-service.yml" -n
Log into the Concourse UI and unpause the pipelines. Start each. You should see that the build jobs all succeed.

In addition, you will see a new dev/<version_number> tag in each GitHub repo, as well as the app jars uploaded into Bintray.
The test, stage, and prod jobs will fail because we have not yet added scaffolding for deployment to Cloud Foundry. We will do that next.
If you are deploying to Cloud Foundry, you may already be routinely including manifest files with your apps. Our sample apps did not have manifest files, so we add them now.
In the greeting-ui repo, create a manifest.yml file as follows:
---
applications:
- name: greeting-ui
  timeout: 120
  services:
  - config-server
  - cloud-bus
  - service-registry
  - circuit-breaker-dashboard
  env:
    JAVA_OPTS: -Djava.security.egd=file:///dev/urandom
    TRUST_CERTS: api.run.pivotal.io
In the fortune-service repo, create a manifest.yml file as follows:
---
applications:
- name: fortune-service
  timeout: 120
  services:
  - fortune-db
  - config-server
  - cloud-bus
  - service-registry
  - circuit-breaker-dashboard
  env:
    JAVA_OPTS: -Djava.security.egd=file:///dev/urandom
    TRUST_CERTS: api.run.pivotal.io
The TRUST_CERTS variable is used by the Pivotal Spring Cloud Services (Config Server, Service Registry, and Circuit Breaker Dashboard), which we are using in this example. The value specified above assumes deployment to Pivotal Web Services. Update it accordingly if you are deploying to a different Cloud Foundry foundation, or you can leave it out altogether if you are replacing the Pivotal Spring Cloud Services with alternative implementations (e.g. deploying the services as apps and exposing them as user-provided services).
You may add additional values to the manifest files if you wish, for example if additional values are useful for any manual deployment you may still want to do, or desirable in your Spring Cloud Pipelines deployment. For example, an alternative manifest.yml for fortune-service could be as follows:
---
applications:
- name: fortune-service
  timeout: 120
  instances: 3
  memory: 1024M
  buildpack: https://github.com/cloudfoundry/java-buildpack.git
  random-route: true
  path: ./target/fortune-service-0.0.1-SNAPSHOT.jar
  services:
  - fortune-db
  - config-server
  - cloud-bus
  - service-registry
  - circuit-breaker-dashboard
  env:
    SPRING_PROFILES_ACTIVE: someProfile
    JAVA_OPTS: -Djava.security.egd=file:///dev/urandom
    TRUST_CERTS: api.run.pivotal.io
Note that random-route and path are ignored by Spring Cloud Pipelines. instances is honored in stage and prod, but overridden with a value of 1 for test.
The Cloud Foundry manifest created in the previous step includes the logical names of the services to which the apps should be bound, but it does describe how the services can be provisioned. Hence, we add a second manifest file so that Spring Cloud Pipelines can provision the services.
Add a file called sc-pipelines.yml to each app, and include the same list of services as in the corresponding manifest.yml. Add the necessary details such that Spring Cloud Pipelines can construct a cf create-service command.
![[Note]](images/note.png) | Note |
|---|---|
The `type: broker' parameter shown below instructs Spring Cloud Pipelines to provision a service using `cf create-service'. Other service types are also supported: cups, syslog, route, app, and stubrunner. |
More specifically, for greeting-ui, create an sc-pipelines.yml file with the following content:
test:
  services:
    - name: config-server
      type: broker
      broker: p-config-server
      plan: standard
      params:
        git:
          uri: https://github.com/ciberkleid/app-config
      useExisting: true
    - name: cloud-bus
      type: broker
      broker: cloudamqp
      plan: lemur
      useExisting: true
    - name: service-registry
      type: broker
      broker: p-service-registry
      plan: standard
      useExisting: true
    - name: circuit-breaker-dashboard
      type: broker
      broker: p-circuit-breaker-dashboard
      plan: standard
      useExisting: true
The sc-pipelines.yml file for fortune-service is similar, with the addition of the fortune-db service:
test:
  # list of required services
  services:
    - name: fortune-db
      type: broker
      broker: cleardb
      plan: spark
      useExisting: true
    - name: config-server
      type: broker
      broker: p-config-server
      plan: standard
      params:
        git:
          uri: https://github.com/ciberkleid/app-config
      useExisting: true
    - name: cloud-bus
      type: broker
      broker: cloudamqp
      plan: lemur
      useExisting: true
    - name: service-registry
      type: broker
      broker: p-service-registry
      plan: standard
      useExisting: true
    - name: circuit-breaker-dashboard
      type: broker
      broker: p-circuit-breaker-dashboard
      plan: standard
      useExisting: true
The values above assume deployment to Pivotal Web Services. If you are deploying to a different Cloud Foundry foundation, please update the values accordingly. Also, make sure to replace the config-server uri with the address of your fork of the app-config repo.
![[Tip]](images/tip.png) | Tip |
|---|---|
Notice the |
Push the above changes to GitHub. You should be pushing the following to each of the two app repos:
- new app manifest file
- new sc-pipelines manifest file
Spring Cloud Pipelines requires that the Cloud Foundry test, stage, and prod spaces exist before a pipeline is run. If you wish, you can use different foundations, orgs, and users for each. For simplicity, in this example, we use a single foundation (PWS), a single org, and a single user.
You can name the org(s) and spaces anything you like. Each app requires its own test space. The stage and prod spaces are shared.
For this example, create the following spaces:
cf create-space scp-test-greeting-ui
cf create-space scp-test-fortune-service
cf create-space scp-stage
cf create-space scp-prod
Spring Cloud Pipelines will dynamically create the services in the test spaces as per the sc-pipelines.yml file we created previously. Optionally, a second section can be added to the sc-pipelines.yml file for the stage environment, and these will be created dynamically as well. Prod services, however, must always be created manually.
For this example, we will create the stage and prod services manually.
Create the services listed in the app manifest files in both scp-stage and scp-prod.
Update the greeting-ui and fortune-service credentials files with Cloud Foundry information. Replace values in the example below as appropriate for your Cloud Foundry environment.
Notice that the test space name specified is a prefix, unlike the stage and prod space names, which are literals. Spring Cloud Pipelines will append the app name to the test space name, thereby matching the test space names we created manually. The stage and prod space names are not prefixes and will not be altered by Spring Cloud Pipelines.
Note also the paas-hostname-uuid. The value will be included in each route created. This value is optional, but it is useful in shared/multi-tenant environments such as PWS, as it helps ensure routes are unique. Change it to a unique uuid of your choosing.
pipeline-descriptor: sc-pipelines.yml

paas-type: cf

paas-hostname-uuid: cyi

# test values
paas-test-api-url: https://api.run.pivotal.io
paas-test-username: [email protected]
paas-test-password: secret
paas-test-org: S1Pdemo12
paas-test-space-prefix: scp-test

# stage values
paas-stage-api-url: https://api.run.pivotal.io
paas-stage-username: [email protected]
paas-stage-password: my-super-secret-password
paas-stage-org: S1Pdemo12
paas-stage-space: scp-stage

# prod values
paas-prod-api-url: https://api.run.pivotal.io
paas-prod-username: [email protected]
paas-prod-password: my-super-secret-password
paas-prod-org: S1Pdemo12
paas-prod-space: scp-prod
Set the Concourse pipelines again, as we did previously, to update them with the values added to the credentials files. The test, stage, and prod jobs will all now succeed.
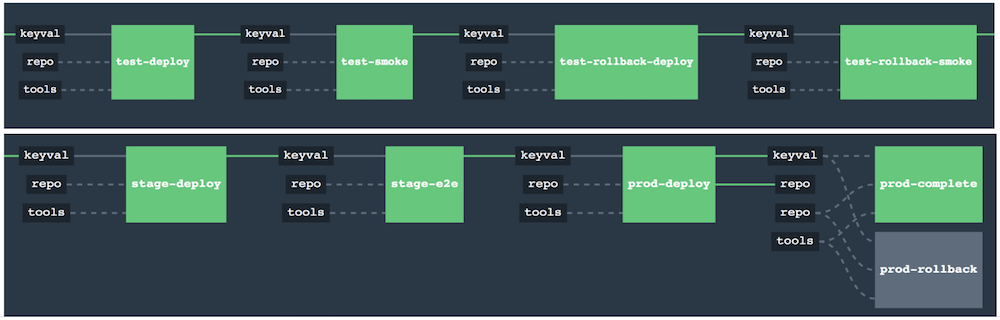
On Cloud Foundry, you will now see the apps deployed in the test, stage, and prod spaces. The image below shows the deployment of fortune-service to its dedicated test space. Notice that the 5 services declared in its manifest files (sc-pipelines.yml for provisioning, and manifest.yml for binding) have also been automatically provisioned. The image also shows the deployment of the same app to the shared prod space. Notice that the instance of the previous version has been renamed as "venerable" and stopped. If a rollback were deemed necessary, the prod-rollback job in the pipeline could be triggered to remove the currently running version, remove the prod/<version_number> tag from GitHub, and re-start the former ("venerable") version.

What have we accomplished?
- By adding the basic scaffolding needed to enable Spring Cloud Pipelines to manage the lifecycle of
greeting-uiandfortune-servicefrom source code commit to production deploy, we have made it possible for the app dev teams to instantly and easily create pipelines for each app using a common, standardized template We can count on the pipelines to:
- automatically provision services in test spaces, and optionally in stage as well
- dynamically clean up the test spaces between pipeline executions
- upload the app artifacts to the maven repo (e.g. Bintray)
- tag the git repositories with
dev/<version_number>andprod/<version_number>
- After each successful pipeline run, we are in a position to roll back to the last deployed version using the
prod-rollbackjob, if necessary
These accomplishments are extremely valuable, but in order to derive confidence and reliability from the pipelines, we need to incorporate testing. We do this in Stage 2 of the app migration.
In this stage, we enable Spring Cloud Pipelines to execute tests so that we can increase confidence in the code being deployed. We do so by adding test profiles to the pom.xml files, and then organizing and/or adding tests in a way that corresponds to the profiles. By doing so, we are establishing standards around testing across development teams in the enterprise.
We will also enable database schema versioning in this stage, thereby providing the foundation for rollback testing during schema changes.
For both greeting-ui and fortune-service, add a profiles section to the pom.xml file, as shown below. Note that we are adding four profiles:
default
- For unit and integration tests. Note that this profile includes all tests except those that will explicitly be called by the smoke and e2e profiles.
- Tests matching this profile will be executed during the build-and-upload job
apicompatibility
- For ensuring backward compatibility in case of API changes. Note that this is not effective until Stage 3, when we will add contracts. However, we add this profile now to ensure the api-compatibility-check job does not execute other tests.
smoke
- For tests to be run against the app deployed in the test space.
e2e
- For tests to be run against the app deployed in the stage space.
  <profiles>
    <profile>
      <id>default</id>
      <activation>
        <activeByDefault>true</activeByDefault>
      </activation>
      <build>
        <plugins>
          <plugin>
            <groupId>org.apache.maven.plugins</groupId>
            <artifactId>maven-surefire-plugin</artifactId>
            <configuration>
              <includes>
                <include>**/*Tests.java</include>
                <include>**/*Test.java</include>
              </includes>
              <excludes>
                <exclude>**/smoke/**</exclude>
                <exclude>**/e2e/**</exclude>
              </excludes>
            </configuration>
          </plugin>
          <plugin>
            <groupId>org.springframework.boot</groupId>
            <artifactId>spring-boot-maven-plugin</artifactId>
          </plugin>
        </plugins>
      </build>
    </profile>
    <profile>
      <id>apicompatibility</id>
      <build>
        <plugins>
          <plugin>
            <groupId>org.apache.maven.plugins</groupId>
            <artifactId>maven-surefire-plugin</artifactId>
            <configuration>
              <includes>
                <include>**/contracttests/**/*Tests.java</include>
                <include>**/contracttests/**/*Test.java</include>
              </includes>
            </configuration>
          </plugin>
        </plugins>
      </build>
    </profile>
    <profile>
      <id>smoke</id>
      <build>
        <plugins>
          <plugin>
            <groupId>org.apache.maven.plugins</groupId>
            <artifactId>maven-surefire-plugin</artifactId>
            <configuration>
              <includes>
                <include>smoke/**/*Tests.java</include>
                <include>smoke/**/*Test.java</include>
              </includes>
            </configuration>
          </plugin>
        </plugins>
      </build>
    </profile>
    <profile>
      <id>e2e</id>
      <build>
        <plugins>
          <plugin>
            <groupId>org.apache.maven.plugins</groupId>
            <artifactId>maven-surefire-plugin</artifactId>
            <configuration>
              <includes>
                <include>e2e/**/*Tests.java</include>
                <include>e2e/**/*Test.java</include>
              </includes>
            </configuration>
          </plugin>
        </plugins>
      </build>
    </profile>
  </profiles>
Next, we ensure that we have a matching test package structure in our apps:
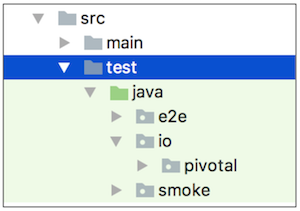
Note that we are creating matching packages for the default, smoke, and e2e profiles only. We will address the package for the apicompatibility profile in Stage 3.
When working with your own apps, if you have existing tests, you would move the files into one of these packages now, and rename them so that they are included by the filters declared in the profiles (i.e. the file names end in Test.java or Tests.java)
In the case of our sample apps, there are no tests, so we add some now as follows.
fortune-service default tests
Add your unit and integration tests so that they match the default profile as defined in the fortune-service pom.xml file. These will be executed on Concourse against the fortune-service application running on the Concourse worker in the build-and-upload job.
As an example, we will add two tests, one that loads the context, and another that verifies the number of rows expected in the database:
package io.pivotal;

import org.junit.Test;
import org.junit.runner.RunWith;
import org.springframework.beans.factory.annotation.Autowired;
import org.springframework.boot.test.context.SpringBootTest;
import org.springframework.test.context.junit4.SpringRunner;

import org.springframework.jdbc.core.JdbcTemplate;
import static org.assertj.core.api.Assertions.assertThat;

import static org.junit.Assert.*;

@RunWith(SpringRunner.class)
@SpringBootTest(classes = FortuneServiceApplication.class)
public class FortuneServiceApplicationTests {

    @Test
    public void contextLoads() throws Exception {

    }

    @Autowired
    private JdbcTemplate template;

    @Test
    public void testDefaultSettings() throws Exception {
        assertThat(this.template.queryForObject("SELECT COUNT(*) from FORTUNE",
                Integer.class)).isEqualTo(7);
    }

}
fortune-service smoke tests
Add your smoke tests so that they match the smoke profile as defined in the fortune-service pom.xml file. These will be executed on Concourse against the fortune-service application deployed in the Cloud Foundry scp-test-fortune-service space. Two versions of these tests are executed against the app:
- the current version, in the
test-smokejob - the latest prod version, in the
test-rollback-smokejob
In the test environment, we choose to verify that fortune-service is retrieving a fortune from fortune-db, and not returning its Hystrix fallback response:
package smoke;

import org.assertj.core.api.BDDAssertions;
import org.junit.Test;
import org.junit.runner.RunWith;
import org.springframework.beans.factory.annotation.Value;
import org.springframework.boot.autoconfigure.EnableAutoConfiguration;
import org.springframework.boot.test.context.SpringBootTest;
import org.springframework.http.ResponseEntity;
import org.springframework.test.context.junit4.SpringRunner;
import org.springframework.web.client.RestTemplate;

@RunWith(SpringRunner.class)
@SpringBootTest(classes = SmokeTests.class,
        webEnvironment = SpringBootTest.WebEnvironment.NONE)
@EnableAutoConfiguration
public class SmokeTests {

	@Value("${application.url}") String applicationUrl;

	RestTemplate restTemplate = new RestTemplate();

	@Test
	public void should_return_a_fortune() {
		ResponseEntity<String> response = this.restTemplate
				.getForEntity("http://" + this.applicationUrl + "/", String.class);

		BDDAssertions.then(response.getStatusCodeValue()).isEqualTo(200);

		// Filter out the known Hystrix fallback response
		BDDAssertions.then(response.getBody()).doesNotContain("The fortuneteller will be back soon.");
	}

}
fortune-service e2e tests
Add your e2e tests so that they match the e2e profile as defined in the fortune-service pom.xml file. These will be executed on Concourse against the fortune-service application deployed in the Cloud Foundry scp-stage space. This space is shared, so we assume greeting-ui is also present.
In the e2e environment, we choose to use a string replacement to obtain the URL for greeting-ui. We also choose to verify that we are hitting fortune-db and not receiving Hystrix fallback responses from either application:
package e2e;

import org.assertj.core.api.BDDAssertions;
import org.junit.Test;
import org.junit.runner.RunWith;
import org.springframework.beans.factory.annotation.Value;
import org.springframework.boot.autoconfigure.EnableAutoConfiguration;
import org.springframework.boot.test.context.SpringBootTest;
import org.springframework.http.ResponseEntity;
import org.springframework.test.context.junit4.SpringRunner;
import org.springframework.web.client.RestTemplate;

@RunWith(SpringRunner.class)
@SpringBootTest(classes = E2eTests.class,
		webEnvironment = SpringBootTest.WebEnvironment.NONE)
@EnableAutoConfiguration
public class E2eTests {

	// The app is running in CF but the tests are executed from Concourse worker,
	// so the test will deduce the url to greeting-ui: it will assume the same host
	// as fortune-service, and simply replace "fortune-service" with "greeting-ui" in the url

	@Value("${application.url}") String applicationUrl;

	RestTemplate restTemplate = new RestTemplate();

	@Test
	public void should_return_a_fortune() {
		ResponseEntity<String> response = this.restTemplate
				.getForEntity("http://" + this.applicationUrl.replace("fortune-service", "greeting-ui") + "/", String.class);

		BDDAssertions.then(response.getStatusCodeValue()).isEqualTo(200);

		// Filter out the known Hystrix fallback responses from both fortune and greeting
		BDDAssertions.then(response.getBody()).doesNotContain("This fortune is no good. Try another.").doesNotContain("The fortuneteller will be back soon.");
	}

}
greeting-ui default tests
Add your unit and integration tests so that they match the default profile as defined in the greeting-ui pom.xml file. These will be executed on Concourse against the greeting-ui application running on the Concourse worker in the build-and-upload job.
As an example, we will add one test that loads the context:
package io.pivotal;

import org.junit.Test;
import org.junit.runner.RunWith;
import org.springframework.boot.test.context.SpringBootTest;
import org.springframework.test.context.junit4.SpringRunner;

@RunWith(SpringRunner.class)
@SpringBootTest(classes = GreetingUIApplication.class)
public class GreetingUIApplicationTests {

    @Test
    public void contextLoads() throws Exception {

    }

}
greeting-ui smoke tests
Add your smoke tests so that they match the smoke profile as defined in the greeting-ui pom.xml file. These will be executed on Concourse against the greeting-ui application deployed in the Cloud Foundry scp-test-greeting-ui space. Two versions of these tests are executed against the app:
- the current version, in the
test-smokejob - the latest prod version, in the
test-rollback-smokejob
Since fortune-service is not deployed to the scp-test-greeting-ui space, we expect to receive the Hystrix fallback response defined in greeting-ui. Hence, our smoke test validates that condition:
package smoke;

import org.assertj.core.api.BDDAssertions;
import org.junit.Test;
import org.junit.runner.RunWith;
import org.springframework.beans.factory.annotation.Value;
import org.springframework.boot.autoconfigure.EnableAutoConfiguration;
import org.springframework.boot.test.context.SpringBootTest;
import org.springframework.http.ResponseEntity;
import org.springframework.test.context.junit4.SpringRunner;
import org.springframework.web.client.RestTemplate;

@RunWith(SpringRunner.class)
@SpringBootTest(classes = SmokeTests.class,
        webEnvironment = SpringBootTest.WebEnvironment.NONE)
@EnableAutoConfiguration
public class SmokeTests {

    @Value("${application.url}") String applicationUrl;

    RestTemplate restTemplate = new RestTemplate();

    @Test
    public void should_return_a_fallback_fortune() {
        ResponseEntity<String> response = this.restTemplate
                .getForEntity("http://" + this.applicationUrl + "/", String.class);

        BDDAssertions.then(response.getStatusCodeValue()).isEqualTo(200);

        // Expect the hystrix fallback response
        BDDAssertions.then(response.getBody()).contains("This fortune is no good. Try another.");
    }

}
greeting-ui e2e tests
Add your e2e tests so that they match the e2e profile as defined in the greeting-ui pom.xml file. These will be executed on Concourse against the greeting-ui application deployed in the Cloud Foundry scp-stage space. This space is shared, so we assume fortune-service is also present.
In the e2e environment, we choose to verify that we are hitting fortune-service and not receiving the Hystrix fallback response from greeting-ui:
package e2e;

import org.assertj.core.api.BDDAssertions;
import org.junit.Test;
import org.junit.runner.RunWith;
import org.springframework.beans.factory.annotation.Value;
import org.springframework.boot.autoconfigure.EnableAutoConfiguration;
import org.springframework.boot.test.context.SpringBootTest;
import org.springframework.http.ResponseEntity;
import org.springframework.test.context.junit4.SpringRunner;
import org.springframework.web.client.RestTemplate;

@RunWith(SpringRunner.class)
@SpringBootTest(classes = E2eTests.class,
		webEnvironment = SpringBootTest.WebEnvironment.NONE)
@EnableAutoConfiguration
public class E2eTests {

	@Value("${application.url}") String applicationUrl;

	RestTemplate restTemplate = new RestTemplate();

	@Test
	public void should_return_a_fortune() {
		ResponseEntity<String> response = this.restTemplate
				.getForEntity("http://" + this.applicationUrl + "/", String.class);

		BDDAssertions.then(response.getStatusCodeValue()).isEqualTo(200);

		// Filter out the known Hystrix fallback response
		BDDAssertions.then(response.getBody()).doesNotContain("This fortune is no good. Try another.");
	}

}
At this point we will also incorporate Flyway, an OSS database migration tool, to track database schema versions and handle schema changes and data loading.
This change only needs to be made to fortune-service, since fortune-service owns the interaction with fortune-db.
Add Flyway dependency
We first add the Flyway dependency to the fortune-service pom.xml. We need not add a version as Spring Boot will take care of that for us.
    <dependency>
      <groupId>org.flywaydb</groupId>
      <artifactId>flyway-core</artifactId>
    </dependency>
    <dependency>
Create Flyway migration
Next, we create a migration directory and our initial migration file following Flyway’s file naming convention:
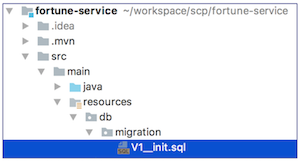
Note the filename specifies the version (V1), followed by two underscore characters.
We place our CREATE TABLE and INSERT statements in our src/main/resources/db/migration/V1__init.sql file:
CREATE TABLE fortune (
  id BIGINT PRIMARY KEY AUTO_INCREMENT,
  text varchar(255) not null
);

INSERT INTO fortune (text) VALUES ('Do what works.');

INSERT INTO fortune (text) VALUES ('Do the right thing.');

INSERT INTO fortune (text) VALUES ('Always be kind.');

INSERT INTO fortune (text) VALUES ('You learn from your mistakes... You will learn a lot today.');

INSERT INTO fortune (text) VALUES ('You can always find happiness at work on Friday.');

INSERT INTO fortune (text) VALUES ('You will be hungry again in one hour.');

INSERT INTO fortune (text) VALUES ('Today will be an awesome day!');
Disable JPA DDL initialization
Now that we are relying on Flyway to create and populate the schema, we need to disable JPA-based database initialization. We can set ddl-auto to validate, which will validate the schema against the application entities and throw an error in case of a mismatch, but not actually generate the schema:
spring:
  jpa:
    hibernate:
      ddl-auto: validate
There are a few options for where to store the ddl-auto configuration, both in terms of location (in the fortune-service app or on the app-config GitHub repo) and in terms of file name. For this example, update the application.yml in the fortune-service app for local testing. Additionally, save these values in a new file called application-flyway.yml on your fork of app-config.
By convention, fortune-service will pick up the configurations in application-flyway.yml if the string flyway is in the list of active Spring profiles. Thus, we add flyway to the environment variable SPRING_PROFILES_ACTIVE via the fortune-service manifest.yml:
---
applications:
- name: fortune-service
  timeout: 120
  services:
  - fortune-db
  - config-server
  - cloud-bus
  - service-registry
  - circuit-breaker-dashboard
  env:
    SPRING_PROFILES_ACTIVE: flyway
    JAVA_OPTS: -Djava.security.egd=file:///dev/urandom
    TRUST_CERTS: api.run.pivotal.io
Remove non-Flyway data loading
We can now remove the old code that populated the database. In our sample app, this was found in class io.pivotal.FortuneServiceApplication. The following shows the code we now remove:
@Bean
    CommandLineRunner loadDatabase(FortuneRepository fortuneRepo) {
        return args -> {
//            logger.debug("loading database..");
//            fortuneRepo.save(new Fortune(1L, "Do what works."));
//            fortuneRepo.save(new Fortune(2L, "Do the right thing."));
//            fortuneRepo.save(new Fortune(3L, "Always be kind."));
//            fortuneRepo.save(new Fortune(4L, "You learn from your mistakes... You will learn a lot today."));
//            fortuneRepo.save(new Fortune(5L, "You can always find happiness at work on Friday."));
//            fortuneRepo.save(new Fortune(6L, "You will be hungry again in one hour."));
//            fortuneRepo.save(new Fortune(7L, "Today will be an awesome day!"));
            logger.debug("record count: {}", fortuneRepo.count());
            fortuneRepo.findAll().forEach(x -> logger.debug(x.toString()));
        };

    }
We also no longer need the Fortune entity constructors, so we can comment these out in class io.pivotal.fortune.Fortune as shown below:
//    public Fortune() {
//    }
//
//    public Fortune(Long id, String text) {
//        super();
//        this.id = id;
//        this.text = text;
//    }
Flyway integration summary
With that, we have completed the setup for Flyway and our database schema is now versioned. From this point onward, Spring Boot will call Flyway.migrate() to perform the database migration. As long as we follow Flyway conventions for future schema changes, Flyway will take care of tracking the schema version and migrating the database for us.
From a rollback perspective, Spring Cloud Pipelines includes two jobs in the test phase - test-rollback-deploy and test-rollback-smoke - wherein it validates that the latest prod jar works against the newly updated database. The purpose is to ensure that we can roll back the application in prod if a problem is discovered after the prod database schema has been updated, and avoid the burden of rolling back the database.
Read more about Spring Boot database initialization with Flyway for further information, including Flyway configuration options.
For greeting-ui, you should be pushing the following new or modified files:
- pom.xml
- src/test/java/e2e/E2eTests.java
- src/test/java/io/pivotal/GreetingUIApplicationTests.java
- src/test/java/smoke/SmokeTests.java
For fortune-service, you should be pushing the following new or modified files:
- pom.xml
- src/test/java/e2e/E2eTests.java
- src/test/java/io/pivotal/FortuneServiceApplicationTests.java
- src/test/java/smoke/SmokeTests.java
- src/main/resources/db/migration/V1__init.sql
- src/main/resources/application.yml
- manifest.yml
- src/main/java/io/pivotal/FortuneServiceApplication.java
- src/main/java/io/pivotal/fortune/Fortune.java
For app-config, you should be pushing the following new or modified files:
- application-flyway.yml
Run through the pipelines again and view the output for the jobs that run the default, smoke, and e2e tests. You will see that the tests we added in this stage were executed.
As you run through the pipelines a second time, you will see the smoke tests from the latest prod version run against the database in the test-rollback-smoke job. In this case there is no schema upgrade, but nonetheless the tests confirm that the latest prod version of the app can be used with the current database schema.
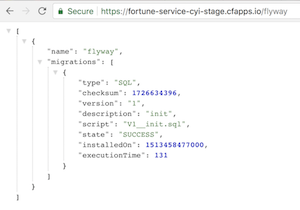
You can see the database version information stored in the database by Flyway either by querying the database itself or by hitting the flyway endpoint on the fortune-service URL. Here is an example from the scp-stage environment:
What have we accomplished?
- By integrating our applications with the testing strategy built into Spring Cloud Pipelines, we have increased the effectiveness of the pipelines, as well as our confidence in them
- Established a standard approach to organizing tests that will bring consistency within and across development teams
- Enabled auto-managed database versioning and backward compatibility testing that will alleviate database schema management throughout the release management lifecycle
We are now positioned to add any unit, integration, smoke, and end-to-end tests to our code base and extract a very high level of reliability and confidence from our pipelines. We are also better positioned to ensure that our dev teams conform to these practices, given the structure established by Spring Cloud Pipelines and the fast feedback and visibility we gain from the pipelines as they execute the tests.
However, we could benefit further by incorporating contracts to define and test the API integration points between applications. We do this in Stage 3 of the app migration.
In this stage, we introduce contract-based programming practices into our sample application. Doing so improves API management capabilities, including defining, communicating, and testing API semantics. It also enables us to catch breaking API changes (i.e. validate API backward compatibility) in the build phase. This will extend the effectiveness of the pipelines, encourage better communication and programming practices across development teams, and provide faster feedback to developers.
We will integrate Spring Cloud Contract and add contracts, stubs, and a stub runner. We will also now complete and make use of the apicompatibility profile defined in Stage 2.
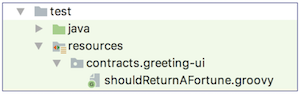
Let’s start by creating the contract for the interaction between greeting-ui and fortune-service. The contract should describe the following expectation:
greeting-uimakes aGETrequest to the root URL offortune-serviceand expects a response with status 200 and a string ("foo fortune") in the body
We codify this using groovy syntax as follows:
import org.springframework.cloud.contract.spec.Contract

Contract.make {
    description("""
should return a fortune string
""")
    request {
        method GET()
        url "/"
    }
    response {
        status 200
        body "foo fortune"
    }
}
Save this contract in the fortune-service code base in the following location, which is compliant with Spring Cloud Contract convention (src/test/resources/contracts/<service-name>/<contract-file>):
| Note |
|---|---|
You can optionally enable your IDE to assist with contract syntax by adding the Spring Cloud Contract Verifier to your |
    <dependency>
      <groupId>org.springframework.cloud</groupId>
      <artifactId>spring-cloud-starter-contract-verifier</artifactId>
      <scope>test</scope>
    </dependency>
Now that we have a codified contract, we want to enable auto-generation of contract-based tests. The auto-generation, which we will configure in the next steps, requires a base class that stubs out the service that satisfies the API call, so that we can run the test without external dependencies (e.g. the DB). The objective is to focus on testing API semantics.
We create the base class in the fortune-service test package as follows:
package io.pivotal.fortune;

import io.restassured.module.mockmvc.RestAssuredMockMvc;
import org.junit.Before;
import org.mockito.BDDMockito;

public class BaseClass {

    @Before
    public void setup() {
        FortuneService service = BDDMockito.mock(FortuneService.class);
        BDDMockito.given(service.getFortune()).willReturn("foo fortune");
        RestAssuredMockMvc.standaloneSetup(new FortuneController(service));
    }
}
Now that we have a contract and a base class, we can use the Spring Cloud Contract maven plugin to auto-generate contract tests, stubs, and a stub jar.
First we add the Spring Cloud Contract version to the list of properties in the fortune-service pom.xml file, since we will reference it when we enable the Spring Cloud Contract maven plugin:
  <properties>
...
    <spring-cloud-contract.version>1.2.1.RELEASE</spring-cloud-contract.version>
...
</properties>
Next, we edit the default profile in the fortune-service pom.xml file as follows:
- Add a plugin block for Spring Cloud Contract maven plugin
- Configure it to use our base class (
io.pivotal.fortune.BaseClass) to generate tests - Configure it to place auto-generated tests in the test package
io.pivotal.fortune.contracttests
Note that the package of the contracttests will be included by the include filter in the default profile, so these tests will be run against the app during the build-and-upload job. For fortune-service, this serves to validate that the app conforms to the contract.
Here is the complete profile:
    <profile>
      <id>default</id>
      <activation>
        <activeByDefault>true</activeByDefault>
      </activation>
      <build>
        <plugins>
          <plugin>
            <groupId>org.apache.maven.plugins</groupId>
            <artifactId>maven-surefire-plugin</artifactId>
            <configuration>
              <includes>
                <include>**/*Tests.java</include>
                <include>**/*Test.java</include>
              </includes>
              <excludes>
                <exclude>**/smoke/**</exclude>
                <exclude>**/e2e/**</exclude>
              </excludes>
            </configuration>
          </plugin>
          <plugin>
            <groupId>org.springframework.boot</groupId>
            <artifactId>spring-boot-maven-plugin</artifactId>
          </plugin>
          <!--Spring Cloud Contract maven plugin -->
          <plugin>
            <groupId>org.springframework.cloud</groupId>
            <artifactId>spring-cloud-contract-maven-plugin</artifactId>
            <version>${spring-cloud-contract.version}</version>
            <extensions>true</extensions>
            <configuration>
              <baseClassForTests>io.pivotal.fortune.BaseClass</baseClassForTests>
              <basePackageForTests>io.pivotal.fortune.contracttests</basePackageForTests>
            </configuration>
          </plugin>
        </plugins>
      </build>
    </profile>
When the app is built, the Spring Cloud Contract maven plugin will also now produce a stub and a stub jar containing the contract and stub. This stub jar will be uploaded to Bintray, along with the usual app jar. As we will see shortly, this stub jar can be used by the greeting-ui dev team while they wait for fortune-service to be completed. In other words, this gives the greeting-ui dev team a producer to test against that is based on a mutually agreed-upon contract without the lead time of having to wait for fortune-service to implement anything more than a base class, and without having to manually stub out calls to fortune-service based on arbitrary or static responses.
| Tip |
|---|---|
Package the project locally (run |
To enable Spring Cloud Pipelines to catch any breaking API changes during the build-api-compatibility-check job, we add the Spring Cloud Contract maven plugin to the apicompatibility profile as well.
In this case, we want the plugin to generate tests based on contracts outside of the project (the ones from the latest prod version), so we configure the plugin to download the latest prod stub jar, which contains the old contract. The plugin will use the old contract and the specified base class, which in our example is the same as the one in the previous step, to generate contract tests. These tests are run against the new code to validate that it is still compatible with consumers complying with the prior contract. This ensures backward compatibility for the API.
In short, we edit the apicompatibility profile in the fortune-service pom.xml file as follows:
- Add a plugin block for Spring Cloud Contract maven plugin
- Configure it to download the latest prod stub jar from Bintray to obtain the old contract
- Configure it to use our base class (
io.pivotal.fortune.BaseClass) to generate tests (we are using the same one as in the prior step) - Configure it to place auto-generated tests in the test package
io.pivotal.fortune.contracttests
Note that the package of the contracttests matches the include filter in the apicompatibility profile, so these tests will be run against the app during the build-api-compatibility-check job. For fortune-service, this serves to validate that the app conforms to the old contract.
Here is the complete profile:
    <profile>
      <id>apicompatibility</id>
      <build>
        <plugins>
          <plugin>
            <groupId>org.apache.maven.plugins</groupId>
            <artifactId>maven-surefire-plugin</artifactId>
            <configuration>
              <includes>
                <include>**/contracttests/**/*Tests.java</include>
                <include>**/contracttests/**/*Test.java</include>
              </includes>
            </configuration>
          </plugin>
          <!--Spring Cloud Contract maven plugin -->
          <plugin>
            <groupId>org.springframework.cloud</groupId>
            <artifactId>spring-cloud-contract-maven-plugin</artifactId>
            <version>${spring-cloud-contract.version}</version>
            <extensions>true</extensions>
            <configuration>
              <contractsRepositoryUrl>${repo.with.binaries}</contractsRepositoryUrl>
              <contractDependency>
                <groupId>${project.groupId}</groupId>
                <artifactId>${project.artifactId}</artifactId>
                <classifier>stubs</classifier>
                <version>${latest.production.version}</version>
              </contractDependency>
              <contractsPath>/</contractsPath>
              <baseClassForTests>io.pivotal.fortune.BaseClass</baseClassForTests>
              <basePackageForTests>io.pivotal.fortune.contracttests</basePackageForTests>
            </configuration>
          </plugin>
        </plugins>
      </build>
    </profile>
The values for ${repo.with.binaries} and ${latest.production.version} will be injected dynamically by Spring Cloud Pipelines. You can run this locally by providing these values manually as system properties in the maven command.
All changes in Stage 3 thus far are in fortune-service. At this point, you should be pushing the following new or modified files:
- pom.xml
- src/test/resources/contracts/greeting-ui/shouldReturnAFortune.groovy
- src/test/java/io/pivotal/fortune/BaseClass.java
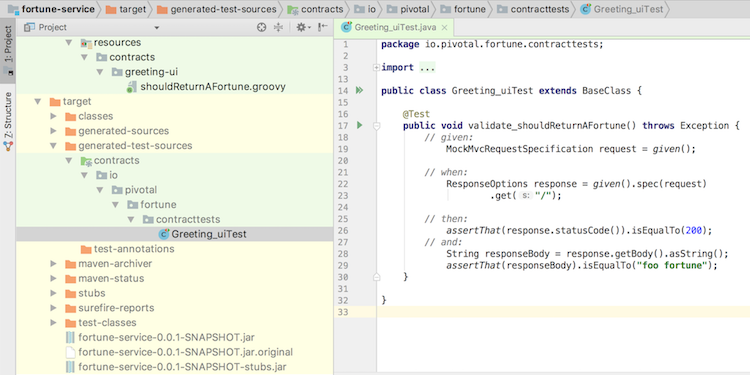
Run through the fortune-service pipeline to generate stubs. The following output from the build-and-upload job shows the auto-generation of tests and stubs:

You will also see output in the build-and-upload job showing the execution of these tests against the code.
Additionally, you will see the stub jar uploaded to Bintray along with the usual app jar.
Finally, as you run through the pipeline a second time, you will see the contract tests from the latest prod version run against the new code in the output of the build-api-compatibility-check job. In this case there is no API change, but nonetheless the tests confirm that the latest prod version of the API can be used with the current code base.
We are in the home stretch! Let’s turn our attention to greeting-ui.
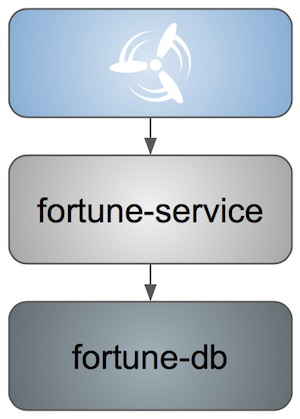
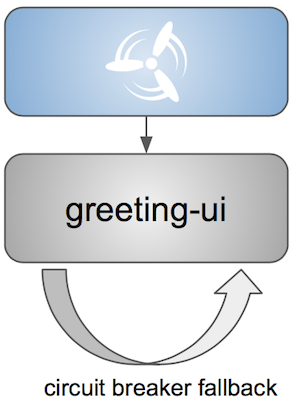
The following image compares the path of a request through greeting-ui in the build phase, both with and without stubs.
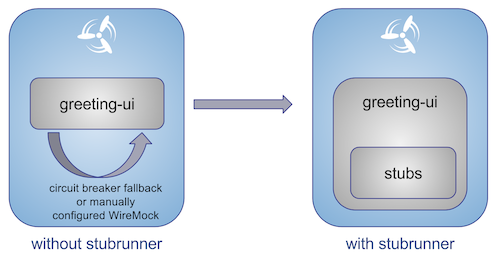
Without stubs, we expect the response to be the hystrix fallback response that is hard-coded in greeting-ui. With stubs, however, we can expect the response that was declared in the contract. In this case, the stubs are loaded into the greeting-ui process. This leads us to our next task: load the stubs produced by fortune-service.
Enable in-process stub runner
To load the stubs into the greeting-ui process, we must enable the Spring Cloud Contract Stub Runner dependency. This dependency will start an in-process stub runner that automatically configures Wiremock.
Add the following to the greeting-ui pom.xml file:
<dependency>
 <groupId>org.springframework.cloud</groupId>
 <artifactId>spring-cloud-starter-contract-stub-runner</artifactId>
 <scope>test</scope>
</dependency>
Add integration tests aligned with the contract
Next, we add integration tests to greeting-ui that test for the expected response declared in the contract.
Add the following class to the test package in greeting-ui:
package io.pivotal.fortune;

import io.pivotal.GreetingUIApplication;
import org.assertj.core.api.BDDAssertions;
import org.junit.Test;
import org.junit.runner.RunWith;
import org.springframework.beans.factory.annotation.Autowired;
import org.springframework.boot.test.context.SpringBootTest;
import org.springframework.cloud.contract.stubrunner.spring.AutoConfigureStubRunner;
import org.springframework.test.context.junit4.SpringRunner;

@RunWith(SpringRunner.class)
@SpringBootTest(classes = GreetingUIApplication.class, webEnvironment = SpringBootTest.WebEnvironment.NONE,
        properties = {"spring.application.name=greeting-ui", "spring.cloud.circuit.breaker.enabled=false", "hystrix.stream.queue.enabled=false"})
@AutoConfigureStubRunner(ids = {"io.pivotal:fortune-service:1.0.0.M1-20180102_203542-VERSION"},
        repositoryRoot = "${REPO_WITH_BINARIES}"
        //workOffline = true
)

public class FortuneServiceTests {

    @Autowired FortuneService fortuneService;

    @Test
    public void shouldSendRequestToFortune() {
        // when
        String fortune = fortuneService.getFortune();
        // then
        BDDAssertions.then(fortune).isEqualTo("foo fortune");
    }

}
At this point, we can get through the build phase for greeting-ui, and the integration tests will be executed against the fortune-service stubs running in the greeting-ui process on the Concourse worker.
| Tip |
|---|---|
Notice the configuration of |
| Tip |
|---|---|
Setting |
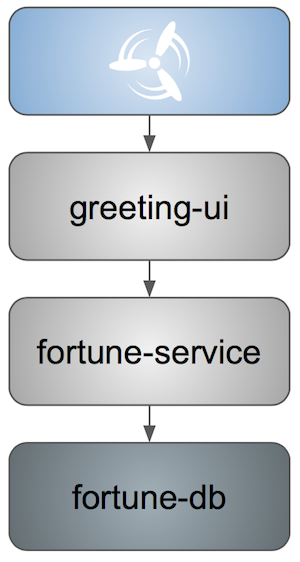
The following image compares the path of a request through greeting-ui in the test phase, both with and without stubs. Note that in the build phase, where the app process is running on the Concourse worker, we ran the stubs in the same process. In the test environment (Cloud Foundry), we will run the stubs in a separate process using a standalone stub runner application.
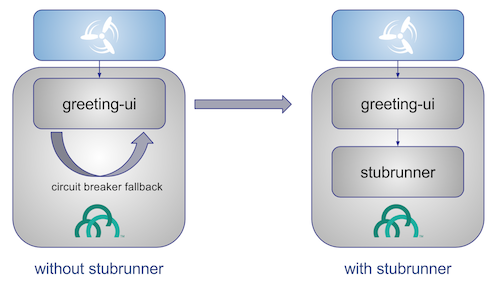
As in the build phase, without stubs we expect the response to be the hystrix fallback response that is hard-coded in greeting-ui. With stubs, however, we can expect the response that was declared in the contract.
We will rely on Spring Cloud Pipelines to:
- Deploy a stub runner application
- Provide the stub runner application the necessary information to download the stubs
- Open a port on the stub runner application for each stub
We will rely on the stub runner application to:
- Download the stubs from our maven repo (Bintray)
- Expose each stub on a separate port
- Register each stub in the Service Discovery server
The following steps describe how to configure this.
Provide standalone stub runner app jar
In the Prep step for this tutorial, you cloned the cloudfoundry-stub-runner-boot repo to your local machine. The next step is to build this app and upload it to Bintray to make the jar available to Spring Cloud Pipelines.
As mentioned in Stage 1 of this tutorial, Bintray requires that a package exist before any app artifacts can be uploaded. Log into the Bintray UI and create a package for cloudfoundry-stub-runner-boot. If you forked this repo, you can use the Import from GitHub option. Otherwise, create the package manually and choose any license (e.g. Apache 2.0).
Now you are ready to build and upload this app to Bintray. The following script shows cloning, building and uploading. Edit as appropriate to match your Bintray URL, the Bintray ID in your ~/.m2/settings/xml file, and the cloudfoundry-stub-runner-boot repo URL if you chose to fork it.
# Edit to match your Bintray URL and M2 repo ID setting (check your ~/.m2/settings.xml file)
MAVEN_REPO_URL=https://api.bintray.com/maven/ciberkleid/maven-repo/cloudfoundry-stub-runner-boot
MAVEN_REPO_ID=bintray

# Clone cloudfoundry-stub-runner-boot
git clone https://github.com/spring-cloud-samples/cloudfoundry-stub-runner-boot.git
cd cloudfoundry-stub-runner-boot

# Build and upload
./mvnw clean deploy -Ddistribution.management.release.url="${MAVEN_REPO_URL}" -Ddistribution.management.release.id="${MAVEN_REPO_ID}"
You should now see the cloudfoundry-stub-runner-boot artifacts uploaded on Bintray.
Provide standalone stub runner app manifest
Next, we add a manifest file for the stub runner app for deployment to Cloud Foundry.
We will place this file in the greeting-ui repo. The file name and location can be your choice. For this example, we will use sc-pipelines/manifest-stubrunner.yml:
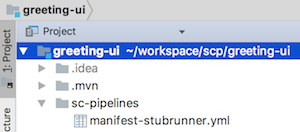
We populate this manifest-stubrunner.yml with the content shown below so that the stub runner binds to service-registry. The stub runner will register the fortune-service stub there so that greeting-ui can discover it in the same way it will discover the actual fortune-service app endpoint in stage and prod. From the greeting-ui perspective, there is no difference in how it interacts with Eureka and the stub runner app in test and the way it will interact with Eureka and the fortune-service app in stage and prod.
---
applications:
- name: stubrunner
  timeout: 120
  services:
  - service-registry
  env:
    JAVA_OPTS: -Djava.security.egd=file:///dev/urandom
    TRUST_CERTS: api.run.pivotal.io
Provide stub runner jar and manifest info to the pipeline
Now that we have a jar file and manifest file for our stub runner app, we need to provide this information to our greeting-ui pipeline so that the pipeline downloads the jar from Bintray and deploys it to Cloud Foundry. We do this through the greeting-ui sc-pipelines.yml file. We add an entry to the list of services in the test section, as follows:
    - name: stubrunner
      type: stubrunner
      coordinates: io.pivotal:cloudfoundry-stub-runner-boot:0.0.1.M1
      pathToManifest: sc-pipelines/manifest-stubrunner.yml
Notice that name matches the name of the app in manifest-stubrunner.yml, coordinates corresponds to the jar coordinates on the maven repo, and pathToManifest matches our chosen fie name for the stub runner app manifest.
Note also the type is set to stubrunner, which Spring Cloud Pipelines will recognize as a stanalone stub runner app and treat accordingly.
Provide stub configuration for stub runner app
The final steps in the configuration of the standalone stub runner app are:
- Enable the stub runner app to download the
fortune-servicestub from Bintray - Open a second port on the container to receive requests for this stub
To accomplish this, we put stub and port configuration information into the properties section of the greeting-ui pom.xml file, using a property called stubrunner.ids. This property can accept a list of stubrunner ids, but for this tutorial, we only have one:
  <properties>
...
    <!--Tell stub runner app to start this stub-->
    <stubrunner.ids>io.pivotal:fortune-service:1.0.0.M1-20180102_203542-VERSION:stubs:10000</stubrunner.ids>
  </properties>
Spring Cloud Pipelines will use this information in two ways:
It will provide this information to the stub runner app via the app’s environment variables
- Spring Cloud Pipelines will aslo provide the
$REPO_WITH_BINARIESas an env var for the stub runner app - The stub runner app will use this information to download the stub from Bintray and expose it on the specified port
- Spring Cloud Pipelines will aslo provide the
It will open the additional port specified on the stub runner app and map a new route to it
- The format for each route will be
<stub-runner-app-name>-<hostname-uuid>-<env>-<app-name>-<port>.<domain> - In our example, this would be
stubrunner-cyi-test-greeting-ui-10000.cfapps.io
- The format for each route will be
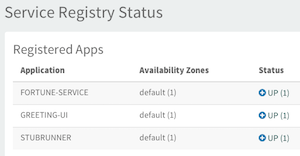
Since we bound our stub runner app to service-registry (Eureka), the stub runner app will register the stub URL under the application name FORTUNE-SERVICE on Eureka:
This completes the process of configuring the standalone stub runner application.
| Note |
|---|---|
The port configuration may be automated by Spring Cloud Pipelines in the future, such that it will not be necessary to include the port in the |
Edit smoke tests to align with the contract
Finally, we edit our smoke tests for greeting-ui to ensure the response does not contain the hystrix fallback, since we are now expecting a response from the stub.
package smoke;

import org.assertj.core.api.BDDAssertions;
import org.junit.Test;
import org.junit.runner.RunWith;
import org.springframework.beans.factory.annotation.Value;
import org.springframework.boot.autoconfigure.EnableAutoConfiguration;
import org.springframework.boot.test.context.SpringBootTest;
import org.springframework.http.ResponseEntity;
import org.springframework.test.context.junit4.SpringRunner;
import org.springframework.web.client.RestTemplate;

@RunWith(SpringRunner.class)
@SpringBootTest(classes = SmokeTests.class,
        webEnvironment = SpringBootTest.WebEnvironment.NONE)
@EnableAutoConfiguration
public class SmokeTests {

	@Value("${application.url}") String applicationUrl;

	RestTemplate restTemplate = new RestTemplate();

	@Test
	public void should_return_a_fortune() {
		ResponseEntity<String> response = this.restTemplate
				.getForEntity("http://" + this.applicationUrl + "/", String.class);

		BDDAssertions.then(response.getStatusCodeValue()).isEqualTo(200);

		// Filter out the known Hystrix fallback response
		BDDAssertions.then(response.getBody()).doesNotContain("This fortune is no good. Try another.");
	}

}
In this case, in contrast to the integration test we created earlier for greeting-ui, we do not include @AutoConfigureStubRunner since we are using a standalone stub runner application.
Push contract-based changes for greeting-ui. You should be pushing the following new or modified files:
- pom.xml
- sc-pipelines.yml
- sc-pipelines/manifest-stubrunner.yml
- src/test/java/io/pivotal/fortune/FortuneServiceTests.java
- src/test/java/smoke/SmokeTests.java
At this point, we can run through the full pipeline for greeting-ui and leverage the contract-based stub in both the build and test environments.
What have we accomplished?
By implementing a contract-driven approach with auto-generation of tests and stubs, we have introduced a clean, structured, and reliable way to define, communicate, document, manage and test APIs
Inter-team communication will be simpler
- Consumer and producer teams can now communicate requirements through codified contracts
- The inventory of contracts serves as a record and reference of the agreed upon APIs
Developer productivity will increase
- Producers can quickly and easily generate contract-based stubs
- Consumers no longer have to manually stub out APIs and write tests with arbitrary hard-coded responses - instead they can use the auto-generated stubs and test for contract-based responses
- Both producers and consumers can validate they are compliant with the contract
- Producers can verify backward compatibility of API changes
- Troubleshooting will be easier
- Failure and feedback will be faster
This concludes the tutorial on migrating apps for Spring Cloud Pipelines for Cloud Foundry.
Moving forward, the refactoring work needed here can be incorporated into your and/or your team’s standard practices. In short:
Good:
- Use maven or gradle wrappers
- Include a Cloud Foundry manifest file in your app repo
- Include a pipeline descriptor (
sc-manifest.yml) in your app repo - Create an empty
versionbranch in your app repo - Include artifact repository configuration in the pom.xml file
- Align your Cloud Foundry spaces with Spring Cloud Pipelines model (isolated test space, shared stage and prod spaces)
Better
- Include default, apicompatibility, smoke, and e2e profiles in the pom.xml file
- Organize tests accordingly in your app repo
Best
- Use a database migration tool like flyway
- Use contract-based API programming
Implementing all the "good" practices above already positions you to instantly create pipelines for your apps usign Spring Cloud Pipelines. This is a huge win in terms of consistency and productivity, and standardization across development teams. Of course, this is an open source project, so it can be modified to meet your needs.
Implementing the "better" practices will ensure the proper tests get run at the proper time. At that point you can add as much test coverage as you need to have high confidence in your pipelines.
Implementing the "best" practices will give you additional confidence in your pipeline and encourage better programming practices for database version and API management across development teams. It will also give you higher confidence in your pipelines and enable you to avoid the cumbersome business of rolling back a database.
Happy coding!