2.2.0.BUILD-SNAPSHOT
Preface
A Brief History of Spring’s Data Integration Journey
Spring’s journey on Data Integration started with Spring Integration. With its programming model, it provided a consistent developer experience to build applications that can embrace Enterprise Integration Patterns to connect with external systems such as, databases, message brokers, and among others.
Fast forward to the cloud-era, where microservices have become prominent in the enterprise setting. Spring Boot transformed the way how developers built Applications. With Spring’s programming model and the runtime responsibilities handled by Spring Boot, it became seamless to develop stand-alone, production-grade Spring-based microservices.
To extend this to Data Integration workloads, Spring Integration and Spring Boot were put together into a new project. Spring Cloud Stream was born.
With Spring Cloud Stream, developers can:
* Build, test, iterate, and deploy data-centric applications in isolation.
* Apply modern microservices architecture patterns, including composition through messaging.
* Decouple application responsibilities with event-centric thinking. An event can represent something that has happened in time, to which the downstream consumer applications can react without knowing where it originated or the producer’s identity.
* Port the business logic onto message brokers (such as RabbitMQ, Apache Kafka, Amazon Kinesis).
* Interoperate between channel-based and non-channel-based application binding scenarios to support stateless and stateful computations by using Project Reactor’s Flux and Kafka Streams APIs.
* Rely on the framework’s automatic content-type support for common use-cases. Extending to different data conversion types is possible.
Quick Start
You can try Spring Cloud Stream in less then 5 min even before you jump into any details by following this three-step guide.
We show you how to create a Spring Cloud Stream application that receives messages coming from the messaging middleware of your choice (more on this later) and logs received messages to the console.
We call it LoggingConsumer.
While not very practical, it provides a good introduction to some of the main concepts
and abstractions, making it easier to digest the rest of this user guide.
The three steps are as follows:
Creating a Sample Application by Using Spring Initializr
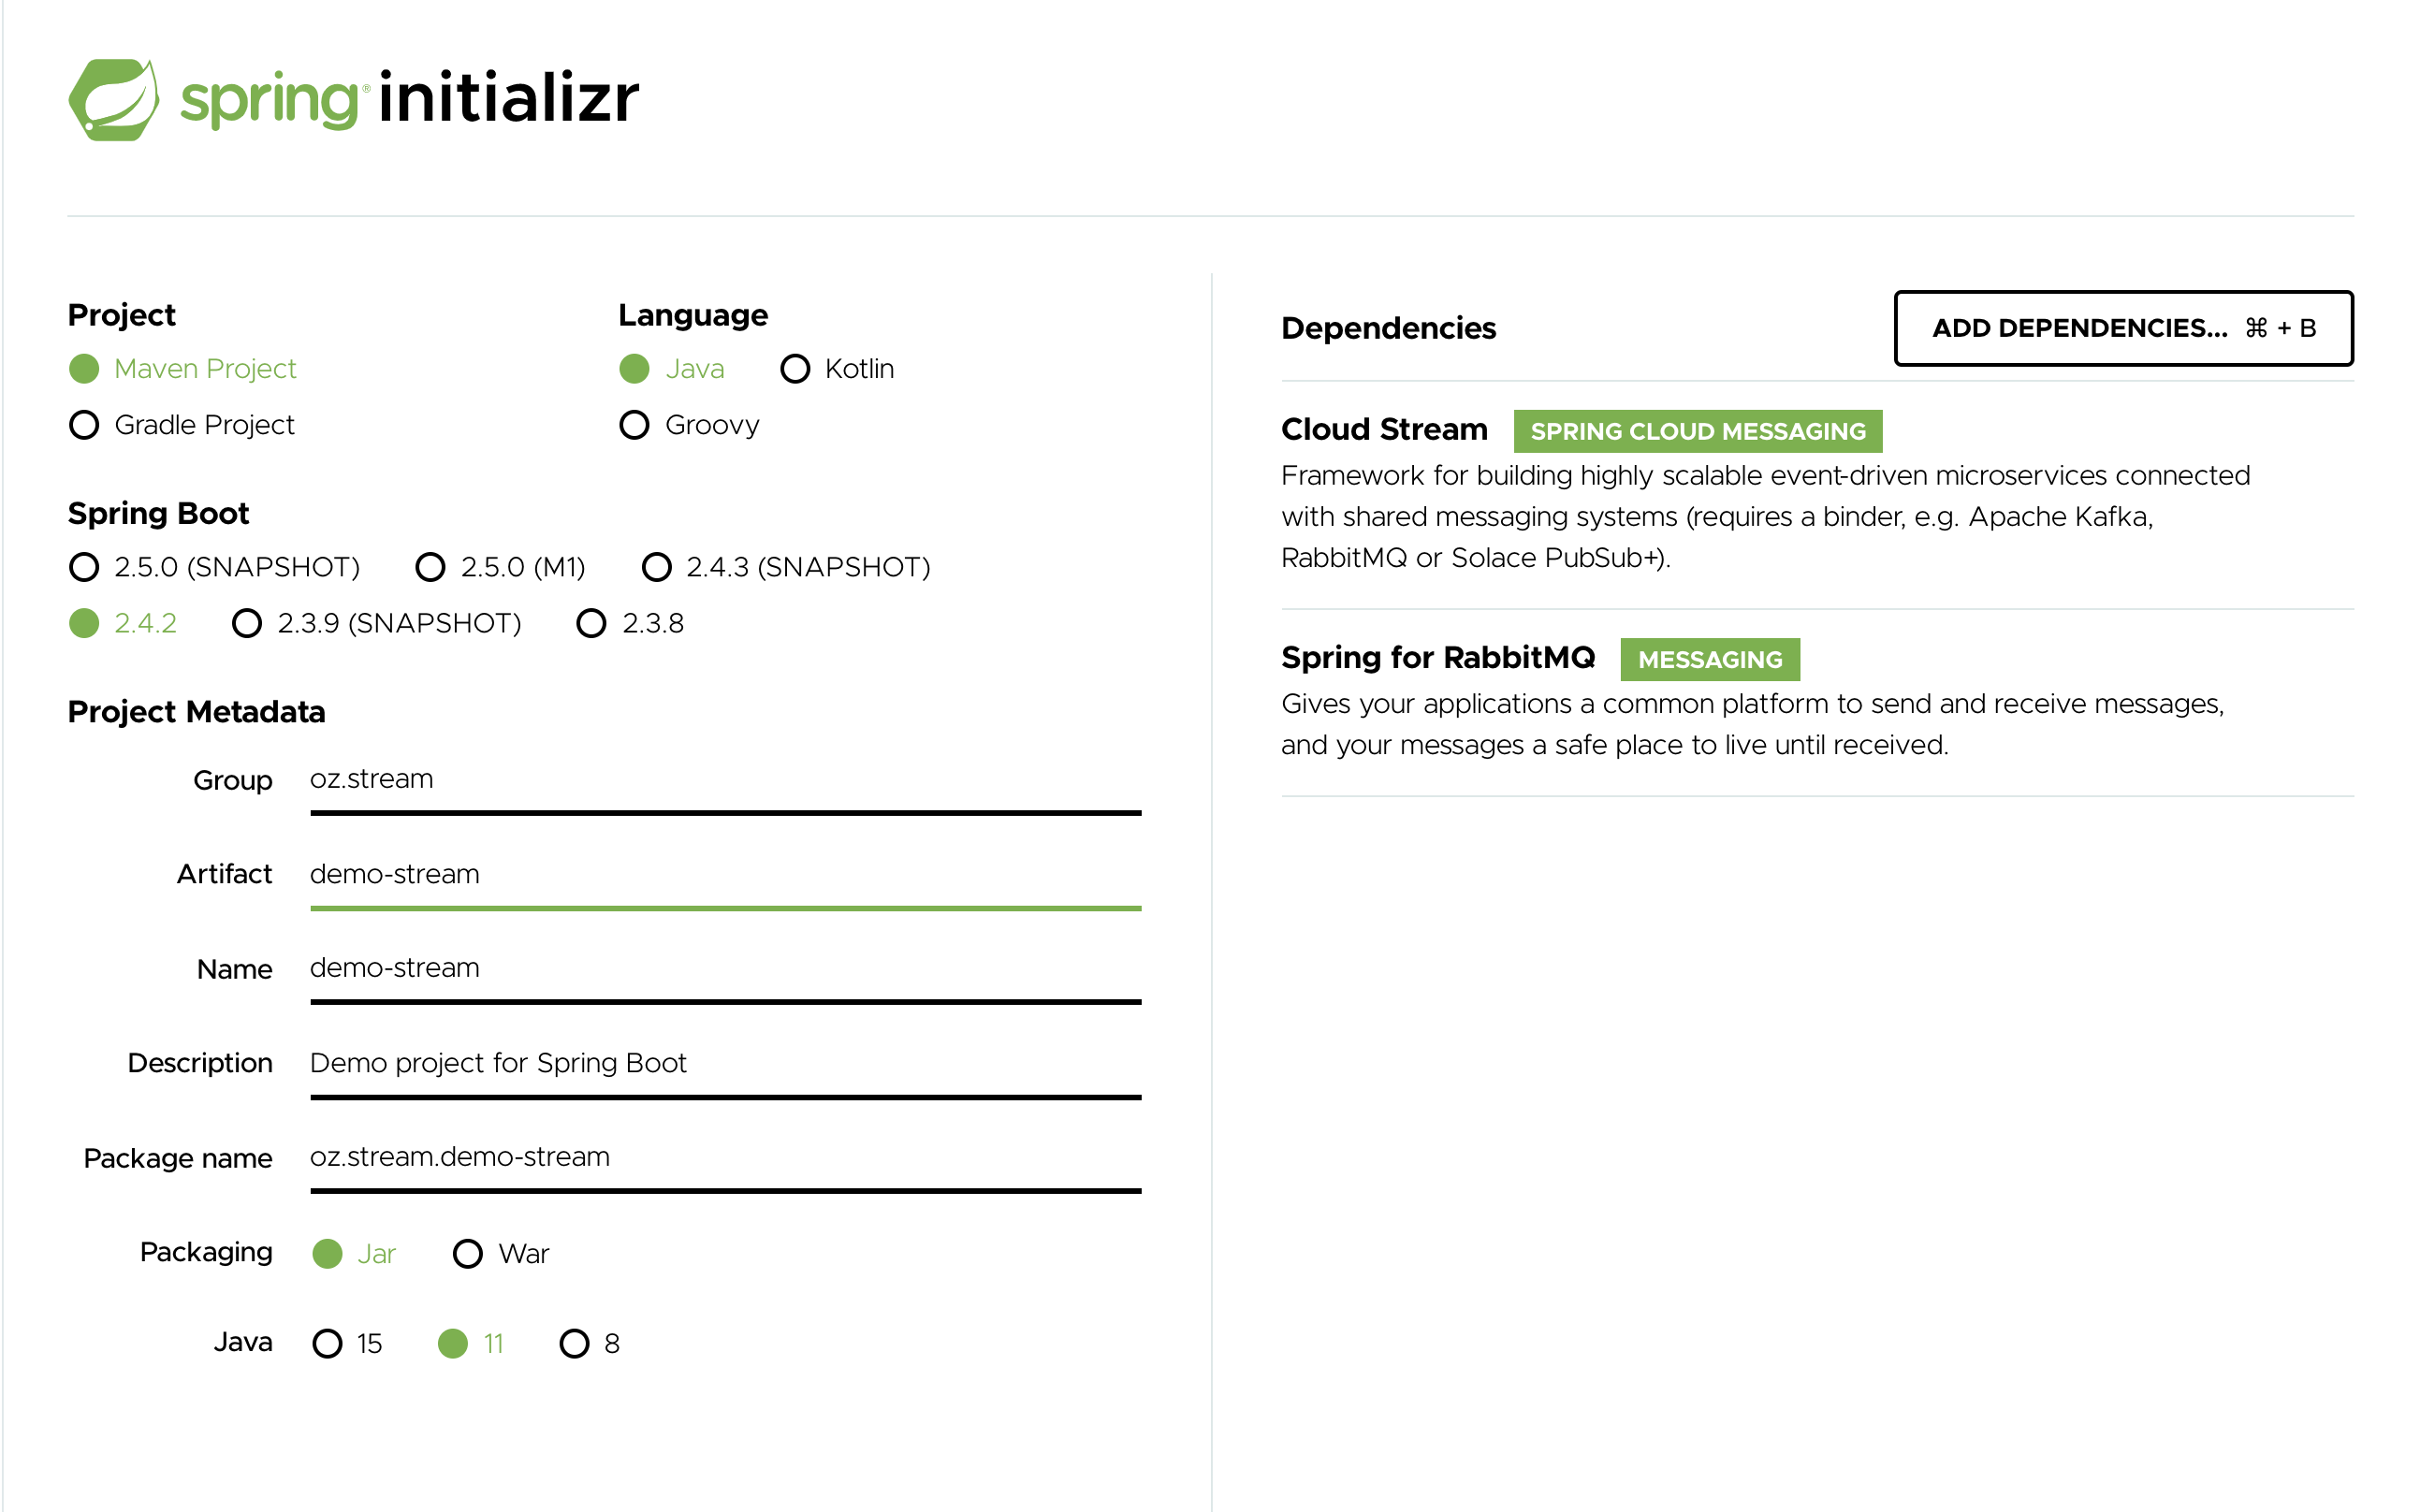
To get started, visit the Spring Initializr. From there, you can generate our LoggingConsumer application. To do so:
-
In the Dependencies section, start typing
stream. When the “Cloud Stream” option should appears, select it. -
Start typing either 'kafka' or 'rabbit'.
-
Select “Kafka” or “RabbitMQ”.
Basically, you choose the messaging middleware to which your application binds. We recommend using the one you have already installed or feel more comfortable with installing and running. Also, as you can see from the Initilaizer screen, there are a few other options you can choose. For example, you can choose Gradle as your build tool instead of Maven (the default).
-
In the Artifact field, type 'logging-consumer'.
The value of the Artifact field becomes the application name. If you chose RabbitMQ for the middleware, your Spring Initializr should now be as follows:
-
Click the Generate Project button.
Doing so downloads the zipped version of the generated project to your hard drive.
-
Unzip the file into the folder you want to use as your project directory.
| We encourage you to explore the many possibilities available in the Spring Initializr. It lets you create many different kinds of Spring applications. |
Importing the Project into Your IDE
Now you can import the project into your IDE. Keep in mind that, depending on the IDE, you may need to follow a specific import procedure. For example, depending on how the project was generated (Maven or Gradle), you may need to follow specific import procedure (for example, in Eclipse or STS, you need to use File → Import → Maven → Existing Maven Project).
Once imported, the project must have no errors of any kind. Also, src/main/java should contain com.example.loggingconsumer.LoggingConsumerApplication.
Technically, at this point, you can run the application’s main class. It is already a valid Spring Boot application. However, it does not do anything, so we want to add some code.
Adding a Message Handler, Building, and Running
Modify the com.example.loggingconsumer.LoggingConsumerApplication class to look as follows:
@SpringBootApplication
@EnableBinding(Sink.class)
public class LoggingConsumerApplication {

	public static void main(String[] args) {
		SpringApplication.run(LoggingConsumerApplication.class, args);
	}

	@StreamListener(Sink.INPUT)
	public void handle(Person person) {
		System.out.println("Received: " + person);
	}

	public static class Person {
		private String name;
		public String getName() {
			return name;
		}
		public void setName(String name) {
			this.name = name;
		}
		public String toString() {
			return this.name;
		}
	}
}
As you can see from the preceding listing:
-
We have enabled
Sinkbinding (input-no-output) by using@EnableBinding(Sink.class). Doing so signals to the framework to initiate binding to the messaging middleware, where it automatically creates the destination (that is, queue, topic, and others) that are bound to theSink.INPUTchannel. -
We have added a
handlermethod to receive incoming messages of typePerson. Doing so lets you see one of the core features of the framework: It tries to automatically convert incoming message payloads to typePerson.
You now have a fully functional Spring Cloud Stream application that does listens for messages.
From here, for simplicity, we assume you selected RabbitMQ in step one.
Assuming you have RabbitMQ installed and running, you can start the application by running its main method in your IDE.
You should see following output:
	--- [ main] c.s.b.r.p.RabbitExchangeQueueProvisioner : declaring queue for inbound: input.anonymous.CbMIwdkJSBO1ZoPDOtHtCg, bound to: input
	--- [ main] o.s.a.r.c.CachingConnectionFactory       : Attempting to connect to: [localhost:5672]
	--- [ main] o.s.a.r.c.CachingConnectionFactory       : Created new connection: rabbitConnectionFactory#2a3a299:0/SimpleConnection@66c83fc8. . .
	. . .
	--- [ main] o.s.i.a.i.AmqpInboundChannelAdapter      : started inbound.input.anonymous.CbMIwdkJSBO1ZoPDOtHtCg
	. . .
	--- [ main] c.e.l.LoggingConsumerApplication         : Started LoggingConsumerApplication in 2.531 seconds (JVM running for 2.897)
Go to the RabbitMQ management console or any other RabbitMQ client and send a message to input.anonymous.CbMIwdkJSBO1ZoPDOtHtCg.
The anonymous.CbMIwdkJSBO1ZoPDOtHtCg part represents the group name and is generated, so it is bound to be different in your environment.
For something more predictable, you can use an explicit group name by setting spring.cloud.stream.bindings.input.group=hello (or whatever name you like).
The contents of the message should be a JSON representation of the Person class, as follows:
{"name":"Sam Spade"}
Then, in your console, you should see:
Received: Sam Spade
You can also build and package your application into a boot jar (by using ./mvnw clean install) and run the built JAR by using the java -jar command.
Now you have a working (albeit very basic) Spring Cloud Stream application.
What’s New in 2.2?
Spring Cloud Stream introduces a number of new features, enhancements, and changes in addition to the once already introduced in version 2.0
The following sections outline the most notable ones:
Notable Deprecations
As of version 2.2, the following items have been deprecated:
-
The spring-cloud-stream-reactive module is deprecated in favor of native support via Spring Cloud Function programming model.
Notes on migrating from 1.x to 2.x?
-
Due to the improvements in content-type negotiation, the
originalContentTypeheader is not used (ignored) since 2.x and only exists for maintaining compatibility with 1.x versions -
Introduction of
@StreamRetryTemplatequalifier. While configuring custom instance of theRetryTemplateand to avoid conflicts you must qualify the instance of suchRetryTemplatewith this qualifier. See Retry Template for more details.
Introducing Spring Cloud Stream
Spring Cloud Stream is a framework for building message-driven microservice applications. Spring Cloud Stream builds upon Spring Boot to create standalone, production-grade Spring applications and uses Spring Integration to provide connectivity to message brokers. It provides opinionated configuration of middleware from several vendors, introducing the concepts of persistent publish-subscribe semantics, consumer groups, and partitions.
You can add the @EnableBinding annotation to your application to get immediate connectivity to a message broker, and you can add @StreamListener to a method to cause it to receive events for stream processing.
The following example shows a sink application that receives external messages:
@SpringBootApplication
@EnableBinding(Sink.class)
public class VoteRecordingSinkApplication {

  public static void main(String[] args) {
    SpringApplication.run(VoteRecordingSinkApplication.class, args);
  }

  @StreamListener(Sink.INPUT)
  public void processVote(Vote vote) {
      votingService.recordVote(vote);
  }
}
The @EnableBinding annotation takes one or more interfaces as parameters (in this case, the parameter is a single Sink interface).
An interface declares input and output channels.
Spring Cloud Stream provides the Source, Sink, and Processor interfaces. You can also define your own interfaces.
The following listing shows the definition of the Sink interface:
public interface Sink {
  String INPUT = "input";

  @Input(Sink.INPUT)
  SubscribableChannel input();
}
The @Input annotation identifies an input channel, through which received messages enter the application.
The @Output annotation identifies an output channel, through which published messages leave the application.
The @Input and @Output annotations can take a channel name as a parameter.
If a name is not provided, the name of the annotated method is used.
Spring Cloud Stream creates an implementation of the interface for you. You can use this in the application by autowiring it, as shown in the following example (from a test case):
@RunWith(SpringJUnit4ClassRunner.class)
@SpringApplicationConfiguration(classes = VoteRecordingSinkApplication.class)
@WebAppConfiguration
@DirtiesContext
public class StreamApplicationTests {

  @Autowired
  private Sink sink;

  @Test
  public void contextLoads() {
    assertThat(this.sink.input()).isNotNull();
  }
}
Main Concepts
Spring Cloud Stream provides a number of abstractions and primitives that simplify the writing of message-driven microservice applications. This section gives an overview of the following:
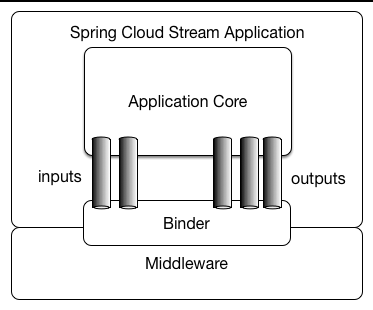
Application Model
A Spring Cloud Stream application consists of a middleware-neutral core. The application communicates with the outside world through input and output channels injected into it by Spring Cloud Stream. Channels are connected to external brokers through middleware-specific Binder implementations.
Fat JAR
Spring Cloud Stream applications can be run in stand-alone mode from your IDE for testing. To run a Spring Cloud Stream application in production, you can create an executable (or “fat”) JAR by using the standard Spring Boot tooling provided for Maven or Gradle. See the Spring Boot Reference Guide for more details.
The Binder Abstraction
Spring Cloud Stream provides Binder implementations for Kafka and Rabbit MQ. Spring Cloud Stream also includes a TestSupportBinder, which leaves a channel unmodified so that tests can interact with channels directly and reliably assert on what is received. You can also use the extensible API to write your own Binder.
Spring Cloud Stream uses Spring Boot for configuration, and the Binder abstraction makes it possible for a Spring Cloud Stream application to be flexible in how it connects to middleware.
For example, deployers can dynamically choose, at runtime, the destinations (such as the Kafka topics or RabbitMQ exchanges) to which channels connect.
Such configuration can be provided through external configuration properties and in any form supported by Spring Boot (including application arguments, environment variables, and application.yml or application.properties files).
In the sink example from the Introducing Spring Cloud Stream section, setting the spring.cloud.stream.bindings.input.destination application property to raw-sensor-data causes it to read from the raw-sensor-data Kafka topic or from a queue bound to the raw-sensor-data RabbitMQ exchange.
Spring Cloud Stream automatically detects and uses a binder found on the classpath. You can use different types of middleware with the same code. To do so, include a different binder at build time. For more complex use cases, you can also package multiple binders with your application and have it choose the binder( and even whether to use different binders for different channels) at runtime.
Persistent Publish-Subscribe Support
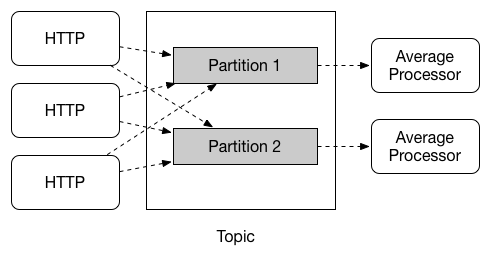
Communication between applications follows a publish-subscribe model, where data is broadcast through shared topics. This can be seen in the following figure, which shows a typical deployment for a set of interacting Spring Cloud Stream applications.
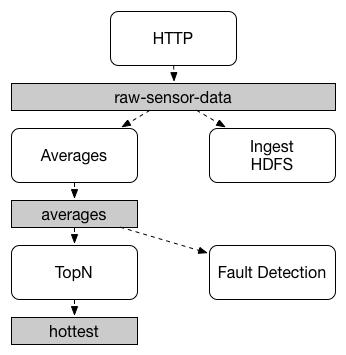
Data reported by sensors to an HTTP endpoint is sent to a common destination named raw-sensor-data.
From the destination, it is independently processed by a microservice application that computes time-windowed averages and by another microservice application that ingests the raw data into HDFS (Hadoop Distributed File System).
In order to process the data, both applications declare the topic as their input at runtime.
The publish-subscribe communication model reduces the complexity of both the producer and the consumer and lets new applications be added to the topology without disruption of the existing flow. For example, downstream from the average-calculating application, you can add an application that calculates the highest temperature values for display and monitoring. You can then add another application that interprets the same flow of averages for fault detection. Doing all communication through shared topics rather than point-to-point queues reduces coupling between microservices.
While the concept of publish-subscribe messaging is not new, Spring Cloud Stream takes the extra step of making it an opinionated choice for its application model. By using native middleware support, Spring Cloud Stream also simplifies use of the publish-subscribe model across different platforms.
Consumer Groups
While the publish-subscribe model makes it easy to connect applications through shared topics, the ability to scale up by creating multiple instances of a given application is equally important. When doing so, different instances of an application are placed in a competing consumer relationship, where only one of the instances is expected to handle a given message.
Spring Cloud Stream models this behavior through the concept of a consumer group.
(Spring Cloud Stream consumer groups are similar to and inspired by Kafka consumer groups.)
Each consumer binding can use the spring.cloud.stream.bindings.<channelName>.group property to specify a group name.
For the consumers shown in the following figure, this property would be set as spring.cloud.stream.bindings.<channelName>.group=hdfsWrite or spring.cloud.stream.bindings.<channelName>.group=average.
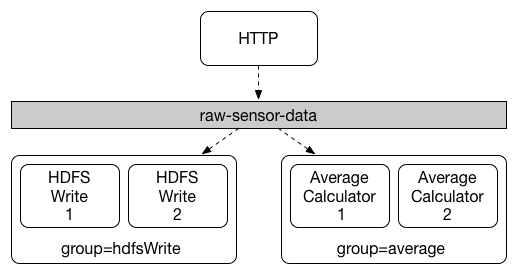
All groups that subscribe to a given destination receive a copy of published data, but only one member of each group receives a given message from that destination. By default, when a group is not specified, Spring Cloud Stream assigns the application to an anonymous and independent single-member consumer group that is in a publish-subscribe relationship with all other consumer groups.
Consumer Types
Two types of consumer are supported:
-
Message-driven (sometimes referred to as Asynchronous)
-
Polled (sometimes referred to as Synchronous)
Prior to version 2.0, only asynchronous consumers were supported. A message is delivered as soon as it is available and a thread is available to process it.
When you wish to control the rate at which messages are processed, you might want to use a synchronous consumer.
Durability
Consistent with the opinionated application model of Spring Cloud Stream, consumer group subscriptions are durable. That is, a binder implementation ensures that group subscriptions are persistent and that, once at least one subscription for a group has been created, the group receives messages, even if they are sent while all applications in the group are stopped.
|
Anonymous subscriptions are non-durable by nature. For some binder implementations (such as RabbitMQ), it is possible to have non-durable group subscriptions. |
In general, it is preferable to always specify a consumer group when binding an application to a given destination. When scaling up a Spring Cloud Stream application, you must specify a consumer group for each of its input bindings. Doing so prevents the application’s instances from receiving duplicate messages (unless that behavior is desired, which is unusual).
Partitioning Support
Spring Cloud Stream provides support for partitioning data between multiple instances of a given application. In a partitioned scenario, the physical communication medium (such as the broker topic) is viewed as being structured into multiple partitions. One or more producer application instances send data to multiple consumer application instances and ensure that data identified by common characteristics are processed by the same consumer instance.
Spring Cloud Stream provides a common abstraction for implementing partitioned processing use cases in a uniform fashion. Partitioning can thus be used whether the broker itself is naturally partitioned (for example, Kafka) or not (for example, RabbitMQ).
Partitioning is a critical concept in stateful processing, where it is critical (for either performance or consistency reasons) to ensure that all related data is processed together. For example, in the time-windowed average calculation example, it is important that all measurements from any given sensor are processed by the same application instance.
| To set up a partitioned processing scenario, you must configure both the data-producing and the data-consuming ends. |
Programming Model
To understand the programming model, you should be familiar with the following core concepts:
-
Destination Binders: Components responsible to provide integration with the external messaging systems.
-
Destination Bindings: Bridge between the external messaging systems and application provided Producers and Consumers of messages (created by the Destination Binders).
-
Message: The canonical data structure used by producers and consumers to communicate with Destination Binders (and thus other applications via external messaging systems).
Destination Binders
Destination Binders are extension components of Spring Cloud Stream responsible for providing the necessary configuration and implementation to facilitate integration with external messaging systems. This integration is responsible for connectivity, delegation, and routing of messages to and from producers and consumers, data type conversion, invocation of the user code, and more.
Binders handle a lot of the boiler plate responsibilities that would otherwise fall on your shoulders. However, to accomplish that, the binder still needs some help in the form of minimalistic yet required set of instructions from the user, which typically come in the form of some type of configuration.
While it is out of scope of this section to discuss all of the available binder and binding configuration options (the rest of the manual covers them extensively), Destination Binding does require special attention. The next section discusses it in detail.
Destination Bindings
As stated earlier, Destination Bindings provide a bridge between the external messaging system and application-provided Producers and Consumers.
Applying the @EnableBinding annotation to one of the application’s configuration classes defines a destination binding.
The @EnableBinding annotation itself is meta-annotated with @Configuration and triggers the configuration of the Spring Cloud Stream infrastructure.
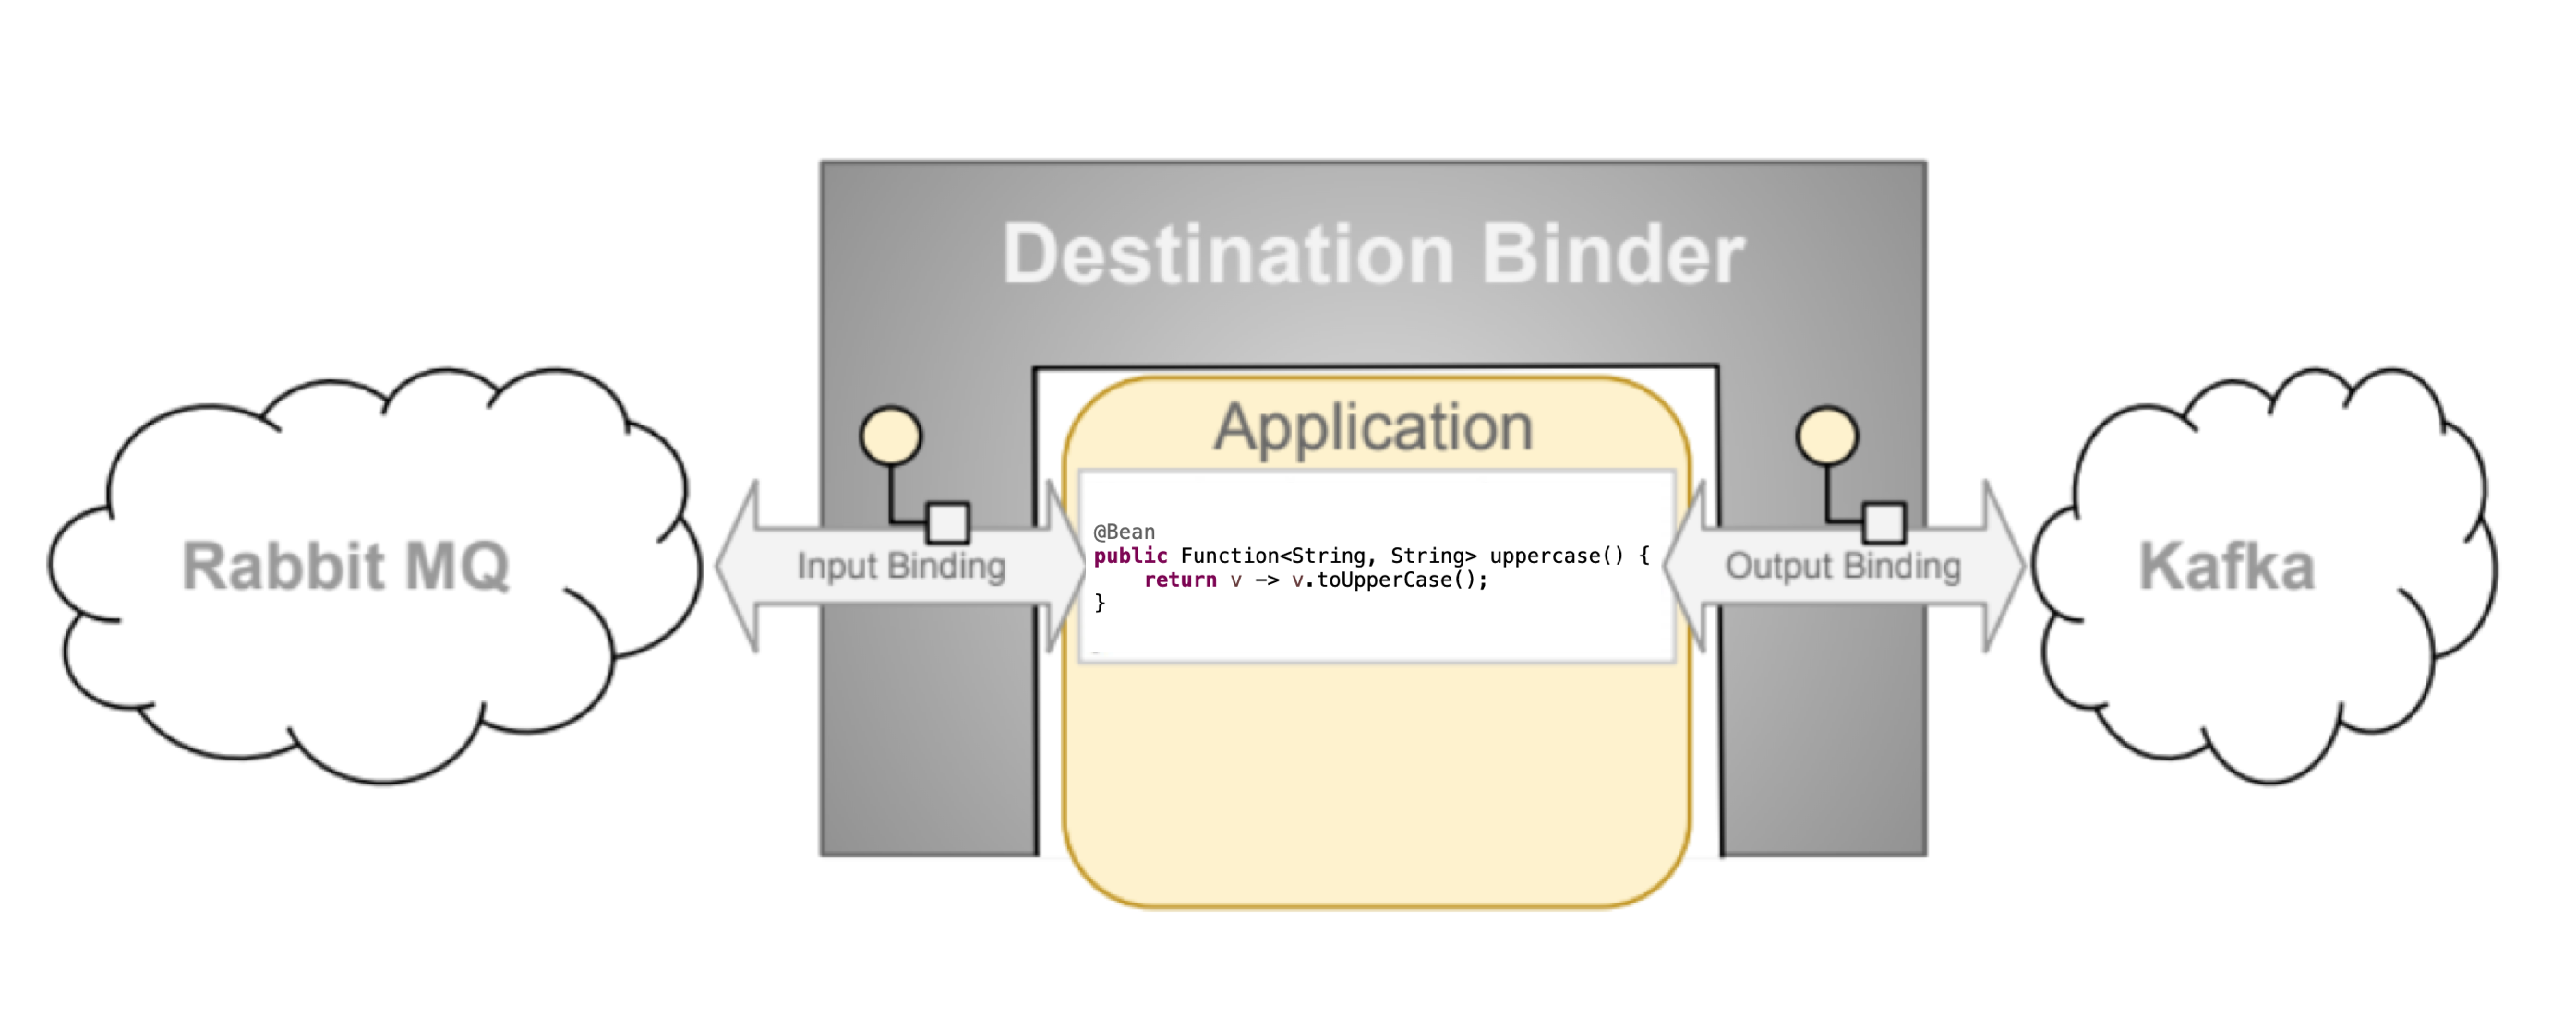
The following example shows a fully configured and functioning Spring Cloud Stream application that receives the payload of the message from the INPUT
destination as a String type (see Content Type Negotiation section), logs it to the console and sends it to the OUTPUT destination after converting it to upper case.
@SpringBootApplication
@EnableBinding(Processor.class)
public class MyApplication {

	public static void main(String[] args) {
		SpringApplication.run(MyApplication.class, args);
	}

	@StreamListener(Processor.INPUT)
	@SendTo(Processor.OUTPUT)
	public String handle(String value) {
		System.out.println("Received: " + value);
		return value.toUpperCase();
	}
}
As you can see the @EnableBinding annotation can take one or more interface classes as parameters. The parameters are referred to as bindings,
and they contain methods representing bindable components.
These components are typically message channels (see Spring Messaging)
for channel-based binders (such as Rabbit, Kafka, and others). However other types of bindings can
provide support for the native features of the corresponding technology. For example Kafka Streams binder (formerly known as KStream) allows native bindings directly to Kafka Streams
(see Kafka Binder for more details).
Spring Cloud Stream already provides binding interfaces for typical message exchange contracts, which include:
-
Sink: Identifies the contract for the message consumer by providing the destination from which the message is consumed.
-
Source: Identifies the contract for the message producer by providing the destination to which the produced message is sent.
-
Processor: Encapsulates both the sink and the source contracts by exposing two destinations that allow consumption and production of messages.
public interface Sink {

  String INPUT = "input";

  @Input(Sink.INPUT)
  SubscribableChannel input();
}
public interface Source {
String OUTPUT = "output";
@Output(Source.OUTPUT)
MessageChannel output();
}public interface Processor extends Source, Sink {}While the preceding example satisfies the majority of cases, you can also define your own contracts by defining your own bindings interfaces and use @Input and @Output
annotations to identify the actual bindable components.
For example:
public interface Barista {

    @Input
    SubscribableChannel orders();

    @Output
    MessageChannel hotDrinks();

    @Output
    MessageChannel coldDrinks();
}
Using the interface shown in the preceding example as a parameter to @EnableBinding triggers the creation of the three bound channels named orders, hotDrinks, and coldDrinks,
respectively.
You can provide as many binding interfaces as you need, as arguments to the @EnableBinding annotation, as shown in the following example:
@EnableBinding(value = { Orders.class, Payment.class })In Spring Cloud Stream, the bindable MessageChannel components are the Spring Messaging MessageChannel (for outbound) and its extension, SubscribableChannel,
(for inbound).
Pollable Destination Binding
While the previously described bindings support event-based message consumption, sometimes you need more control, such as rate of consumption.
Starting with version 2.0, you can now bind a pollable consumer:
The following example shows how to bind a pollable consumer:
public interface PolledBarista {

    @Input
    PollableMessageSource orders();
	. . .
}
In this case, an implementation of PollableMessageSource is bound to the orders “channel”. See Using Polled Consumers for more details.
Customizing Channel Names
By using the @Input and @Output annotations, you can specify a customized channel name for the channel, as shown in the following example:
public interface Barista {
    @Input("inboundOrders")
    SubscribableChannel orders();
}
In the preceding example, the created bound channel is named inboundOrders.
Normally, you need not access individual channels or bindings directly (other then configuring them via @EnableBinding annotation). However there may be
times, such as testing or other corner cases, when you do.
Aside from generating channels for each binding and registering them as Spring beans, for each bound interface, Spring Cloud Stream generates a bean that implements the interface. That means you can have access to the interfaces representing the bindings or individual channels by auto-wiring either in your application, as shown in the following two examples:
Autowire Binding interface
@Autowire
private Source source

public void sayHello(String name) {
    source.output().send(MessageBuilder.withPayload(name).build());
}
Autowire individual channel
@Autowire
private MessageChannel output;

public void sayHello(String name) {
    output.send(MessageBuilder.withPayload(name).build());
}
You can also use standard Spring’s @Qualifier annotation for cases when channel names are customized or in multiple-channel scenarios that require specifically named channels.
The following example shows how to use the @Qualifier annotation in this way:
@Autowire
@Qualifier("myChannel")
private MessageChannel output;
Producing and Consuming Messages
You can write a Spring Cloud Stream application by using either Spring Integration annotations or Spring Cloud Stream native annotation.
Spring Integration Support
Spring Cloud Stream is built on the concepts and patterns defined by Enterprise Integration Patterns and relies in its internal implementation on an already established and popular implementation of Enterprise Integration Patterns within the Spring portfolio of projects: Spring Integration framework.
So its only natural for it to support the foundation, semantics, and configuration options that are already established by Spring Integration
For example, you can attach the output channel of a Source to a MessageSource and use the familiar @InboundChannelAdapter annotation, as follows:
@EnableBinding(Source.class)
public class TimerSource {

  @Bean
  @InboundChannelAdapter(value = Source.OUTPUT, poller = @Poller(fixedDelay = "10", maxMessagesPerPoll = "1"))
  public MessageSource<String> timerMessageSource() {
    return () -> new GenericMessage<>("Hello Spring Cloud Stream");
  }
}
Similarly, you can use @Transformer or @ServiceActivator while providing an implementation of a message handler method for a Processor binding contract, as shown in the following example:
@EnableBinding(Processor.class)
public class TransformProcessor {
  @Transformer(inputChannel = Processor.INPUT, outputChannel = Processor.OUTPUT)
  public Object transform(String message) {
    return message.toUpperCase();
  }
}
While this may be skipping ahead a bit, it is important to understand that, when you consume from the same binding using @StreamListener annotation, a pub-sub model is used.
Each method annotated with @StreamListener receives its own copy of a message, and each one has its own consumer group.
However, if you consume from the same binding by using one of the Spring Integration annotation (such as @Aggregator, @Transformer, or @ServiceActivator), those consume in a competing model.
No individual consumer group is created for each subscription.
|
Using @StreamListener Annotation
Complementary to its Spring Integration support, Spring Cloud Stream provides its own @StreamListener annotation, modeled after other Spring Messaging annotations
(@MessageMapping, @JmsListener, @RabbitListener, and others) and provides conviniences, such as content-based routing and others.
@EnableBinding(Sink.class)
public class VoteHandler {

  @Autowired
  VotingService votingService;

  @StreamListener(Sink.INPUT)
  public void handle(Vote vote) {
    votingService.record(vote);
  }
}
As with other Spring Messaging methods, method arguments can be annotated with @Payload, @Headers, and @Header.
For methods that return data, you must use the @SendTo annotation to specify the output binding destination for data returned by the method, as shown in the following example:
@EnableBinding(Processor.class)
public class TransformProcessor {

  @Autowired
  VotingService votingService;

  @StreamListener(Processor.INPUT)
  @SendTo(Processor.OUTPUT)
  public VoteResult handle(Vote vote) {
    return votingService.record(vote);
  }
}
Using @StreamListener for Content-based routing
Spring Cloud Stream supports dispatching messages to multiple handler methods annotated with @StreamListener based on conditions.
In order to be eligible to support conditional dispatching, a method must satisfy the follow conditions:
-
It must not return a value.
-
It must be an individual message handling method (reactive API methods are not supported).
The condition is specified by a SpEL expression in the condition argument of the annotation and is evaluated for each message.
All the handlers that match the condition are invoked in the same thread, and no assumption must be made about the order in which the invocations take place.
In the following example of a @StreamListener with dispatching conditions, all the messages bearing a header type with the value bogey are dispatched to the
receiveBogey method, and all the messages bearing a header type with the value bacall are dispatched to the receiveBacall method.
@EnableBinding(Sink.class)
@EnableAutoConfiguration
public static class TestPojoWithAnnotatedArguments {

    @StreamListener(target = Sink.INPUT, condition = "headers['type']=='bogey'")
    public void receiveBogey(@Payload BogeyPojo bogeyPojo) {
       // handle the message
    }

    @StreamListener(target = Sink.INPUT, condition = "headers['type']=='bacall'")
    public void receiveBacall(@Payload BacallPojo bacallPojo) {
       // handle the message
    }
}
Content Type Negotiation in the Context of condition
It is important to understand some of the mechanics behind content-based routing using the condition argument of @StreamListener, especially in the context of the type of the message as a whole.
It may also help if you familiarize yourself with the Content Type Negotiation before you proceed.
Consider the following scenario:
@EnableBinding(Sink.class)
@EnableAutoConfiguration
public static class CatsAndDogs {

    @StreamListener(target = Sink.INPUT, condition = "payload.class.simpleName=='Dog'")
    public void bark(Dog dog) {
       // handle the message
    }

    @StreamListener(target = Sink.INPUT, condition = "payload.class.simpleName=='Cat'")
    public void purr(Cat cat) {
       // handle the message
    }
}
The preceding code is perfectly valid. It compiles and deploys without any issues, yet it never produces the result you expect.
That is because you are testing something that does not yet exist in a state you expect. That is because the payload of the message is not yet converted from the
wire format (byte[]) to the desired type.
In other words, it has not yet gone through the type conversion process described in the Content Type Negotiation.
So, unless you use a SPeL expression that evaluates raw data (for example, the value of the first byte in the byte array), use message header-based expressions
(such as condition = "headers['type']=='dog'").
At the moment, dispatching through @StreamListener conditions is supported only for channel-based binders (not for reactive programming)
support.
|
Spring Cloud Function support
Since Spring Cloud Stream v2.1, another alternative for defining stream handlers and sources is to use build-in
support for Spring Cloud Function where they can be expressed as beans of
type java.util.function.[Supplier/Function/Consumer].
To specify which functional bean to bind to the external destination(s) exposed by the bindings, you must provide spring.cloud.stream.function.definition property.
Here is the example of the Processor application exposing message handler as java.util.function.Function
@SpringBootApplication
@EnableBinding(Processor.class)
public class MyFunctionBootApp {

	public static void main(String[] args) {
		SpringApplication.run(MyFunctionBootApp.class, "--spring.cloud.stream.function.definition=toUpperCase");
	}

	@Bean
	public Function<String, String> toUpperCase() {
		return s -> s.toUpperCase();
	}
}
In the above you we simply define a bean of type java.util.function.Function called toUpperCase and identify it as a bean to be used as message handler
whose 'input' and 'output' must be bound to the external destinations exposed by the Processor binding.
Below are the examples of simple functional applications to support Source, Processor and Sink.
Here is the example of a Source application defined as java.util.function.Supplier
@SpringBootApplication
@EnableBinding(Source.class)
public static class SourceFromSupplier {
	public static void main(String[] args) {
		SpringApplication.run(SourceFromSupplier.class, "--spring.cloud.stream.function.definition=date");
	}
	@Bean
	public Supplier<Date> date() {
		return () -> new Date(12345L);
	}
}
Here is the example of a Processor application defined as java.util.function.Function
@SpringBootApplication
@EnableBinding(Processor.class)
public static class ProcessorFromFunction {
	public static void main(String[] args) {
		SpringApplication.run(ProcessorFromFunction.class, "--spring.cloud.stream.function.definition=toUpperCase");
	}
	@Bean
	public Function<String, String> toUpperCase() {
		return s -> s.toUpperCase();
	}
}
Here is the example of a Sink application defined as java.util.function.Consumer
@EnableAutoConfiguration
@EnableBinding(Sink.class)
public static class SinkFromConsumer {
	public static void main(String[] args) {
		SpringApplication.run(SinkFromConsumer.class, "--spring.cloud.stream.function.definition=sink");
	}
	@Bean
	public Consumer<String> sink() {
		return System.out::println;
	}
}
Reactive Functions support
Since Spring Cloud Function is build on top of Project Reactor there isn’t much you need to do
to benefit from reactive programming model while implementing Supplier, Function or Consumer.
For example:
@EnableAutoConfiguration
@EnableBinding(Processor.class)
public static class SinkFromConsumer {
	public static void main(String[] args) {
		SpringApplication.run(SinkFromConsumer.class, "--spring.cloud.stream.function.definition=reactiveUpperCase");
	}
	@Bean
	public Function<Flux<String>, Flux<String>> reactiveUpperCase() {
		return flux -> flux.map(val -> val.toUpperCase());
	}
}
Functional Composition
Using this programming model you can also benefit from functional composition where you can dynamically compose complex handlers from a set of simple functions. As an example let’s add the following function bean to the application defined above
@Bean
public Function<String, String> wrapInQuotes() {
	return s -> "\"" + s + "\"";
}
and modify the spring.cloud.stream.function.definition property to reflect your intention to compose a new function from both ‘toUpperCase’ and ‘wrapInQuotes’.
To do that Spring Cloud Function allows you to use | (pipe) symbol. So to finish our example our property will now look like this:
--spring.cloud.stream.function.definition=toUpperCase|wrapInQuotes| One of the great benefits of functional composition support provided by Spring Cloud Function is the fact that you can compose reactive and imperative functions. |
For example, the above composition could be defined as such (if both functions present):
--spring.cloud.stream.function.definition=reactiveUpperCase|wrapInQuotesUsing Polled Consumers
Overview
When using polled consumers, you poll the PollableMessageSource on demand.
Consider the following example of a polled consumer:
public interface PolledConsumer {

    @Input
    PollableMessageSource destIn();

    @Output
    MessageChannel destOut();

}
Given the polled consumer in the preceding example, you might use it as follows:
@Bean
public ApplicationRunner poller(PollableMessageSource destIn, MessageChannel destOut) {
    return args -> {
        while (someCondition()) {
            try {
                if (!destIn.poll(m -> {
                    String newPayload = ((String) m.getPayload()).toUpperCase();
                    destOut.send(new GenericMessage<>(newPayload));
                })) {
                    Thread.sleep(1000);
                }
            }
            catch (Exception e) {
                // handle failure
            }
        }
    };
}
A less manual and more Spring-like alternative would be to configure a scheduled task bean. For example,
@Scheduled(fixedDelay = 5_000)
public void poll() {
	System.out.println("Polling...");
	this.source.poll(m -> {
		System.out.println(m.getPayload());

	}, new ParameterizedTypeReference<Foo>() { });
}
The PollableMessageSource.poll() method takes a MessageHandler argument (often a lambda expression, as shown here).
It returns true if the message was received and successfully processed.
As with message-driven consumers, if the MessageHandler throws an exception, messages are published to error channels,
as discussed in Error Handling.
Normally, the poll() method acknowledges the message when the MessageHandler exits.
If the method exits abnormally, the message is rejected (not re-queued), but see Handling Errors.
You can override that behavior by taking responsibility for the acknowledgment, as shown in the following example:
@Bean
public ApplicationRunner poller(PollableMessageSource dest1In, MessageChannel dest2Out) {
    return args -> {
        while (someCondition()) {
            if (!dest1In.poll(m -> {
                StaticMessageHeaderAccessor.getAcknowledgmentCallback(m).noAutoAck();
                // e.g. hand off to another thread which can perform the ack
                // or acknowledge(Status.REQUEUE)

            })) {
                Thread.sleep(1000);
            }
        }
    };
}
You must ack (or nack) the message at some point, to avoid resource leaks.
|
Some messaging systems (such as Apache Kafka) maintain a simple offset in a log. If a delivery fails and is re-queued with StaticMessageHeaderAccessor.getAcknowledgmentCallback(m).acknowledge(Status.REQUEUE);, any later successfully ack’d messages are redelivered.
|
There is also an overloaded poll method, for which the definition is as follows:
poll(MessageHandler handler, ParameterizedTypeReference<?> type)The type is a conversion hint that allows the incoming message payload to be converted, as shown in the following example:
boolean result = pollableSource.poll(received -> {
			Map<String, Foo> payload = (Map<String, Foo>) received.getPayload();
            ...

		}, new ParameterizedTypeReference<Map<String, Foo>>() {});
Handling Errors
By default, an error channel is configured for the pollable source; if the callback throws an exception, an ErrorMessage is sent to the error channel (<destination>.<group>.errors); this error channel is also bridged to the global Spring Integration errorChannel.
You can subscribe to either error channel with a @ServiceActivator to handle errors; without a subscription, the error will simply be logged and the message will be acknowledged as successful.
If the error channel service activator throws an exception, the message will be rejected (by default) and won’t be redelivered.
If the service activator throws a RequeueCurrentMessageException, the message will be requeued at the broker and will be again retrieved on a subsequent poll.
If the listener throws a RequeueCurrentMessageException directly, the message will be requeued, as discussed above, and will not be sent to the error channels.
Error Handling
Errors happen, and Spring Cloud Stream provides several flexible mechanisms to handle them. The error handling comes in two flavors:
-
application: The error handling is done within the application (custom error handler).
-
system: The error handling is delegated to the binder (re-queue, DL, and others). Note that the techniques are dependent on binder implementation and the capability of the underlying messaging middleware.
Spring Cloud Stream uses the Spring Retry library to facilitate successful message processing. See Retry Template for more details. However, when all fails, the exceptions thrown by the message handlers are propagated back to the binder. At that point, binder invokes custom error handler or communicates the error back to the messaging system (re-queue, DLQ, and others).
Application Error Handling
There are two types of application-level error handling. Errors can be handled at each binding subscription or a global handler can handle all the binding subscription errors. Let’s review the details.
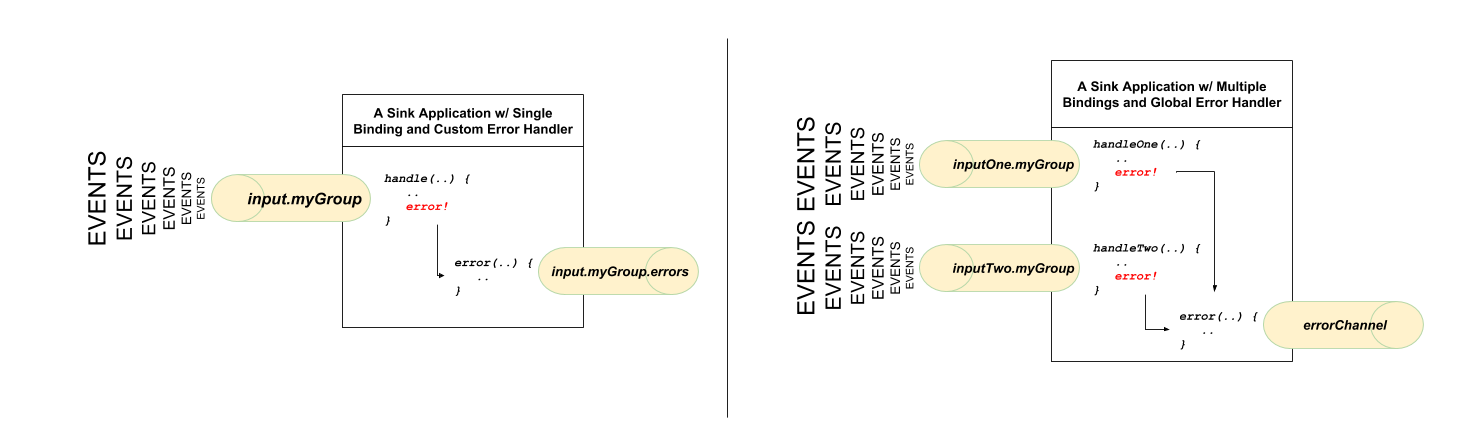
For each input binding, Spring Cloud Stream creates a dedicated error channel with the following semantics <destinationName>.errors.
The <destinationName> consists of the name of the binding (such as input) and the name of the group (such as myGroup).
|
Consider the following:
spring.cloud.stream.bindings.input.group=myGroup@StreamListener(Sink.INPUT) // destination name 'input.myGroup'
public void handle(Person value) {
throw new RuntimeException("BOOM!");
}
@ServiceActivator(inputChannel = Processor.INPUT + ".myGroup.errors") //channel name 'input.myGroup.errors'
public void error(Message<?> message) {
System.out.println("Handling ERROR: " + message);
}In the preceding example the destination name is input.myGroup and the dedicated error channel name is input.myGroup.errors.
| The use of @StreamListener annotation is intended specifically to define bindings that bridge internal channels and external destinations. Given that the destination specific error channel does NOT have an associated external destination, such channel is a prerogative of Spring Integration (SI). This means that the handler for such destination must be defined using one of the SI handler annotations (i.e., @ServiceActivator, @Transformer etc.). |
If group is not specified anonymous group is used (something like input.anonymous.2K37rb06Q6m2r51-SPIDDQ), which is not suitable for error
handling scenarious, since you don’t know what it’s going to be until the destination is created.
|
Also, in the event you are binding to the existing destination such as:
spring.cloud.stream.bindings.input.destination=myFooDestination
spring.cloud.stream.bindings.input.group=myGroup
the full destination name is myFooDestination.myGroup and then the dedicated error channel name is myFooDestination.myGroup.errors.
Back to the example…
The handle(..) method, which subscribes to the channel named input, throws an exception. Given there is also a subscriber to the error channel input.myGroup.errors
all error messages are handled by this subscriber.
If you have multiple bindings, you may want to have a single error handler. Spring Cloud Stream automatically provides support for
a global error channel by bridging each individual error channel to the channel named errorChannel, allowing a single subscriber to handle all errors,
as shown in the following example:
@StreamListener("errorChannel")
public void error(Message<?> message) {
	System.out.println("Handling ERROR: " + message);
}
This may be a convenient option if error handling logic is the same regardless of which handler produced the error.
System Error Handling
System-level error handling implies that the errors are communicated back to the messaging system and, given that not every messaging system is the same, the capabilities may differ from binder to binder.
That said, in this section we explain the general idea behind system level error handling and use Rabbit binder as an example. NOTE: Kafka binder provides similar support, although some configuration properties do differ. Also, for more details and configuration options, see the individual binder’s documentation.
If no internal error handlers are configured, the errors propagate to the binders, and the binders subsequently propagate those errors back to the messaging system. Depending on the capabilities of the messaging system such a system may drop the message, re-queue the message for re-processing or send the failed message to DLQ. Both Rabbit and Kafka support these concepts. However, other binders may not, so refer to your individual binder’s documentation for details on supported system-level error-handling options.
Drop Failed Messages
By default, if no additional system-level configuration is provided, the messaging system drops the failed message. While acceptable in some cases, for most cases, it is not, and we need some recovery mechanism to avoid message loss.
DLQ - Dead Letter Queue
DLQ allows failed messages to be sent to a special destination: - Dead Letter Queue.
When configured, failed messages are sent to this destination for subsequent re-processing or auditing and reconciliation.
For example, continuing on the previous example and to set up the DLQ with Rabbit binder, you need to set the following property:
spring.cloud.stream.rabbit.bindings.input.consumer.auto-bind-dlq=trueKeep in mind that, in the above property, input corresponds to the name of the input destination binding.
The consumer indicates that it is a consumer property and auto-bind-dlq instructs the binder to configure DLQ for input
destination, which results in an additional Rabbit queue named input.myGroup.dlq.
Once configured, all failed messages are routed to this queue with an error message similar to the following:
delivery_mode:	1
headers:
x-death:
count:	1
reason:	rejected
queue:	input.hello
time:	1522328151
exchange:
routing-keys:	input.myGroup
Payload {"name”:"Bob"}
As you can see from the above, your original message is preserved for further actions.
However, one thing you may have noticed is that there is limited information on the original issue with the message processing. For example, you do not see a stack trace corresponding to the original error. To get more relevant information about the original error, you must set an additional property:
spring.cloud.stream.rabbit.bindings.input.consumer.republish-to-dlq=trueDoing so forces the internal error handler to intercept the error message and add additional information to it before publishing it to DLQ. Once configured, you can see that the error message contains more information relevant to the original error, as follows:
delivery_mode:	2
headers:
x-original-exchange:
x-exception-message:	has an error
x-original-routingKey:	input.myGroup
x-exception-stacktrace:	org.springframework.messaging.MessageHandlingException: nested exception is
      org.springframework.messaging.MessagingException: has an error, failedMessage=GenericMessage [payload=byte[15],
      headers={amqp_receivedDeliveryMode=NON_PERSISTENT, amqp_receivedRoutingKey=input.hello, amqp_deliveryTag=1,
      deliveryAttempt=3, amqp_consumerQueue=input.hello, amqp_redelivered=false, id=a15231e6-3f80-677b-5ad7-d4b1e61e486e,
      amqp_consumerTag=amq.ctag-skBFapilvtZhDsn0k3ZmQg, contentType=application/json, timestamp=1522327846136}]
      at org.spring...integ...han...MethodInvokingMessageProcessor.processMessage(MethodInvokingMessageProcessor.java:107)
      at. . . . .
Payload {"name”:"Bob"}
This effectively combines application-level and system-level error handling to further assist with downstream troubleshooting mechanics.
Re-queue Failed Messages
As mentioned earlier, the currently supported binders (Rabbit and Kafka) rely on RetryTemplate to facilitate successful message processing. See Retry Template for details.
However, for cases when max-attempts property is set to 1, internal reprocessing of the message is disabled. At this point, you can facilitate message re-processing (re-tries)
by instructing the messaging system to re-queue the failed message. Once re-queued, the failed message is sent back to the original handler, essentially creating a retry loop.
This option may be feasible for cases where the nature of the error is related to some sporadic yet short-term unavailability of some resource.
To accomplish that, you must set the following properties:
spring.cloud.stream.bindings.input.consumer.max-attempts=1
spring.cloud.stream.rabbit.bindings.input.consumer.requeue-rejected=true
In the preceding example, the max-attempts set to 1 essentially disabling internal re-tries and requeue-rejected (short for requeue rejected messages) is set to true.
Once set, the failed message is resubmitted to the same handler and loops continuously or until the handler throws AmqpRejectAndDontRequeueException
essentially allowing you to build your own re-try logic within the handler itself.
Retry Template
The RetryTemplate is part of the Spring Retry library.
While it is out of scope of this document to cover all of the capabilities of the RetryTemplate, we will mention the following consumer properties that are specifically related to
the RetryTemplate:
- maxAttempts
-
The number of attempts to process the message.
Default: 3.
- backOffInitialInterval
-
The backoff initial interval on retry.
Default 1000 milliseconds.
- backOffMaxInterval
-
The maximum backoff interval.
Default 10000 milliseconds.
- backOffMultiplier
-
The backoff multiplier.
Default 2.0.
- defaultRetryable
-
Whether exceptions thrown by the listener that are not listed in the
retryableExceptionsare retryable.Default:
true. - retryableExceptions
-
A map of Throwable class names in the key and a boolean in the value. Specify those exceptions (and subclasses) that will or won’t be retried. Also see
defaultRetriable. Example:spring.cloud.stream.bindings.input.consumer.retryable-exceptions.java.lang.IllegalStateException=false.Default: empty.
While the preceding settings are sufficient for majority of the customization requirements, they may not satisfy certain complex requirements at, which
point you may want to provide your own instance of the RetryTemplate. To do so configure it as a bean in your application configuration. The application provided
instance will override the one provided by the framework. Also, to avoid conflicts you must qualify the instance of the RetryTemplate you want to be used by the binder
as @StreamRetryTemplate. For example,
@StreamRetryTemplate
public RetryTemplate myRetryTemplate() {
    return new RetryTemplate();
}
As you can see from the above example you don’t need to annotate it with @Bean since @StreamRetryTemplate is a qualified @Bean.
If you need to be more precise with your RetryTemplate, you can specify the bean by name in your ConsumerProperties to associate
the specific retry bean per binding.
spring.cloud.stream.bindings.<foo>.consumer.retry-template-name=<your-retry-template-bean-name>Binders
Spring Cloud Stream provides a Binder abstraction for use in connecting to physical destinations at the external middleware. This section provides information about the main concepts behind the Binder SPI, its main components, and implementation-specific details.
Producers and Consumers
The following image shows the general relationship of producers and consumers:
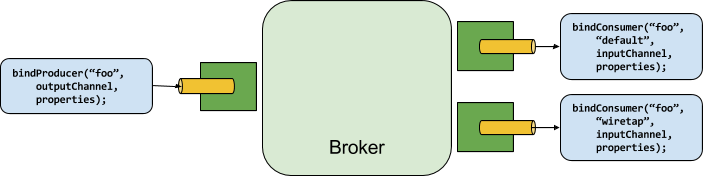
A producer is any component that sends messages to a channel.
The channel can be bound to an external message broker with a Binder implementation for that broker.
When invoking the bindProducer() method, the first parameter is the name of the destination within the broker, the second parameter is the local channel instance to which the producer sends messages, and the third parameter contains properties (such as a partition key expression) to be used within the adapter that is created for that channel.
A consumer is any component that receives messages from a channel.
As with a producer, the consumer’s channel can be bound to an external message broker.
When invoking the bindConsumer() method, the first parameter is the destination name, and a second parameter provides the name of a logical group of consumers.
Each group that is represented by consumer bindings for a given destination receives a copy of each message that a producer sends to that destination (that is, it follows normal publish-subscribe semantics).
If there are multiple consumer instances bound with the same group name, then messages are load-balanced across those consumer instances so that each message sent by a producer is consumed by only a single consumer instance within each group (that is, it follows normal queueing semantics).
Binder SPI
The Binder SPI consists of a number of interfaces, out-of-the box utility classes, and discovery strategies that provide a pluggable mechanism for connecting to external middleware.
The key point of the SPI is the Binder interface, which is a strategy for connecting inputs and outputs to external middleware. The following listing shows the definnition of the Binder interface:
public interface Binder<T, C extends ConsumerProperties, P extends ProducerProperties> {
    Binding<T> bindConsumer(String name, String group, T inboundBindTarget, C consumerProperties);

    Binding<T> bindProducer(String name, T outboundBindTarget, P producerProperties);
}
The interface is parameterized, offering a number of extension points:
-
Input and output bind targets. As of version 1.0, only
MessageChannelis supported, but this is intended to be used as an extension point in the future. -
Extended consumer and producer properties, allowing specific Binder implementations to add supplemental properties that can be supported in a type-safe manner.
A typical binder implementation consists of the following:
-
A class that implements the
Binderinterface; -
A Spring
@Configurationclass that creates a bean of typeBinderalong with the middleware connection infrastructure. -
A
META-INF/spring.bindersfile found on the classpath containing one or more binder definitions, as shown in the following example:kafka:\ org.springframework.cloud.stream.binder.kafka.config.KafkaBinderConfiguration
Binder Detection
Spring Cloud Stream relies on implementations of the Binder SPI to perform the task of connecting channels to message brokers. Each Binder implementation typically connects to one type of messaging system.
Classpath Detection
By default, Spring Cloud Stream relies on Spring Boot’s auto-configuration to configure the binding process. If a single Binder implementation is found on the classpath, Spring Cloud Stream automatically uses it. For example, a Spring Cloud Stream project that aims to bind only to RabbitMQ can add the following dependency:
<dependency>
  <groupId>org.springframework.cloud</groupId>
  <artifactId>spring-cloud-stream-binder-rabbit</artifactId>
</dependency>
For the specific Maven coordinates of other binder dependencies, see the documentation of that binder implementation.
Multiple Binders on the Classpath
When multiple binders are present on the classpath, the application must indicate which binder is to be used for each channel binding.
Each binder configuration contains a META-INF/spring.binders file, which is a simple properties file, as shown in the following example:
rabbit:\
org.springframework.cloud.stream.binder.rabbit.config.RabbitServiceAutoConfiguration
Similar files exist for the other provided binder implementations (such as Kafka), and custom binder implementations are expected to provide them as well.
The key represents an identifying name for the binder implementation, whereas the value is a comma-separated list of configuration classes that each contain one and only one bean definition of type org.springframework.cloud.stream.binder.Binder.
Binder selection can either be performed globally, using the spring.cloud.stream.defaultBinder property (for example, spring.cloud.stream.defaultBinder=rabbit) or individually, by configuring the binder on each channel binding.
For instance, a processor application (that has channels named input and output for read and write respectively) that reads from Kafka and writes to RabbitMQ can specify the following configuration:
spring.cloud.stream.bindings.input.binder=kafka
spring.cloud.stream.bindings.output.binder=rabbit
Connecting to Multiple Systems
By default, binders share the application’s Spring Boot auto-configuration, so that one instance of each binder found on the classpath is created. If your application should connect to more than one broker of the same type, you can specify multiple binder configurations, each with different environment settings.
Turning on explicit binder configuration disables the default binder configuration process altogether.
If you do so, all binders in use must be included in the configuration.
Frameworks that intend to use Spring Cloud Stream transparently may create binder configurations that can be referenced by name, but they do not affect the default binder configuration.
In order to do so, a binder configuration may have its defaultCandidate flag set to false (for example, spring.cloud.stream.binders.<configurationName>.defaultCandidate=false).
This denotes a configuration that exists independently of the default binder configuration process.
|
The following example shows a typical configuration for a processor application that connects to two RabbitMQ broker instances:
spring:
  cloud:
    stream:
      bindings:
        input:
          destination: thing1
          binder: rabbit1
        output:
          destination: thing2
          binder: rabbit2
      binders:
        rabbit1:
          type: rabbit
          environment:
            spring:
              rabbitmq:
                host: <host1>
        rabbit2:
          type: rabbit
          environment:
            spring:
              rabbitmq:
                host: <host2>
The environment property of the particular binder can also be used for any Spring Boot property,
including this spring.main.sources which can be useful for adding additional configurations for the
particular binders, e.g. overriding auto-configured beans.
|
For example;
environment:
    spring:
        main:
           sources: com.acme.config.MyCustomBinderConfiguration
To activate a specific profile for the particular binder environment, you should use a spring.profiles.active property:
environment:
    spring:
        profiles:
           active: myBinderProfile
Binding visualization and control
Since version 2.0, Spring Cloud Stream supports visualization and control of the Bindings through Actuator endpoints.
Starting with version 2.0 actuator and web are optional, you must first add one of the web dependencies as well as add the actuator dependency manually. The following example shows how to add the dependency for the Web framework:
<dependency>
     <groupId>org.springframework.boot</groupId>
     <artifactId>spring-boot-starter-web</artifactId>
</dependency>
The following example shows how to add the dependency for the WebFlux framework:
<dependency>
       <groupId>org.springframework.boot</groupId>
       <artifactId>spring-boot-starter-webflux</artifactId>
</dependency>
You can add the Actuator dependency as follows:
<dependency>
    <groupId>org.springframework.boot</groupId>
    <artifactId>spring-boot-starter-actuator</artifactId>
</dependency>
To run Spring Cloud Stream 2.0 apps in Cloud Foundry, you must add spring-boot-starter-web and spring-boot-starter-actuator to the classpath. Otherwise, the
application will not start due to health check failures.
|
You must also enable the bindings actuator endpoints by setting the following property: --management.endpoints.web.exposure.include=bindings.
Once those prerequisites are satisfied. you should see the following in the logs when application start:
: Mapped "{[/actuator/bindings/{name}],methods=[POST]. . .
: Mapped "{[/actuator/bindings],methods=[GET]. . .
: Mapped "{[/actuator/bindings/{name}],methods=[GET]. . .
To visualize the current bindings, access the following URL:
http://<host>:<port>/actuator/bindings
Alternative, to see a single binding, access one of the URLs similar to the following:
http://<host>:<port>/actuator/bindings/<bindingName>;
You can also stop, start, pause, and resume individual bindings by posting to the same URL while providing a state argument as JSON, as shown in the following examples:
curl -d '{"state":"STOPPED"}' -H "Content-Type: application/json" -X POST http://<host>:<port>/actuator/bindings/myBindingName
curl -d '{"state":"STARTED"}' -H "Content-Type: application/json" -X POST http://<host>:<port>/actuator/bindings/myBindingName
curl -d '{"state":"PAUSED"}' -H "Content-Type: application/json" -X POST http://<host>:<port>/actuator/bindings/myBindingName
curl -d '{"state":"RESUMED"}' -H "Content-Type: application/json" -X POST http://<host>:<port>/actuator/bindings/myBindingName
PAUSED and RESUMED work only when the corresponding binder and its underlying technology supports it. Otherwise, you see the warning message in the logs.
Currently, only Kafka binder supports the PAUSED and RESUMED states.
|
Binder Configuration Properties
The following properties are available when customizing binder configurations. These properties exposed via org.springframework.cloud.stream.config.BinderProperties
They must be prefixed with spring.cloud.stream.binders.<configurationName>.
- type
-
The binder type. It typically references one of the binders found on the classpath — in particular, a key in a
META-INF/spring.bindersfile.By default, it has the same value as the configuration name.
- inheritEnvironment
-
Whether the configuration inherits the environment of the application itself.
Default:
true. - environment
-
Root for a set of properties that can be used to customize the environment of the binder. When this property is set, the context in which the binder is being created is not a child of the application context. This setting allows for complete separation between the binder components and the application components.
Default:
empty. - defaultCandidate
-
Whether the binder configuration is a candidate for being considered a default binder or can be used only when explicitly referenced. This setting allows adding binder configurations without interfering with the default processing.
Default:
true.
Configuration Options
Spring Cloud Stream supports general configuration options as well as configuration for bindings and binders. Some binders let additional binding properties support middleware-specific features.
Configuration options can be provided to Spring Cloud Stream applications through any mechanism supported by Spring Boot. This includes application arguments, environment variables, and YAML or .properties files.
Binding Service Properties
These properties are exposed via org.springframework.cloud.stream.config.BindingServiceProperties
- spring.cloud.stream.instanceCount
-
The number of deployed instances of an application. Must be set for partitioning on the producer side. Must be set on the consumer side when using RabbitMQ and with Kafka if
autoRebalanceEnabled=false.Default:
1. - spring.cloud.stream.instanceIndex
-
The instance index of the application: A number from
0toinstanceCount - 1. Used for partitioning with RabbitMQ and with Kafka ifautoRebalanceEnabled=false. Automatically set in Cloud Foundry to match the application’s instance index. - spring.cloud.stream.dynamicDestinations
-
A list of destinations that can be bound dynamically (for example, in a dynamic routing scenario). If set, only listed destinations can be bound.
Default: empty (letting any destination be bound).
- spring.cloud.stream.defaultBinder
-
The default binder to use, if multiple binders are configured. See Multiple Binders on the Classpath.
Default: empty.
- spring.cloud.stream.overrideCloudConnectors
-
This property is only applicable when the
cloudprofile is active and Spring Cloud Connectors are provided with the application. If the property isfalse(the default), the binder detects a suitable bound service (for example, a RabbitMQ service bound in Cloud Foundry for the RabbitMQ binder) and uses it for creating connections (usually through Spring Cloud Connectors). When set totrue, this property instructs binders to completely ignore the bound services and rely on Spring Boot properties (for example, relying on thespring.rabbitmq.*properties provided in the environment for the RabbitMQ binder). The typical usage of this property is to be nested in a customized environment when connecting to multiple systems.Default:
false. - spring.cloud.stream.bindingRetryInterval
-
The interval (in seconds) between retrying binding creation when, for example, the binder does not support late binding and the broker (for example, Apache Kafka) is down. Set it to zero to treat such conditions as fatal, preventing the application from starting.
Default:
30
Binding Properties
Binding properties are supplied by using the format of spring.cloud.stream.bindings.<channelName>.<property>=<value>.
The <channelName> represents the name of the channel being configured (for example, output for a Source).
To avoid repetition, Spring Cloud Stream supports setting values for all channels, in the format of spring.cloud.stream.default.<property>=<value>.
When it comes to avoiding repetitions for extended binding properties, this format should be used - spring.cloud.stream.<binder-type>.default.<producer|consumer>.<property>=<value>.
In what follows, we indicate where we have omitted the spring.cloud.stream.bindings.<channelName>. prefix and focus just on the property name, with the understanding that the prefix ise included at runtime.
Common Binding Properties
These properties are exposed via org.springframework.cloud.stream.config.BindingProperties
The following binding properties are available for both input and output bindings and must be prefixed with spring.cloud.stream.bindings.<channelName>. (for example, spring.cloud.stream.bindings.input.destination=ticktock).
Default values can be set by using the spring.cloud.stream.default prefix (for example`spring.cloud.stream.default.contentType=application/json`).
- destination
-
The target destination of a channel on the bound middleware (for example, the RabbitMQ exchange or Kafka topic). If the channel is bound as a consumer, it could be bound to multiple destinations, and the destination names can be specified as comma-separated
Stringvalues. If not set, the channel name is used instead. The default value of this property cannot be overridden. - group
-
The consumer group of the channel. Applies only to inbound bindings. See Consumer Groups.
Default:
null(indicating an anonymous consumer). - contentType
-
The content type of the channel. See
Content Type Negotiation.Default:
application/json. - binder
-
The binder used by this binding. See
Multiple Binders on the Classpathfor details.Default:
null(the default binder is used, if it exists).
Consumer Properties
These properties are exposed via org.springframework.cloud.stream.binder.ConsumerProperties
The following binding properties are available for input bindings only and must be prefixed with spring.cloud.stream.bindings.<channelName>.consumer. (for example, spring.cloud.stream.bindings.input.consumer.concurrency=3).
Default values can be set by using the spring.cloud.stream.default.consumer prefix (for example, spring.cloud.stream.default.consumer.headerMode=none).
- autoStartup
-
Signals if this consumer needs to be started automatically
Default:
true. - concurrency
-
The concurrency of the inbound consumer.
Default:
1. - partitioned
-
Whether the consumer receives data from a partitioned producer.
Default:
false. - headerMode
-
When set to
none, disables header parsing on input. Effective only for messaging middleware that does not support message headers natively and requires header embedding. This option is useful when consuming data from non-Spring Cloud Stream applications when native headers are not supported. When set toheaders, it uses the middleware’s native header mechanism. When set toembeddedHeaders, it embeds headers into the message payload.Default: depends on the binder implementation.
- maxAttempts
-
If processing fails, the number of attempts to process the message (including the first). Set to
1to disable retry.Default:
3. - backOffInitialInterval
-
The backoff initial interval on retry.
Default:
1000. - backOffMaxInterval
-
The maximum backoff interval.
Default:
10000. - backOffMultiplier
-
The backoff multiplier.
Default:
2.0. - defaultRetryable
-
Whether exceptions thrown by the listener that are not listed in the
retryableExceptionsare retryable.Default:
true. - instanceIndex
-
When set to a value greater than equal to zero, it allows customizing the instance index of this consumer (if different from
spring.cloud.stream.instanceIndex). When set to a negative value, it defaults tospring.cloud.stream.instanceIndex. SeeInstance Index and Instance Countfor more information.Default:
-1. - instanceCount
-
When set to a value greater than equal to zero, it allows customizing the instance count of this consumer (if different from
spring.cloud.stream.instanceCount). When set to a negative value, it defaults tospring.cloud.stream.instanceCount. SeeInstance Index and Instance Countfor more information.Default:
-1. - retryableExceptions
-
A map of Throwable class names in the key and a boolean in the value. Specify those exceptions (and subclasses) that will or won’t be retried. Also see
defaultRetriable. Example:spring.cloud.stream.bindings.input.consumer.retryable-exceptions.java.lang.IllegalStateException=false.Default: empty.
- useNativeDecoding
-
When set to
true, the inbound message is deserialized directly by the client library, which must be configured correspondingly (for example, setting an appropriate Kafka producer value deserializer). When this configuration is being used, the inbound message unmarshalling is not based on thecontentTypeof the binding. When native decoding is used, it is the responsibility of the producer to use an appropriate encoder (for example, the Kafka producer value serializer) to serialize the outbound message. Also, when native encoding and decoding is used, theheaderMode=embeddedHeadersproperty is ignored and headers are not embedded in the message. See the producer propertyuseNativeEncoding.Default:
false.
Advanced Consumer Configuration
For advanced configuration of the underlying message listener container for message-driven consumers, add a single ListenerContainerCustomizer bean to the application context.
It will be invoked after the above properties have been applied and can be used to set additional properties.
Similarly, for polled consumers, add a MessageSourceCustomizer bean.
The following is an example for the RabbitMQ binder:
@Bean
public ListenerContainerCustomizer<AbstractMessageListenerContainer> containerCustomizer() {
    return (container, dest, group) -> container.setAdviceChain(advice1, advice2);
}

@Bean
public MessageSourceCustomizer<AmqpMessageSource> sourceCustomizer() {
    return (source, dest, group) -> source.setPropertiesConverter(customPropertiesConverter);
}
Producer Properties
These properties are exposed via org.springframework.cloud.stream.binder.ProducerProperties
The following binding properties are available for output bindings only and must be prefixed with spring.cloud.stream.bindings.<channelName>.producer. (for example, spring.cloud.stream.bindings.input.producer.partitionKeyExpression=payload.id).
Default values can be set by using the prefix spring.cloud.stream.default.producer (for example, spring.cloud.stream.default.producer.partitionKeyExpression=payload.id).
- autoStartup
-
Signals if this consumer needs to be started automatically
Default:
true. - partitionKeyExpression
-
A SpEL expression that determines how to partition outbound data. If set, or if
partitionKeyExtractorClassis set, outbound data on this channel is partitioned.partitionCountmust be set to a value greater than 1 to be effective. Mutually exclusive withpartitionKeyExtractorClass. SeePartitioning Support.Default: null.
- partitionKeyExtractorClass
-
A
PartitionKeyExtractorStrategyimplementation. If set, or ifpartitionKeyExpressionis set, outbound data on this channel is partitioned.partitionCountmust be set to a value greater than 1 to be effective. Mutually exclusive withpartitionKeyExpression. SeePartitioning Support.Default:
null. - partitionSelectorClass
-
A
PartitionSelectorStrategyimplementation. Mutually exclusive withpartitionSelectorExpression. If neither is set, the partition is selected as thehashCode(key) % partitionCount, wherekeyis computed through eitherpartitionKeyExpressionorpartitionKeyExtractorClass.Default:
null. - partitionSelectorExpression
-
A SpEL expression for customizing partition selection. Mutually exclusive with
partitionSelectorClass. If neither is set, the partition is selected as thehashCode(key) % partitionCount, wherekeyis computed through eitherpartitionKeyExpressionorpartitionKeyExtractorClass.Default:
null. - partitionCount
-
The number of target partitions for the data, if partitioning is enabled. Must be set to a value greater than 1 if the producer is partitioned. On Kafka, it is interpreted as a hint. The larger of this and the partition count of the target topic is used instead.
Default:
1. - requiredGroups
-
A comma-separated list of groups to which the producer must ensure message delivery even if they start after it has been created (for example, by pre-creating durable queues in RabbitMQ).
- headerMode
-
When set to
none, it disables header embedding on output. It is effective only for messaging middleware that does not support message headers natively and requires header embedding. This option is useful when producing data for non-Spring Cloud Stream applications when native headers are not supported. When set toheaders, it uses the middleware’s native header mechanism. When set toembeddedHeaders, it embeds headers into the message payload.Default: Depends on the binder implementation.
- useNativeEncoding
-
When set to
true, the outbound message is serialized directly by the client library, which must be configured correspondingly (for example, setting an appropriate Kafka producer value serializer). When this configuration is being used, the outbound message marshalling is not based on thecontentTypeof the binding. When native encoding is used, it is the responsibility of the consumer to use an appropriate decoder (for example, the Kafka consumer value de-serializer) to deserialize the inbound message. Also, when native encoding and decoding is used, theheaderMode=embeddedHeadersproperty is ignored and headers are not embedded in the message. See the consumer propertyuseNativeDecoding.Default:
false. - errorChannelEnabled
-
When set to
true, if the binder supports asynchroous send results, send failures are sent to an error channel for the destination. SeeError Handlingfor more information.Default:
false.
Using Dynamically Bound Destinations
Besides the channels defined by using @EnableBinding, Spring Cloud Stream lets applications send messages to dynamically bound destinations.
This is useful, for example, when the target destination needs to be determined at runtime.
Applications can do so by using the BinderAwareChannelResolver bean, registered automatically by the @EnableBinding annotation.
The 'spring.cloud.stream.dynamicDestinations' property can be used for restricting the dynamic destination names to a known set (whitelisting). If this property is not set, any destination can be bound dynamically.
The BinderAwareChannelResolver can be used directly, as shown in the following example of a REST controller using a path variable to decide the target channel:
@EnableBinding
@Controller
public class SourceWithDynamicDestination {

    @Autowired
    private BinderAwareChannelResolver resolver;

    @RequestMapping(path = "/{target}", method = POST, consumes = "*/*")
    @ResponseStatus(HttpStatus.ACCEPTED)
    public void handleRequest(@RequestBody String body, @PathVariable("target") target,
           @RequestHeader(HttpHeaders.CONTENT_TYPE) Object contentType) {
        sendMessage(body, target, contentType);
    }

    private void sendMessage(String body, String target, Object contentType) {
        resolver.resolveDestination(target).send(MessageBuilder.createMessage(body,
                new MessageHeaders(Collections.singletonMap(MessageHeaders.CONTENT_TYPE, contentType))));
    }
}
Now consider what happens when we start the application on the default port (8080) and make the following requests with CURL:
curl -H "Content-Type: application/json" -X POST -d "customer-1" http://localhost:8080/customers

curl -H "Content-Type: application/json" -X POST -d "order-1" http://localhost:8080/orders
The destinations, 'customers' and 'orders', are created in the broker (in the exchange for Rabbit or in the topic for Kafka) with names of 'customers' and 'orders', and the data is published to the appropriate destinations.
The BinderAwareChannelResolver is a general-purpose Spring Integration DestinationResolver and can be injected in other components — for example, in a router using a SpEL expression based on the target field of an incoming JSON message. The following example includes a router that reads SpEL expressions:
@EnableBinding
@Controller
public class SourceWithDynamicDestination {

    @Autowired
    private BinderAwareChannelResolver resolver;


    @RequestMapping(path = "/", method = POST, consumes = "application/json")
    @ResponseStatus(HttpStatus.ACCEPTED)
    public void handleRequest(@RequestBody String body, @RequestHeader(HttpHeaders.CONTENT_TYPE) Object contentType) {
        sendMessage(body, contentType);
    }

    private void sendMessage(Object body, Object contentType) {
        routerChannel().send(MessageBuilder.createMessage(body,
                new MessageHeaders(Collections.singletonMap(MessageHeaders.CONTENT_TYPE, contentType))));
    }

    @Bean(name = "routerChannel")
    public MessageChannel routerChannel() {
        return new DirectChannel();
    }

    @Bean
    @ServiceActivator(inputChannel = "routerChannel")
    public ExpressionEvaluatingRouter router() {
        ExpressionEvaluatingRouter router =
            new ExpressionEvaluatingRouter(new SpelExpressionParser().parseExpression("payload.target"));
        router.setDefaultOutputChannelName("default-output");
        router.setChannelResolver(resolver);
        return router;
    }
}
The Router Sink Application uses this technique to create the destinations on-demand.
If the channel names are known in advance, you can configure the producer properties as with any other destination.
Alternatively, if you register a NewDestinationBindingCallback<> bean, it is invoked just before the binding is created.
The callback takes the generic type of the extended producer properties used by the binder.
It has one method:
void configure(String channelName, MessageChannel channel, ProducerProperties producerProperties,
        T extendedProducerProperties);
The following example shows how to use the RabbitMQ binder:
@Bean
public NewDestinationBindingCallback<RabbitProducerProperties> dynamicConfigurer() {
    return (name, channel, props, extended) -> {
        props.setRequiredGroups("bindThisQueue");
        extended.setQueueNameGroupOnly(true);
        extended.setAutoBindDlq(true);
        extended.setDeadLetterQueueName("myDLQ");
    };
}
If you need to support dynamic destinations with multiple binder types, use Object for the generic type and cast the extended argument as needed.
|
Content Type Negotiation
Data transformation is one of the core features of any message-driven microservice architecture. Given that, in Spring Cloud Stream, such data
is represented as a Spring Message, a message may have to be transformed to a desired shape or size before reaching its destination. This is required for two reasons:
-
To convert the contents of the incoming message to match the signature of the application-provided handler.
-
To convert the contents of the outgoing message to the wire format.
The wire format is typically byte[] (that is true for the Kafka and Rabbit binders), but it is governed by the binder implementation.
In Spring Cloud Stream, message transformation is accomplished with an org.springframework.messaging.converter.MessageConverter.
| As a supplement to the details to follow, you may also want to read the following blog post. |
Mechanics
To better understand the mechanics and the necessity behind content-type negotiation, we take a look at a very simple use case by using the following message handler as an example:
@StreamListener(Processor.INPUT)
@SendTo(Processor.OUTPUT)
public String handle(Person person) {..}| For simplicity, we assume that this is the only handler in the application (we assume there is no internal pipeline). |
The handler shown in the preceding example expects a Person object as an argument and produces a String type as an output.
In order for the framework to succeed in passing the incoming Message as an argument to this handler, it has to somehow transform the payload of the Message type from the wire format to a Person type.
In other words, the framework must locate and apply the appropriate MessageConverter.
To accomplish that, the framework needs some instructions from the user.
One of these instructions is already provided by the signature of the handler method itself (Person type).
Consequently, in theory, that should be (and, in some cases, is) enough.
However, for the majority of use cases, in order to select the appropriate MessageConverter, the framework needs an additional piece of information.
That missing piece is contentType.
Spring Cloud Stream provides three mechanisms to define contentType (in order of precedence):
-
HEADER: The
contentTypecan be communicated through the Message itself. By providing acontentTypeheader, you declare the content type to use to locate and apply the appropriateMessageConverter. -
BINDING: The
contentTypecan be set per destination binding by setting thespring.cloud.stream.bindings.input.content-typeproperty.The inputsegment in the property name corresponds to the actual name of the destination (which is “input” in our case). This approach lets you declare, on a per-binding basis, the content type to use to locate and apply the appropriateMessageConverter. -
DEFAULT: If
contentTypeis not present in theMessageheader or the binding, the defaultapplication/jsoncontent type is used to locate and apply the appropriateMessageConverter.
As mentioned earlier, the preceding list also demonstrates the order of precedence in case of a tie. For example, a header-provided content type takes precedence over any other content type. The same applies for a content type set on a per-binding basis, which essentially lets you override the default content type. However, it also provides a sensible default (which was determined from community feedback).
Another reason for making application/json the default stems from the interoperability requirements driven by distributed microservices architectures, where producer and consumer not only run in different JVMs but can also run on different non-JVM platforms.
When the non-void handler method returns, if the the return value is already a Message, that Message becomes the payload. However, when the return value is not a Message, the new Message is constructed with the return value as the payload while inheriting
headers from the input Message minus the headers defined or filtered by SpringIntegrationProperties.messageHandlerNotPropagatedHeaders.
By default, there is only one header set there: contentType. This means that the new Message does not have contentType header set, thus ensuring that the contentType can evolve.
You can always opt out of returning a Message from the handler method where you can inject any header you wish.
If there is an internal pipeline, the Message is sent to the next handler by going through the same process of conversion. However, if there is no internal pipeline or you have reached the end of it, the Message is sent back to the output destination.
Content Type versus Argument Type
As mentioned earlier, for the framework to select the appropriate MessageConverter, it requires argument type and, optionally, content type information.
The logic for selecting the appropriate MessageConverter resides with the argument resolvers (HandlerMethodArgumentResolvers), which trigger right before the invocation of the user-defined handler method (which is when the actual argument type is known to the framework).
If the argument type does not match the type of the current payload, the framework delegates to the stack of the
pre-configured MessageConverters to see if any one of them can convert the payload.
As you can see, the Object fromMessage(Message<?> message, Class<?> targetClass);
operation of the MessageConverter takes targetClass as one of its arguments.
The framework also ensures that the provided Message always contains a contentType header.
When no contentType header was already present, it injects either the per-binding contentType header or the default contentType header.
The combination of contentType argument type is the mechanism by which framework determines if message can be converted to a target type.
If no appropriate MessageConverter is found, an exception is thrown, which you can handle by adding a custom MessageConverter (see User-defined Message Converters).
But what if the payload type matches the target type declared by the handler method? In this case, there is nothing to convert, and the
payload is passed unmodified. While this sounds pretty straightforward and logical, keep in mind handler methods that take a Message<?> or Object as an argument.
By declaring the target type to be Object (which is an instanceof everything in Java), you essentially forfeit the conversion process.
Do not expect Message to be converted into some other type based only on the contentType.
Remember that the contentType is complementary to the target type.
If you wish, you can provide a hint, which MessageConverter may or may not take into consideration.
|
Message Converters
MessageConverters define two methods:
Object fromMessage(Message<?> message, Class<?> targetClass);

Message<?> toMessage(Object payload, @Nullable MessageHeaders headers);
It is important to understand the contract of these methods and their usage, specifically in the context of Spring Cloud Stream.
The fromMessage method converts an incoming Message to an argument type.
The payload of the Message could be any type, and it is
up to the actual implementation of the MessageConverter to support multiple types.
For example, some JSON converter may support the payload type as byte[], String, and others.
This is important when the application contains an internal pipeline (that is, input → handler1 → handler2 →. . . → output) and the output of the upstream handler results in a Message which may not be in the initial wire format.
However, the toMessage method has a more strict contract and must always convert Message to the wire format: byte[].
So, for all intents and purposes (and especially when implementing your own converter) you regard the two methods as having the following signatures:
Object fromMessage(Message<?> message, Class<?> targetClass);

Message<byte[]> toMessage(Object payload, @Nullable MessageHeaders headers);
Provided MessageConverters
As mentioned earlier, the framework already provides a stack of MessageConverters to handle most common use cases.
The following list describes the provided MessageConverters, in order of precedence (the first MessageConverter that works is used):
-
ApplicationJsonMessageMarshallingConverter: Variation of theorg.springframework.messaging.converter.MappingJackson2MessageConverter. Supports conversion of the payload of theMessageto/from POJO for cases whencontentTypeisapplication/json(DEFAULT). -
TupleJsonMessageConverter: DEPRECATED Supports conversion of the payload of theMessageto/fromorg.springframework.tuple.Tuple. -
ByteArrayMessageConverter: Supports conversion of the payload of theMessagefrombyte[]tobyte[]for cases whencontentTypeisapplication/octet-stream. It is essentially a pass through and exists primarily for backward compatibility. -
ObjectStringMessageConverter: Supports conversion of any type to aStringwhencontentTypeistext/plain. It invokes Object’stoString()method or, if the payload isbyte[], a newString(byte[]). -
JavaSerializationMessageConverter: DEPRECATED Supports conversion based on java serialization whencontentTypeisapplication/x-java-serialized-object. -
KryoMessageConverter: DEPRECATED Supports conversion based on Kryo serialization whencontentTypeisapplication/x-java-object. -
JsonUnmarshallingConverter: Similar to theApplicationJsonMessageMarshallingConverter. It supports conversion of any type whencontentTypeisapplication/x-java-object. It expects the actual type information to be embedded in thecontentTypeas an attribute (for example,application/x-java-object;type=foo.bar.Cat).
When no appropriate converter is found, the framework throws an exception. When that happens, you should check your code and configuration and ensure you did not miss anything (that is, ensure that you provided a contentType by using a binding or a header).
However, most likely, you found some uncommon case (such as a custom contentType perhaps) and the current stack of provided MessageConverters
does not know how to convert. If that is the case, you can add custom MessageConverter. See User-defined Message Converters.
User-defined Message Converters
Spring Cloud Stream exposes a mechanism to define and register additional MessageConverters.
To use it, implement org.springframework.messaging.converter.MessageConverter, configure it as a @Bean, and annotate it with @StreamMessageConverter.
It is then apended to the existing stack of `MessageConverter`s.
It is important to understand that custom MessageConverter implementations are added to the head of the existing stack.
Consequently, custom MessageConverter implementations take precedence over the existing ones, which lets you override as well as add to the existing converters.
|
The following example shows how to create a message converter bean to support a new content type called application/bar:
@EnableBinding(Sink.class)
@SpringBootApplication
public static class SinkApplication {

    ...

    @Bean
    @StreamMessageConverter
    public MessageConverter customMessageConverter() {
        return new MyCustomMessageConverter();
    }
}

public class MyCustomMessageConverter extends AbstractMessageConverter {

    public MyCustomMessageConverter() {
        super(new MimeType("application", "bar"));
    }

    @Override
    protected boolean supports(Class<?> clazz) {
        return (Bar.class.equals(clazz));
    }

    @Override
    protected Object convertFromInternal(Message<?> message, Class<?> targetClass, Object conversionHint) {
        Object payload = message.getPayload();
        return (payload instanceof Bar ? payload : new Bar((byte[]) payload));
    }
}
Spring Cloud Stream also provides support for Avro-based converters and schema evolution.
See Schema Evolution Support for details.
Schema Evolution Support
Spring Cloud Stream provides support for schema evolution so that the data can be evolved over time and still work with older or newer producers and consumers and vice versa. Most serialization models, especially the ones that aim for portability across different platforms and languages, rely on a schema that describes how the data is serialized in the binary payload. In order to serialize the data and then to interpret it, both the sending and receiving sides must have access to a schema that describes the binary format. In certain cases, the schema can be inferred from the payload type on serialization or from the target type on deserialization. However, many applications benefit from having access to an explicit schema that describes the binary data format. A schema registry lets you store schema information in a textual format (typically JSON) and makes that information accessible to various applications that need it to receive and send data in binary format. A schema is referenceable as a tuple consisting of:
-
A subject that is the logical name of the schema
-
The schema version
-
The schema format, which describes the binary format of the data
This following sections goes through the details of various components involved in schema evolution process.
Schema Registry Client
The client-side abstraction for interacting with schema registry servers is the SchemaRegistryClient interface, which has the following structure:
public interface SchemaRegistryClient {

    SchemaRegistrationResponse register(String subject, String format, String schema);

    String fetch(SchemaReference schemaReference);

    String fetch(Integer id);

}
Spring Cloud Stream provides out-of-the-box implementations for interacting with its own schema server and for interacting with the Confluent Schema Registry.
A client for the Spring Cloud Stream schema registry can be configured by using the @EnableSchemaRegistryClient, as follows:
  @EnableBinding(Sink.class)
  @SpringBootApplication
  @EnableSchemaRegistryClient
  public static class AvroSinkApplication {
    ...
  }
The default converter is optimized to cache not only the schemas from the remote server but also the parse() and toString() methods, which are quite expensive.
Because of this, it uses a DefaultSchemaRegistryClient that does not cache responses.
If you intend to change the default behavior, you can use the client directly on your code and override it to the desired outcome.
To do so, you have to add the property spring.cloud.stream.schemaRegistryClient.cached=true to your application properties.
|
Schema Registry Client Properties
The Schema Registry Client supports the following properties:
spring.cloud.stream.schemaRegistryClient.endpoint-
The location of the schema-server. When setting this, use a full URL, including protocol (
httporhttps) , port, and context path. - Default
spring.cloud.stream.schemaRegistryClient.cached-
Whether the client should cache schema server responses. Normally set to
false, as the caching happens in the message converter. Clients using the schema registry client should set this totrue. - Default
-
false
Avro Schema Registry Client Message Converters
For applications that have a SchemaRegistryClient bean registered with the application context, Spring Cloud Stream auto configures an Apache Avro message converter for schema management. This eases schema evolution, as applications that receive messages can get easy access to a writer schema that can be reconciled with their own reader schema.
For outbound messages, if the content type of the channel is set to application/*+avro, the MessageConverter is activated, as shown in the following example:
spring.cloud.stream.bindings.output.contentType=application/*+avroDuring the outbound conversion, the message converter tries to infer the schema of each outbound messages (based on its type) and register it to a subject (based on the payload type) by using the SchemaRegistryClient.
If an identical schema is already found, then a reference to it is retrieved.
If not, the schema is registered, and a new version number is provided.
The message is sent with a contentType header by using the following scheme: application/[prefix].[subject].v[version]+avro, where prefix is configurable and subject is deduced from the payload type.
For example, a message of the type User might be sent as a binary payload with a content type of application/vnd.user.v2+avro, where user is the subject and 2 is the version number.
When receiving messages, the converter infers the schema reference from the header of the incoming message and tries to retrieve it. The schema is used as the writer schema in the deserialization process.
Avro Schema Registry Message Converter Properties
If you have enabled Avro based schema registry client by setting spring.cloud.stream.bindings.output.contentType=application/*+avro, you can customize the behavior of the registration by setting the following properties.
- spring.cloud.stream.schema.avro.dynamicSchemaGenerationEnabled
-
Enable if you want the converter to use reflection to infer a Schema from a POJO.
Default:
false - spring.cloud.stream.schema.avro.readerSchema
-
Avro compares schema versions by looking at a writer schema (origin payload) and a reader schema (your application payload). See the Avro documentation for more information. If set, this overrides any lookups at the schema server and uses the local schema as the reader schema. Default:
null - spring.cloud.stream.schema.avro.schemaLocations
-
Registers any
.avscfiles listed in this property with the Schema Server.Default:
empty - spring.cloud.stream.schema.avro.prefix
-
The prefix to be used on the Content-Type header.
Default:
vnd
Apache Avro Message Converters
Spring Cloud Stream provides support for schema-based message converters through its spring-cloud-stream-schema module.
Currently, the only serialization format supported out of the box for schema-based message converters is Apache Avro, with more formats to be added in future versions.
The spring-cloud-stream-schema module contains two types of message converters that can be used for Apache Avro serialization:
-
Converters that use the class information of the serialized or deserialized objects or a schema with a location known at startup.
-
Converters that use a schema registry. They locate the schemas at runtime and dynamically register new schemas as domain objects evolve.
Converters with Schema Support
The AvroSchemaMessageConverter supports serializing and deserializing messages either by using a predefined schema or by using the schema information available in the class (either reflectively or contained in the SpecificRecord).
If you provide a custom converter, then the default AvroSchemaMessageConverter bean is not created. The following example shows a custom converter:
To use custom converters, you can simply add it to the application context, optionally specifying one or more MimeTypes with which to associate it.
The default MimeType is application/avro.
If the target type of the conversion is a GenericRecord, a schema must be set.
The following example shows how to configure a converter in a sink application by registering the Apache Avro MessageConverter without a predefined schema.
In this example, note that the mime type value is avro/bytes, not the default application/avro.
@EnableBinding(Sink.class)
@SpringBootApplication
public static class SinkApplication {

  ...

  @Bean
  public MessageConverter userMessageConverter() {
      return new AvroSchemaMessageConverter(MimeType.valueOf("avro/bytes"));
  }
}
Conversely, the following application registers a converter with a predefined schema (found on the classpath):
@EnableBinding(Sink.class)
@SpringBootApplication
public static class SinkApplication {

  ...

  @Bean
  public MessageConverter userMessageConverter() {
      AvroSchemaMessageConverter converter = new AvroSchemaMessageConverter(MimeType.valueOf("avro/bytes"));
      converter.setSchemaLocation(new ClassPathResource("schemas/User.avro"));
      return converter;
  }
}
Schema Registry Server
Spring Cloud Stream provides a schema registry server implementation.
To use it, you can add the spring-cloud-stream-schema-server artifact to your project and use the @EnableSchemaRegistryServer annotation, which adds the schema registry server REST controller to your application.
This annotation is intended to be used with Spring Boot web applications, and the listening port of the server is controlled by the server.port property.
The spring.cloud.stream.schema.server.path property can be used to control the root path of the schema server (especially when it is embedded in other applications).
The spring.cloud.stream.schema.server.allowSchemaDeletion boolean property enables the deletion of a schema. By default, this is disabled.
The schema registry server uses a relational database to store the schemas. By default, it uses an embedded database. You can customize the schema storage by using the Spring Boot SQL database and JDBC configuration options.
The following example shows a Spring Boot application that enables the schema registry:
@SpringBootApplication
@EnableSchemaRegistryServer
public class SchemaRegistryServerApplication {
    public static void main(String[] args) {
        SpringApplication.run(SchemaRegistryServerApplication.class, args);
    }
}
Schema Registry Server API
The Schema Registry Server API consists of the following operations:
-
POST /— seeRegistering a New Schema -
'GET /{subject}/{format}/{version}' — see
Retrieving an Existing Schema by Subject, Format, and Version -
GET /{subject}/{format}— seeRetrieving an Existing Schema by Subject and Format -
GET /schemas/{id}— seeRetrieving an Existing Schema by ID -
DELETE /{subject}/{format}/{version}— seeDeleting a Schema by Subject, Format, and Version -
DELETE /schemas/{id}— seeDeleting a Schema by ID -
DELETE /{subject}— seeDeleting a Schema by Subject
Registering a New Schema
To register a new schema, send a POST request to the / endpoint.
The / accepts a JSON payload with the following fields:
-
subject: The schema subject -
format: The schema format -
definition: The schema definition
Its response is a schema object in JSON, with the following fields:
-
id: The schema ID -
subject: The schema subject -
format: The schema format -
version: The schema version -
definition: The schema definition
Retrieving an Existing Schema by Subject, Format, and Version
To retrieve an existing schema by subject, format, and version, send GET request to the /{subject}/{format}/{version} endpoint.
Its response is a schema object in JSON, with the following fields:
-
id: The schema ID -
subject: The schema subject -
format: The schema format -
version: The schema version -
definition: The schema definition
Retrieving an Existing Schema by Subject and Format
To retrieve an existing schema by subject and format, send a GET request to the /subject/format endpoint.
Its response is a list of schemas with each schema object in JSON, with the following fields:
-
id: The schema ID -
subject: The schema subject -
format: The schema format -
version: The schema version -
definition: The schema definition
Retrieving an Existing Schema by ID
To retrieve a schema by its ID, send a GET request to the /schemas/{id} endpoint.
Its response is a schema object in JSON, with the following fields:
-
id: The schema ID -
subject: The schema subject -
format: The schema format -
version: The schema version -
definition: The schema definition
Deleting a Schema by Subject, Format, and Version
To delete a schema identified by its subject, format, and version, send a DELETE request to the /{subject}/{format}/{version} endpoint.
Deleting a Schema by ID
To delete a schema by its ID, send a DELETE request to the /schemas/{id} endpoint.
Deleting a Schema by Subject
DELETE /{subject}
Delete existing schemas by their subject.
This note applies to users of Spring Cloud Stream 1.1.0.RELEASE only.
Spring Cloud Stream 1.1.0.RELEASE used the table name, schema, for storing Schema objects. Schema is a keyword in a number of database implementations.
To avoid any conflicts in the future, starting with 1.1.1.RELEASE, we have opted for the name SCHEMA_REPOSITORY for the storage table.
Any Spring Cloud Stream 1.1.0.RELEASE users who upgrade should migrate their existing schemas to the new table before upgrading.
|
Using Confluent’s Schema Registry
The default configuration creates a DefaultSchemaRegistryClient bean.
If you want to use the Confluent schema registry, you need to create a bean of type ConfluentSchemaRegistryClient, which supersedes the one configured by default by the framework. The following example shows how to create such a bean:
@Bean
public SchemaRegistryClient schemaRegistryClient(@Value("${spring.cloud.stream.schemaRegistryClient.endpoint}") String endpoint){
  ConfluentSchemaRegistryClient client = new ConfluentSchemaRegistryClient();
  client.setEndpoint(endpoint);
  return client;
}| The ConfluentSchemaRegistryClient is tested against Confluent platform version 4.0.0. |
Schema Registration and Resolution
To better understand how Spring Cloud Stream registers and resolves new schemas and its use of Avro schema comparison features, we provide two separate subsections:
Schema Registration Process (Serialization)
The first part of the registration process is extracting a schema from the payload that is being sent over a channel.
Avro types such as SpecificRecord or GenericRecord already contain a schema, which can be retrieved immediately from the instance.
In the case of POJOs, a schema is inferred if the spring.cloud.stream.schema.avro.dynamicSchemaGenerationEnabled property is set to true (the default).

Ones a schema is obtained, the converter loads its metadata (version) from the remote server. First, it queries a local cache. If no result is found, it submits the data to the server, which replies with versioning information. The converter always caches the results to avoid the overhead of querying the Schema Server for every new message that needs to be serialized.

With the schema version information, the converter sets the contentType header of the message to carry the version information — for example: application/vnd.user.v1+avro.
Schema Resolution Process (Deserialization)
When reading messages that contain version information (that is, a contentType header with a scheme like the one described under Schema Registration Process (Serialization), the converter queries the Schema server to fetch the writer schema of the message.
Once it has found the correct schema of the incoming message, it retrieves the reader schema and, by using Avro’s schema resolution support, reads it into the reader definition (setting defaults and any missing properties).

You should understand the difference between a writer schema (the application that wrote the message) and a reader schema (the receiving application).
We suggest taking a moment to read the Avro terminology and understand the process.
Spring Cloud Stream always fetches the writer schema to determine how to read a message.
If you want to get Avro’s schema evolution support working, you need to make sure that a readerSchema was properly set for your application.
|
Inter-Application Communication
Spring Cloud Stream enables communication between applications. Inter-application communication is a complex issue spanning several concerns, as described in the following topics:
Connecting Multiple Application Instances
While Spring Cloud Stream makes it easy for individual Spring Boot applications to connect to messaging systems, the typical scenario for Spring Cloud Stream is the creation of multi-application pipelines, where microservice applications send data to each other. You can achieve this scenario by correlating the input and output destinations of “adjacent” applications.
Suppose a design calls for the Time Source application to send data to the Log Sink application. You could use a common destination named ticktock for bindings within both applications.
Time Source (that has the channel name output) would set the following property:
spring.cloud.stream.bindings.output.destination=ticktock
Log Sink (that has the channel name input) would set the following property:
spring.cloud.stream.bindings.input.destination=ticktock
Instance Index and Instance Count
When scaling up Spring Cloud Stream applications, each instance can receive information about how many other instances of the same application exist and what its own instance index is.
Spring Cloud Stream does this through the spring.cloud.stream.instanceCount and spring.cloud.stream.instanceIndex properties.
For example, if there are three instances of a HDFS sink application, all three instances have spring.cloud.stream.instanceCount set to 3, and the individual applications have spring.cloud.stream.instanceIndex set to 0, 1, and 2, respectively.
When Spring Cloud Stream applications are deployed through Spring Cloud Data Flow, these properties are configured automatically; when Spring Cloud Stream applications are launched independently, these properties must be set correctly.
By default, spring.cloud.stream.instanceCount is 1, and spring.cloud.stream.instanceIndex is 0.
In a scaled-up scenario, correct configuration of these two properties is important for addressing partitioning behavior (see below) in general, and the two properties are always required by certain binders (for example, the Kafka binder) in order to ensure that data are split correctly across multiple consumer instances.
Partitioning
Partitioning in Spring Cloud Stream consists of two tasks:
Configuring Output Bindings for Partitioning
You can configure an output binding to send partitioned data by setting one and only one of its partitionKeyExpression or partitionKeyExtractorName properties, as well as its partitionCount property.
For example, the following is a valid and typical configuration:
spring.cloud.stream.bindings.output.producer.partitionKeyExpression=payload.id
spring.cloud.stream.bindings.output.producer.partitionCount=5
Based on that example configuration, data is sent to the target partition by using the following logic.
A partition key’s value is calculated for each message sent to a partitioned output channel based on the partitionKeyExpression.
The partitionKeyExpression is a SpEL expression that is evaluated against the outbound message for extracting the partitioning key.
If a SpEL expression is not sufficient for your needs, you can instead calculate the partition key value by providing an implementation of org.springframework.cloud.stream.binder.PartitionKeyExtractorStrategy and configuring it as a bean (by using the @Bean annotation).
If you have more then one bean of type org.springframework.cloud.stream.binder.PartitionKeyExtractorStrategy available in the Application Context, you can further filter it by specifying its name with the partitionKeyExtractorName property, as shown in the following example:
--spring.cloud.stream.bindings.output.producer.partitionKeyExtractorName=customPartitionKeyExtractor
--spring.cloud.stream.bindings.output.producer.partitionCount=5
. . .
@Bean
public CustomPartitionKeyExtractorClass customPartitionKeyExtractor() {
    return new CustomPartitionKeyExtractorClass();
}
In previous versions of Spring Cloud Stream, you could specify the implementation of org.springframework.cloud.stream.binder.PartitionKeyExtractorStrategy by setting the spring.cloud.stream.bindings.output.producer.partitionKeyExtractorClass property.
Since version 2.0, this property is deprecated, and support for it will be removed in a future version.
|
Once the message key is calculated, the partition selection process determines the target partition as a value between 0 and partitionCount - 1.
The default calculation, applicable in most scenarios, is based on the following formula: key.hashCode() % partitionCount.
This can be customized on the binding, either by setting a SpEL expression to be evaluated against the 'key' (through the partitionSelectorExpression property) or by configuring an implementation of org.springframework.cloud.stream.binder.PartitionSelectorStrategy as a bean (by using the @Bean annotation).
Similar to the PartitionKeyExtractorStrategy, you can further filter it by using the spring.cloud.stream.bindings.output.producer.partitionSelectorName property when more than one bean of this type is available in the Application Context, as shown in the following example:
--spring.cloud.stream.bindings.output.producer.partitionSelectorName=customPartitionSelector
. . .
@Bean
public CustomPartitionSelectorClass customPartitionSelector() {
    return new CustomPartitionSelectorClass();
}
In previous versions of Spring Cloud Stream you could specify the implementation of org.springframework.cloud.stream.binder.PartitionSelectorStrategy by setting the spring.cloud.stream.bindings.output.producer.partitionSelectorClass property.
Since version 2.0, this property is deprecated and support for it will be removed in a future version.
|
Configuring Input Bindings for Partitioning
An input binding (with the channel name input) is configured to receive partitioned data by setting its partitioned property, as well as the instanceIndex and instanceCount properties on the application itself, as shown in the following example:
spring.cloud.stream.bindings.input.consumer.partitioned=true
spring.cloud.stream.instanceIndex=3
spring.cloud.stream.instanceCount=5
The instanceCount value represents the total number of application instances between which the data should be partitioned.
The instanceIndex must be a unique value across the multiple instances, with a value between 0 and instanceCount - 1.
The instance index helps each application instance to identify the unique partition(s) from which it receives data.
It is required by binders using technology that does not support partitioning natively.
For example, with RabbitMQ, there is a queue for each partition, with the queue name containing the instance index.
With Kafka, if autoRebalanceEnabled is true (default), Kafka takes care of distributing partitions across instances, and these properties are not required.
If autoRebalanceEnabled is set to false, the instanceCount and instanceIndex are used by the binder to determine which partition(s) the instance subscribes to (you must have at least as many partitions as there are instances).
The binder allocates the partitions instead of Kafka.
This might be useful if you want messages for a particular partition to always go to the same instance.
When a binder configuration requires them, it is important to set both values correctly in order to ensure that all of the data is consumed and that the application instances receive mutually exclusive datasets.
While a scenario in which using multiple instances for partitioned data processing may be complex to set up in a standalone case, Spring Cloud Dataflow can simplify the process significantly by populating both the input and output values correctly and by letting you rely on the runtime infrastructure to provide information about the instance index and instance count.
Testing
Spring Cloud Stream provides support for testing your microservice applications without connecting to a messaging system.
You can do that by using the TestSupportBinder provided by the spring-cloud-stream-test-support library, which can be added as a test dependency to the application, as shown in the following example:
   <dependency>
       <groupId>org.springframework.cloud</groupId>
       <artifactId>spring-cloud-stream-test-support</artifactId>
       <scope>test</scope>
   </dependency>
The TestSupportBinder uses the Spring Boot autoconfiguration mechanism to supersede the other binders found on the classpath.
Therefore, when adding a binder as a dependency, you must make sure that the test scope is being used.
|
The TestSupportBinder lets you interact with the bound channels and inspect any messages sent and received by the application.
For outbound message channels, the TestSupportBinder registers a single subscriber and retains the messages emitted by the application in a MessageCollector.
They can be retrieved during tests and have assertions made against them.
You can also send messages to inbound message channels so that the consumer application can consume the messages. The following example shows how to test both input and output channels on a processor:
@RunWith(SpringRunner.class)
@SpringBootTest(webEnvironment= SpringBootTest.WebEnvironment.RANDOM_PORT)
public class ExampleTest {

  @Autowired
  private Processor processor;

  @Autowired
  private MessageCollector messageCollector;

  @Test
  @SuppressWarnings("unchecked")
  public void testWiring() {
    Message<String> message = new GenericMessage<>("hello");
    processor.input().send(message);
    Message<String> received = (Message<String>) messageCollector.forChannel(processor.output()).poll();
    assertThat(received.getPayload(), equalTo("hello world"));
  }


  @SpringBootApplication
  @EnableBinding(Processor.class)
  public static class MyProcessor {

    @Autowired
    private Processor channels;

    @Transformer(inputChannel = Processor.INPUT, outputChannel = Processor.OUTPUT)
    public String transform(String in) {
      return in + " world";
    }
  }
}
In the preceding example, we create an application that has an input channel and an output channel, both bound through the Processor interface.
The bound interface is injected into the test so that we can have access to both channels.
We send a message on the input channel, and we use the MessageCollector provided by Spring Cloud Stream’s test support to capture that the message has been sent to the output channel as a result.
Once we have received the message, we can validate that the component functions correctly.
Disabling the Test Binder Autoconfiguration
The intent behind the test binder superseding all the other binders on the classpath is to make it easy to test your applications without making changes to your production dependencies.
In some cases (for example, integration tests) it is useful to use the actual production binders instead, and that requires disabling the test binder autoconfiguration.
To do so, you can exclude the org.springframework.cloud.stream.test.binder.TestSupportBinderAutoConfiguration class by using one of the Spring Boot autoconfiguration exclusion mechanisms, as shown in the following example:
    @SpringBootApplication(exclude = TestSupportBinderAutoConfiguration.class)
    @EnableBinding(Processor.class)
    public static class MyProcessor {

        @Transformer(inputChannel = Processor.INPUT, outputChannel = Processor.OUTPUT)
        public String transform(String in) {
            return in + " world";
        }
    }
When autoconfiguration is disabled, the test binder is available on the classpath, and its defaultCandidate property is set to false so that it does not interfere with the regular user configuration. It can be referenced under the name, test, as shown in the following example:
spring.cloud.stream.defaultBinder=test
Spring Integration Test Binder
Current test binder was specifically designed to facilitate unit testing of the actual messaging components and thus bypasses some of the core functionality of the binder API. While such light-weight approach is sufficient for a lot of cases, it usually requires additional integration testing with real binders (e.g., Rabbit, Kafka etc).
To begin bridging the gap between unit and integration testing we’ve developed a new test binder which uses Spring Integration framework as an in-JVM Message Broker essentially giving you the best of both worlds - a real binder without the networking.
To enable Spring Integration Test Binder all you need is:
-
Add required dependencies
-
Remove the dependency for
spring-cloud-stream-test-support
Add required dependencies
Below is the example of the required Maven POM entries which could be easily retrofitted into Gradle.
<dependency>
    <groupId>org.springframework.cloud</groupId>
    <artifactId>spring-cloud-stream</artifactId>
    <version>${spring.cloud.strea.version}</version>
    <type>test-jar</type>
    <scope>test</scope>
    <classifier>test-binder</classifier>
</dependency>
. . .
<plugins>
    <plugin>
        <groupId>org.apache.maven.plugins</groupId>
        <artifactId>maven-jar-plugin</artifactId>
        <executions>
	    <execution>
		<configuration>
		    <includes>
			 <include>**/integration/*</include>
		    </includes>
		    <classifier>test-binder</classifier>
		</configuration>
                <goals>
                    <goal>test-jar</goal>
                </goals>
            </execution>
        </executions>
    </plugin>
</plugins>
Remove the dependency for spring-cloud-stream-test-support
To avoid conflicts with the existing test binder you must eremove the following entry
<dependency>
	<groupId>org.springframework.cloud</groupId>
	<artifactId>spring-cloud-stream-test-support</artifactId>
	<scope>test</scope>
</dependency>
Now you can test your microservice as a simple unit test
@SpringBootApplication
@EnableBinding(Processor.class)
public class DemoTestBinderApplication {

	public static void main(String[] args) {
		SpringApplication.run(DemoTestBinderApplication.class, args);
	}

	@StreamListener(Processor.INPUT)
	@SendTo(Processor.OUTPUT)
	public String echo(String value) {
		return value;
	}
}

. . .

@Test
public void sampleTest() {
	ApplicationContext context = new SpringApplicationBuilder(
					TestChannelBinderConfiguration.class,
					DemoTestBinderApplication.class)
				.web(WebApplicationType.NONE).run();
	InputDestination source = context.getBean(InputDestination.class);
	OutputDestination target = context.getBean(OutputDestination.class);
	source.send(new GenericMessage<byte[]>("hello".getBytes()));
	System.out.println("Result: " + new String(target.receive().getPayload()));
}
In the above you simply create an ApplicationContext with your configuration (your application) while additionally supplying TestChannelBinderConfiguration
provided by the framework. Then you access InputDestination and OutputDestination beans to send/receive messages. In the context of this binder
InputDestination and OutputDestination emulate remote destinations such as Rabbit exchange/queue or Kafka topic.
In the future we plan to simplify the API.
| In its current state Spring Integration Test Binder only supports the three bindings provided by the framework (Source, Processor, Sink) specifically to promote light-weight microservices architectures rather then general purpose messaging applications. |
Spring Integration Test Binder and PollableMessageSource
Spring Integration Test Binder also allows you to write tests when working with PollableMessageSource (see Using Polled Consumers for more details).
The important thing that needs to be understood though is that polling is not event-driven, and that PollableMessageSource is a strategy which exposes operation to produce (poll for) a Message (singular).
How often you poll or how many threads you use or where you’re polling from (message queue or file system) is entirely up to you;
In other words it is your responsibility to configure Poller or Threads or the actual source of Message. Luckily Spring has plenty of abstractions to configure exactly that.
Let’s look at the example:
@Test
public void samplePollingTest() {
	ApplicationContext context = new SpringApplicationBuilder(SamplePolledConfiguration.class)
				.web(WebApplicationType.NONE)
				.run("--spring.jmx.enabled=false");
	OutputDestination destination = context.getBean(OutputDestination.class);
	System.out.println("Message 1: " + new String(destination.receive().getPayload()));
	System.out.println("Message 2: " + new String(destination.receive().getPayload()));
	System.out.println("Message 3: " + new String(destination.receive().getPayload()));
}

@EnableBinding(SamplePolledConfiguration.PolledConsumer.class)
@Import(TestChannelBinderConfiguration.class)
@EnableAutoConfiguration
public static class SamplePolledConfiguration {
	@Bean
	public ApplicationRunner poller(PollableMessageSource polledMessageSource, MessageChannel output, TaskExecutor taskScheduler) {
		return args -> {
			taskScheduler.execute(() -> {
				for (int i = 0; i < 3; i++) {
					try {
						if (!polledMessageSource.poll(m -> {
							String newPayload = ((String) m.getPayload()).toUpperCase();
							output.send(new GenericMessage<>(newPayload));
						})) {
							Thread.sleep(2000);
						}
					}
					catch (Exception e) {
						// handle failure
					}
				}
			});
		};
	}

	public static interface PolledConsumer extends Source {
		@Input
		PollableMessageSource pollableSource();
	}
}
The above (very rudimentary) example will produce 3 messages in 2 second intervals sending them to the output destination of Source
which this binder sends to OutputDestination where we retrieve them (for any assertions).
Currently it prints the following:
Message 1: POLLED DATA
Message 2: POLLED DATA
Message 3: POLLED DATA
As you can see the data is the same. That is because this binder defines a default implementation of the actual MessageSource - the source
from which the Messages are polled using poll() operation. While sufficient for most testing scenarios, there are cases where you may want
to define your own MessageSource. To do so simply configure a bean of type MessageSource in your test configuration providing your own
implementation of Message sourcing.
Here is the example:
@Bean
public MessageSource<?> source() {
	return () -> new GenericMessage<>("My Own Data " + UUID.randomUUID());
}
rendering the following output;
Message 1: MY OWN DATA 1C180A91-E79F-494F-ABF4-BA3F993710DA
Message 2: MY OWN DATA D8F3A477-5547-41B4-9434-E69DA7616FEE
Message 3: MY OWN DATA 20BF2E64-7FF4-4CB6-A823-4053D30B5C74
DO NOT name this bean messageSource as it is going to be in conflict with the bean of the same name (different type)
provided by Spring Boot for unrelated reasons.
|
Health Indicator
Spring Cloud Stream provides a health indicator for binders.
It is registered under the name binders and can be enabled or disabled by setting the management.health.binders.enabled property.
To enable health check you first need to enable both "web" and "actuator" by including its dependencies (see Binding visualization and control)
If management.health.binders.enabled is not set explicitly by the application, then management.health.defaults.enabled is matched as true and the binder health indicators are enabled.
If you want to disable health indicator completely, then you have to set management.health.binders.enabled to false.
You can use Spring Boot actuator health endpoint to access the health indicator - /actuator/health.
By default, you will only receive the top level application status when you hit the above endpoint.
In order to receive the full details from the binder specific health indicators, you need to include the property management.endpoint.health.show-details with the value ALWAYS in your application.
Health indicators are binder-specific and certain binder implementations may not necessarily provide a health indicator.
If you want to completely disable all health indicators available out of the box and instead provide your own health indicators,
you can do so by setting property management.health.binders.enabled to false and then provide your own HealthIndicator beans in your application.
In this case, the health indicator infrastructure from Spring Boot will still pick up these custom beans.
Even if you are not disabling the binder health indicators, you can still enhance the health checks by providing your own HealthIndicator beans in addition to the out of the box health checks.
When you have multiple binders in the same application, health indicators are enabled by default unless the application turns them off by setting management.health.binders.enabled to false.
In this case, if the user wants to disable health check for a subset of the binders, then that should be done by setting management.health.binders.enabled to false in the multi binder configurations’s environment.
See Connecting to Multiple Systems for details on how environment specific properties can be provided.
If there are multiple binders present in the classpath but not all of them are used in the application, this may cause some issues in the context of health indicators.
There may be implementation specific details as to how the health checks are performed. For example, a Kafka binder may decide the status as DOWN if there are no destinations registered by the binder.
For this reason, if you include a binder in the classpath, it is advised to use that binder by providing at least one binding (for E.g. through EnableBinding).
If you don’t have any bindings to provide for this binder, then that is an indication that you don’t need to include that binder in the classpath.
Lets take a concrete situation. Imagine you have both Kafka and Kafka Streams binders present in the classpath, but only use the Kafka Streams binder in the application code, i.e. only provide bindings using the Kafka Streams binder.
Since Kafka binder is not used and it has specific checks to see if any destinations are registered, the binder health heck will fail.
The top level application health check status will be reported as DOWN.
In this situation, you can simply remove the dependency for kafka binder from your application since you are not using it.
Metrics Emitter
Spring Boot Actuator provides dependency management and auto-configuration for Micrometer, an application metrics facade that supports numerous monitoring systems.
Spring Cloud Stream provides support for emitting any available micrometer-based metrics to a binding destination, allowing for periodic collection of metric data from stream applications without relying on polling individual endpoints.
Metrics Emitter is activated by defining the spring.cloud.stream.bindings.applicationMetrics.destination property,
which specifies the name of the binding destination used by the current binder to publish metric messages.
For example:
spring.cloud.stream.bindings.applicationMetrics.destination=myMetricDestinationThe preceding example instructs the binder to bind to myMetricDestination (that is, Rabbit exchange, Kafka topic, and others).
The following properties can be used for customizing the emission of metrics:
- spring.cloud.stream.metrics.key
-
The name of the metric being emitted. Should be a unique value per application.
Default:
${spring.application.name:${vcap.application.name:${spring.config.name:application}}} - spring.cloud.stream.metrics.properties
-
Allows white listing application properties that are added to the metrics payload
Default: null.
- spring.cloud.stream.metrics.meter-filter
-
Pattern to control the 'meters' one wants to capture. For example, specifying
spring.integration.*captures metric information for meters whose name starts withspring.integration.Default: all 'meters' are captured.
- spring.cloud.stream.metrics.schedule-interval
-
Interval to control the rate of publishing metric data.
Default: 1 min
Consider the following:
java -jar time-source.jar \
    --spring.cloud.stream.bindings.applicationMetrics.destination=someMetrics \
    --spring.cloud.stream.metrics.properties=spring.application** \
    --spring.cloud.stream.metrics.meter-filter=spring.integration.*
The following example shows the payload of the data published to the binding destination as a result of the preceding command:
{
	"name": "application",
	"createdTime": "2018-03-23T14:48:12.700Z",
	"properties": {
	},
	"metrics": [
		{
			"id": {
				"name": "spring.integration.send",
				"tags": [
					{
						"key": "exception",
						"value": "none"
					},
					{
						"key": "name",
						"value": "input"
					},
					{
						"key": "result",
						"value": "success"
					},
					{
						"key": "type",
						"value": "channel"
					}
				],
				"type": "TIMER",
				"description": "Send processing time",
				"baseUnit": "milliseconds"
			},
			"timestamp": "2018-03-23T14:48:12.697Z",
			"sum": 130.340546,
			"count": 6,
			"mean": 21.72342433333333,
			"upper": 116.176299,
			"total": 130.340546
		}
	]
}
Given that the format of the Metric message has slightly changed after migrating to Micrometer, the published message will also have
a STREAM_CLOUD_STREAM_VERSION header set to 2.x to help distinguish between Metric messages from the older versions of the Spring Cloud Stream.
|
Samples
For Spring Cloud Stream samples, see the spring-cloud-stream-samples repository on GitHub.
Deploying Stream Applications on CloudFoundry
On CloudFoundry, services are usually exposed through a special environment variable called VCAP_SERVICES.
When configuring your binder connections, you can use the values from an environment variable as explained on the dataflow Cloud Foundry Server docs.
Binder Implementations
The following is the list of available binder implementations