For the demo purposes we’re providing Docker Compose setup with Artifactory and Concourse / Jenkins tools. Regardless of the picked CD application for the pipeline to pass one needs either
- a Cloud Foundry instance (for example Pivotal Web Services or PCF Dev)
- a Kubernetes cluster (for example Minikube)
- the infrastructure applications deployed to the JAR hosting application (for the demo we’re providing Artifactory).
Eurekafor Service DiscoveryStub Runner Bootfor running Spring Cloud Contract stubs.
![[Tip]](images/tip.png) | Tip |
|---|---|
In the demos we’re showing you how to first build the |
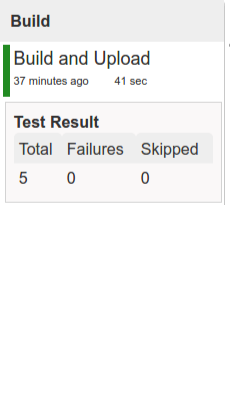
In this step we’re generating a version of the pipeline, next we’re running unit, integration and contract tests. Finally we’re:
- publishing a fat jar of the application
- publishing a Spring Cloud Contract jar containing stubs of the application
- for Kubernetes - uploading a Docker image of the application
During this phase we’re executing a Maven build using Maven Wrapper or a Gradle build using Gradle Wrapper
, with unit and integration tests. We’re also tagging the repository with dev/${version} format. That way in each
subsequent step of the pipeline we’re able to retrieve the tagged version. Also we know
exactly which version of the pipeline corresponds to which Git hash.
Once the artifact got built we’re running API compatibility check.
- we’re searching for the latest production deployment
- we’re retrieving the contracts that were used by that deployment
- from the contracts we’re generating API tests to see if the current implementation is fulfilling the HTTP / messaging contracts that the current production deployment has defined (we’re checking backward compatibility of the API)
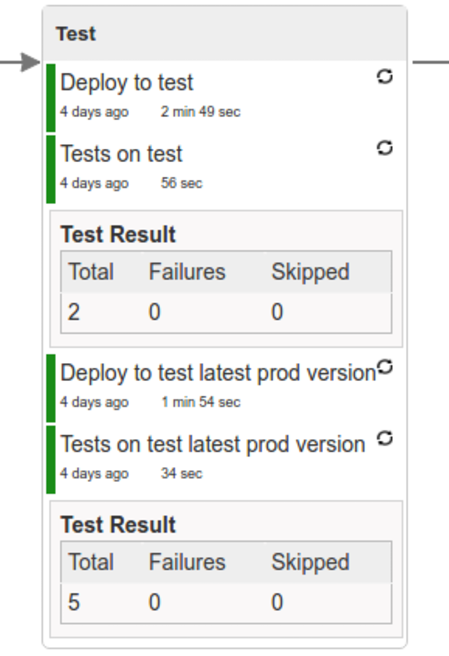
Here we’re
- starting a RabbitMQ service in PaaS
- deploying
Eurekainfrastructure application to PaaS - downloading the fat jar from Nexus and we’re uploading it to PaaS. We want the application to run in isolation (be surrounded by stubs).
| Tip |
|---|---|
Currently due to port constraints in Cloud Foundry
we cannot run multiple stubbed HTTP services in the cloud so to fix this issue we’re running
the application with |
- if the application is using a database then it gets upgraded at this point via Flyway, Liquibase or any other tool once the application gets started
- from the project’s Maven or Gradle build we’re extracting
stubrunner.idsproperty that contains all thegroupId:artifactId:version:classifiernotation of dependant projects for which the stubs should be downloaded. - then we’re uploading
Stub Runner Bootand pass the extractedstubrunner.idsto it. That way we’ll have a running application in Cloud Foundry that will download all the necessary stubs of our application - from the checked out code we’re running the tests available under the
smokeprofile. In the case ofGitHub Analyticsapplication we’re triggering a message from theGitHub Webhookapplication’s stub, that is sent via RabbitMQ to GitHub Analytics. Then we’re checking if message count has increased. - once the tests pass we’re searching for the last production release. Once the application
is deployed to production we’re tagging it with
prod/${version}tag. If there is no such tag (there was no production release) there will be no rollback tests executed. If there was a production release the tests will get executed. - assuming that there was a production release we’re checking out the code corresponding to that release (we’re checking out the tag), we’re downloading the appropriate artifact (either JAR for Cloud Foundry or Docker image for Kubernetes) and we’re uploading it to PaaS. IMPORTANT the old artifact is running against the NEW version of the database.
- we’re running the old
smoketests against the freshly deployed application surrounded by stubs. If those tests pass then we have a high probability that the application is backwards compatible - the default behaviour is that after all of those steps the user can manually click to deploy the application to a stage environment
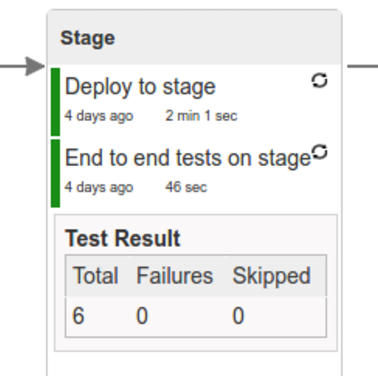
Here we’re
- starting a RabbitMQ service in PaaS
- deploying
Eurekainfrastructure application to PaaS - downloading the artifact (either JAR for Cloud Foundry or Docker image for Kubernetes) from and we’re uploading it to PaaS.
Next we have a manual step in which:
- from the checked out code we’re running the tests available under the
e2eprofile. In the case ofGitHub Analyticsapplication we’re sending a HTTP message to GitHub Analytic’s endpoint. Then we’re checking if the received message count has increased.
The step is manual by default due to the fact that stage environment is often shared between teams and some preparations on databases / infrastructure have to take place before running the tests. Ideally these step should be fully automatic.
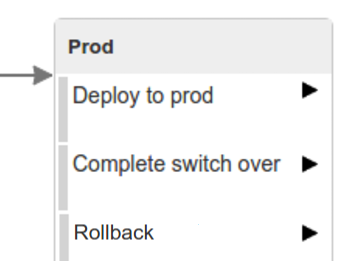
The step to deploy to production is manual but ideally it should be automatic.
![[Important]](images/important.png) | Important |
|---|---|
This step does deployment to production. On production you would assume
that you have the infrastructure running. That’s why before you run this step you
must execute a script that will provision the services on the production environment.
For |
Here we’re
- tagging the Git repo with
prod/${version}tag - downloading the application artifact (either JAR for Cloud Foundry or Docker image for Kubernetes)
- we’re doing Blue Green deployment:
for Cloud Foundry
- we’re renaming the current instance of the app e.g.
fooServicetofooService-venerable - we’re deploying the new instance of the app under the
fooServicename - now two instances of the same application are running on production
- we’re renaming the current instance of the app e.g.
for Kubernetes
- we’re deploying a service with the name of the app e.g.
fooService - we’re doing a deployment with the name of the app with version suffix (with the name escaped
to fulfill the DNS name requirements) e.g.
fooService-1-0-0-M1-123-456-VERSION - all deployments of the same application have the same label
nameequal to app name e.g.fooService - the service is routing the traffic basing on the
namelabel selector - now two instances of the same application are running on production
- we’re deploying a service with the name of the app e.g.
in the
Complete switch overwhich is a manual step- we’re deleting the old instance
- remember to run this step only after you have confirmed that both instances are working fine!
- now two instances of the same application are running on production
in the
Rollback to bluewhich is a manual step- we’re routing all the traffic to the old instance
- in CF we do that by ensuring that blue is running and stopping green
- in K8S we do that by scaling the number of instances of green to 0
- this step will set the state of your system to such where most likely some manual intervention should take place (to restart some applications, redeploy them, etc.)